To understand HTTP Message handler, you first need to understand HTTP Client and HTTP Server. You can think of HTTP Client as software or piece of code that can construct HTTP Messages and send it to the server in the form of HTTP requests, your browser is an HTTP Client, similarly, Fiddler and Postman are standalone HTTP Clients. On the other hand, the software which listens to the request and after some processing sends it to the HTTP Client is called HTTP Servers, for example, IIS is an HTTP Server, similarly, Apache is an HTTP Server. Both HTTP Client and Servers are capable of sending and receiving HTTP Messages.
Http Client like browsers are designed to construct HTTP messages (HTTP request header and HTTP request body) and send them to the HTTP server like IIS, similarly, the HTTP Servers are designed to construct HTTP messages (HTTP response header and HTTP Response body) and send it to HTTP Client.
Asp.Net web API is a framework that is used to create HTTP Services, Services means self-contained independent functionalities for example Facebook's like service, to integrate this functionality into an application, you do not need any other functionalities of Facebook, means it is completely independent self-working functionality when any such service utilizes the features of HTTP like HTTP verbs, content negotiation, Authentication, etc and can be consumed over HTTP with a unique URL as if it is sending a unique resource from the web then we call it a Rest or pure Http Service. For example http://fb.com/Likes/count?postUrl=myurl may give you the count of all likes on a specific Post, similarly, http://fb.com/Likes/friends?postUrl=myurl, may return your list of friends who liked your post. So at the end of the day, such services return some resources from a unique address on the web to the client.
Now wait and think, it is great that we can create HTTP services with web API but the Client (Browser, etc) cannot send HTTP request directly to the web API Controller, Only the HTTP Server like IIS has that ability to catch HTTP Messages that are sent by the client but somehow Http Messages should reach to the web API, this is where we need Http Message handler.
Similarly, it is Okay that we have HTTP Clients like browser and standalone HTTP Clients like Fiddler and Postman, etc but wouldn't it be great if somehow we could send HTTP request from our own application like windows Form or MVC controller to an HTTP server and could get a response back from the Server. Then again, this is the place where we need an HTTP Message handler.
In short web API uses some inbuilt HTTP Message handler to receive HTTP requests from an HTTP server(IIS) and Send responses back to them, we call it Server-side Http Message Handler. On the other hand, if we want to send HTTP requests to an HTTP server from an application or want to receive HTTP messages from an HTTP server directly to our application then we use HttpClient ( a base class for sending HTTP requests and receiving HTTP responses from a resource identified by a URI), which uses some inbuilt Http Message Handler to send or receive HTTP messages from HTTP Server.
Now I don't think there is any need to define HTTP Message Handler, yet I know your soul won't be satisfied until it gets a proper definition, so here it is:
A message handlers are nothing but classes that are designed to receive an HTTP request and return an HTTP response. All Message handlers derive from the abstract HttpMessageHandler class.
Generally construction of HTTP Messages is not handled by a single message Handler, Actually, several Message Handlers are connected forming a chain of message handlers. The First handler receives the request, do some processing and hand over the request to the next handler, somewhere in the pipeline a message handler creates the response and from that point, the response goes up the chain, as in this process the HTTP Messages are delegated from one handler to another it is called delegating handler
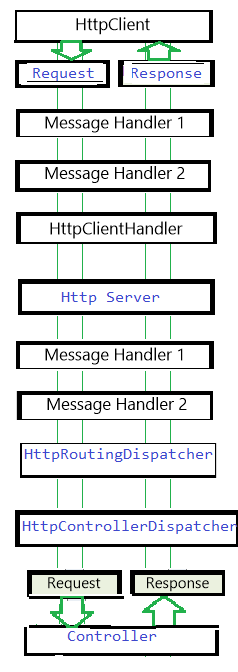
Http Message Handler is used on both sides, On the client-side, the HttpClient class uses message handlers to process requests, where the main or we can say default HTTP Handler is called HttpClientHandler, this handler sends the requests to the network and receives the responses from the server, so at least one handler in the HTTP client pipeline in the form of HttpClientHandler, you get by default.
On the server-side, the Web API pipeline uses some built-in message handlers:
• HttpServer:- this is the first handler in the chain which receives the request from the host.
• HttpRoutingDispatcher :- It resides in the middle that actually dispatches the request based on the route.
• HttpControllerDispatcher:- This is the last handler in the pipeline that sends the request to a Web API controller.
How to create a custom Message Handler
To write a custom message handler,create a class and inherit it from System.Net.Http.DelegatingHandler and override the SendAsync method. Here is the method signature:
Task SendAsync(HttpRequestMessage request, CancellationToken cancellationToken);
The method takes an HttpRequestMessage as input and asynchronously returns an HttpResponseMessage
Adding Custom Message Handlers to the HttpClient Pipeline
To add custom handlers to HttpClient, use the HttpClientFactory.Create method:
HttpClient client = HttpClientFactory.Create(new Handler1(), new Handler2(), new Handler3());
Message handlers are called in the same order as they are added into theCreate method. It means if request travels from left to right then response will travel from right to left. That is, the last handler will always be the first to get the response message.
Adding Custom Message Handlers to the web API Pipeline
on the server side , web API have a collection of Message Handlers called HttpConfiguration.MessageHandlers collection. you can add handlers to this collection inside the WebApiConfig class:
   public static class WebApiConfig
   {
    public static void Register(HttpConfiguration config)
    {
        config.MessageHandlers.Add(new MessageHandler1());
        config.MessageHandlers.Add(new MessageHandler2());

        // Other code not shown...
    }
   }
Message handlers are called in the same order as they were added in theMessageHandlers collection.
Now it's time to do some practical demonstration. Let's start with the Client Side.
Step 1.Create a service using Asp.Net Web API , we will call it from another application let's say winform application using HttpClient.
   public class EmployeeController : ApiController
    {
        public HttpResponseMessage Get()
        {
            try
            {
                var emps = LoadEmpData();
                if (emps != null)
                {
                    return Request.CreateResponse(HttpStatusCode.OK,emps);
                }
                return Request.CreateErrorResponse(HttpStatusCode.NoContent,"No Employees found")
            }
            catch(Exception ex)
            {
               return Request.CreateErrorResponse(HttpStatusCode.InternalServerError,ex.Message);
            }
        }

        public List<Employee> LoadEmpData()
        {
            List<Employee> Employees = new List<Employee>(){
                    new Employee(){Name="ramesh",Age=20},
                    new Employee(){Name="Rihana",Age=21},
                    new Employee(){Name="Michael",Age=34}

                };
            return Employees;
        }
    }
    namespace WebAPITest.Models
    {
    public class Employee
    {
        public string Name { get; set; }
        public int Age { get; set; }
    }
    }
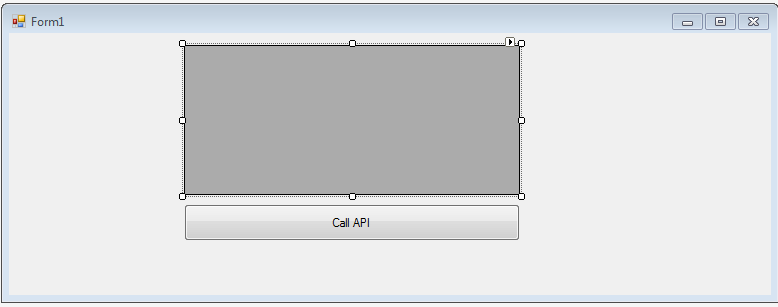
Step 2.Create a windows Form Application with a DataGridView and a Button control and In the code behind of Button_Click event write below code.
   namespace Client
    {
    public partial class Form1: Form
    {
        public Form1()
        {
            InitializeComponent();
        }

        private async void button1_Click(object sender, EventArgs e)
        {
            HttpClient _Client = new HttpClient();
            _Client.BaseAddress = new Uri("http://localhost:58572/");
            _Client.DefaultRequestHeaders.Accept.Clear();
            _Client.DefaultRequestHeaders.Accept.Add(
              new MediaTypeWithQualityHeaderValue("application/json"));

            HttpResponseMessage response = await _Client.GetAsync("api/Employee");

            if (response.IsSuccessStatusCode)
            {
               var res=  response.Content.ReadAsAsync<IEnumerable<Employee>>().Result.ToList();
                dataGridView1.DataSource = res;

            }

        }
    }
    public class Employee
    {
        public string Name { get; set; }
        public int Age { get; set; }
    }
   }
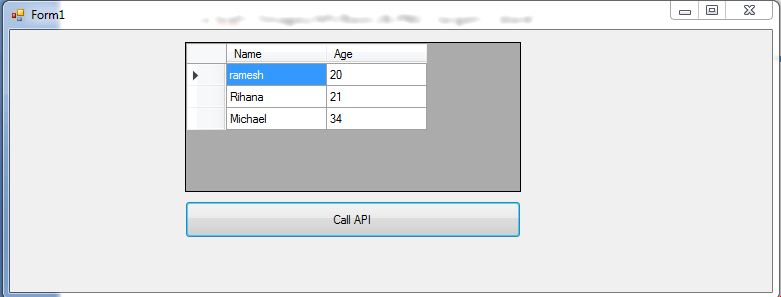
Step 3.Run both the application , and when you click call API button , you will get the below result.
This is how we use HttpClient to call web API from other applications. Now let's create a custom message handler and add it to the HttpClient pipeline.
Custom Message Handlers into HttpClient pipeline
The biggest question is, why to create a Message handler on the Client Pipeline ? and which are the real world scenarios where built-in HttpClienthandler is inefficient and we need some additional logic to add to the Client Pipeline.
Some of the scenarios are as follow:
• Logging
• Retrying failed requests
• Unit Testing
Let's create Custom Message Handler for Loggng.
Logging:
Logging requests and response helps in troubleshoot the application . This can easily be done with a custom delegating handler.
Step 1.Create a folder in your windows form project and name it as Handlers.
Step 2.Add a class file inside the folder and Name it as LoggingHandler.
Step 3.Inherit the class from DeligatingHandler and override the SendAsync() method like below.
  namespace Client.Handlers
   {
    public class LoggingHandler : DelegatingHandler
    {
      protected override async Task SendAsync(HttpRequestMessage request, CancellationToken
      cancellationToken)
        {
            Console.WriteLine("Request:");
            Console.WriteLine(request.ToString());
            if (request.Content != null)
            {
                Console.WriteLine(await request.Content.ReadAsStringAsync());
            }
            Console.WriteLine();

            HttpResponseMessage response = await base.SendAsync(request, cancellationToken);

            Console.WriteLine("Response:");
            Console.WriteLine(response.ToString());
            if (response.Content != null)
            {
                Console.WriteLine(await response.Content.ReadAsStringAsync());
            }
            Console.WriteLine();

            return response;
        }
    }
   }
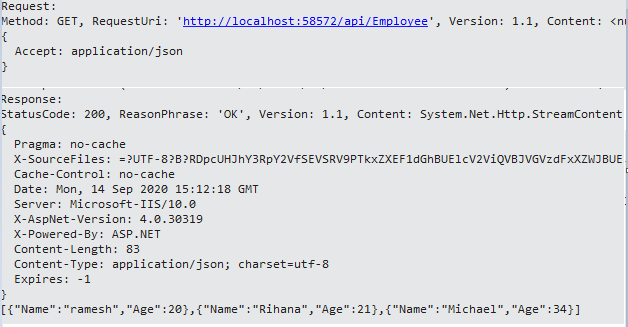
Step 4.Run your web API project first and then run the windows app, and click on Call API button. You will get the result as expected , meaning your dataGridView will be filled with the data coming from the server but at the same time in the output console you will get the below result.
Retrying failed requests
We often face the situation where we try to send requests to the server but server is unavailable due to some technical issue, in such situations manually sending the request after some time is often a pain, so we can automate this process where in the case of failed request our application could send request automatically in some interval.
We can write our own logic to retry request based on different types of error response, but I am going to use Polly. Polly is a .NET library that allows developers to create policies such as Retry in a fluent and thread-safe manner.
Step 1.Add a class file inside the folder Handlers and Name it as HttpRetryHandler.
Step 3.Inherit the class from DeligatingHandler and override the SendAsync() method like below.
  namespace Client.Handlers
  {
   public class HttpRetryHandler : DelegatingHandler
    {
       protected override Task SendAsync(HttpRequestMessage request, CancellationToken cancellationToken)
       {
           return Policy
            .HandleResult(message => !message.IsSuccessStatusCode)
        .WaitAndRetryAsync(3, i => TimeSpan.FromSeconds(2), (result, timeSpan, retryCount, context) =>
        {
            Debug.Write("Request failed with"+result.Result.StatusCode+ "Waiting"+timeSpan+"before next retry. Retry attempt"+retryCount);
        })
            .ExecuteAsync(() => base.SendAsync(request, cancellationToken));

       }
     }
    }
Step 3. To test whether our Retry Handler is working or not, let's create another handler that will add a custom header to the request on each retry then based on the appropriate custom header value web API will send the response. • Add a class file inside the folder Handlers and Name it as CustomDelegatingHandler.
• Inherit the class from DeligatingHandler and override the SendAsync() method like below.
   namespace Client.Handlers
   {
    public class CustomDelegatingHandler: DelegatingHandler
    {
        private int _count = 0;

        protected override Task SendAsync(HttpRequestMessage request,
            CancellationToken cancellationToken)
        {
            if (_count == 0)
            {
                _count++;
                request.Headers.Add("cust", "first");
                return base.SendAsync(request, cancellationToken);
            }
            if(_count==1){
                _count++;
                request.Headers.Clear();
                request.Headers.Add("cust", "second");
                return base.SendAsync(request, cancellationToken);
                            }
            request.Headers.Clear();
            request.Headers.Add("cust", "third");
            return base.SendAsync(request, cancellationToken);
        }
     }
   }
Step 4.Open EmployeeService (web api project) and modify the Get() method like below.
   public HttpResponseMessage Get()
        {
            try
            {
                string HeaderValue = "1";
                if (Request.Headers.Contains("cust"))
                {
                    HeaderValue = Request.Headers.GetValues("cust").FirstOrDefault();
                }
                if (HeaderValue == "third")
                {
                    var emps = LoadEmpData();
                    if (emps != null)
                    {
                        return Request.CreateResponse(HttpStatusCode.OK, emps);
                    }

                    return Request.CreateErrorResponse(HttpStatusCode.NoContent, "No Employees found");
                }

                return Request.CreateErrorResponse(HttpStatusCode.InternalServerError, "error");
            }
            catch(Exception ex)
            {
               return Request.CreateErrorResponse(HttpStatusCode.InternalServerError,ex.Message);
            }
        }
Step 5.Open your windows App (Client APP) and Add these two handlers to the HttpClient pipeline. Now , your windows form1.cs should look like below.
   namespace Client
   {
    public partial class Form1: Form
    {
        private static readonly HttpClient _Client;
        public Form1()
        {

            InitializeComponent();
        }

        private async void button1_Click(object sender, EventArgs e)
        {
             _Client = HttpClientFactory.Create(new HttpRetryHandler(),new     CustomDelegatingHandler(),new LoggingHandler());
            _Client.BaseAddress = new Uri("http://localhost:58572/");
            _Client.DefaultRequestHeaders.Accept.Clear();
            _Client.DefaultRequestHeaders.Accept.Add(
              new MediaTypeWithQualityHeaderValue("application/json"));

            HttpResponseMessage response = await _Client.GetAsync("api/Employee");

            if (response.IsSuccessStatusCode)
            {
                var res = response.Content.ReadAsAsync<IEnumerable<Employee>>().Result.ToList();
                dataGridView1.DataSource = res;

            }

        }
    }
    public class Employee
    {
        public string Name { get; set; }
        public int Age { get; set; }
    }
  }
At this moment run your API and windows application and click the Call API button of windows form application , you will get the similar result , your DataGridView will be filled with Employee's Data but in the output pane of visual studio you will get below results.
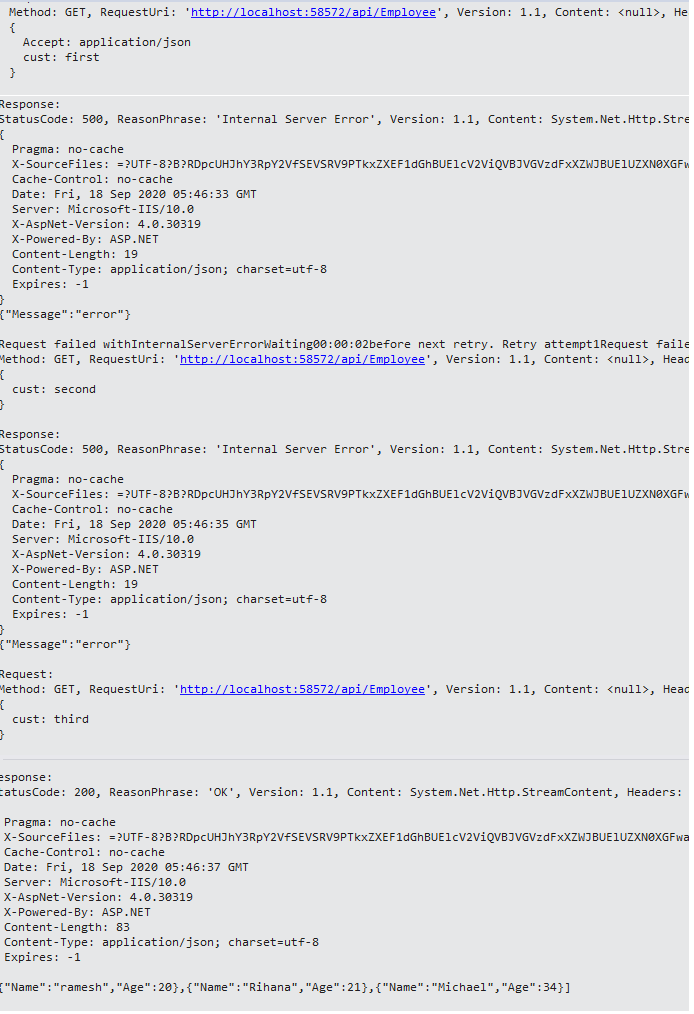
As you can see in the figure above , the request has been send three times in the interval of 2 seconds, in the third attempt the web API is sending 200 OK status code with employee's data.
Some key points to remember when using HttpClient in your application.
1. HttpClient should be instantiated once and the same instance should be re-used throughout the life of an application. Below is an example using HttpClient correctly.
    // for mvc application
   public class HomeController :Controller
   {
    private static readonly HttpClient HttpClient;

    static HomeController()
    {
        HttpClient = new HttpClient();
    }
   }
   // for webform/ windows form
   //Create a singleton class that exports a single HttpClient that every object uses. HttpClient is thread //safe as long as you use SendAsync ,  in all your calls (i.e. don't modify any Default... headers)
2. The DefaultRequestHeaders in the HttpClient class, sets headers to be sent with each request using that client object, hence the name Default Request Headers. For example sometimes we need to define and pass custom headers with the request , for example a Service may ask you to include a custom header for versioning purpose. Read this article to know what do I actually mean. Similarly sometimes we need to pass the Authorization Header that contains Http Scheme type and credentials or Token value to access a specific end point. This can easily be achieved like below.
     using (var client = new HttpClient()) {
    client.BaseAddress = new Uri("https://api.sharpencode.com/");
    client.DefaultRequestHeaders.Accept.Clear();
    client.DefaultRequestHeaders.Authorization = new AuthenticationHeaderValue("Bearer", "xxxxxxxxxxxxxxxxxxxx");
    client.DefaultRequestHeaders.Accept.Add(new MediaTypeWithQualityHeaderValue("application/json"));
     client.DefaultRequestHeaders.Add("X-Version","1");

    var  response = client.PostAsJsonAsync("rest/message", myObject).Result;
     }
But there is a problem with this approach , DefaultRequestHeaders is a property of the HttpClient object; if multiple messages are sent through a given HttpClient, all such messages will all have the same DefaultRequestHeaders. if you need to change or add headers use Headers property of the HttpRequestMessage class. You can add custom headers there, which will be sent with that HTTP request only.
    var  client = new HttpClient();
    var  httpRequestMessage = new HttpRequestMessage
        {
            Method = HttpMethod.Post,
            RequestUri = new Uri("https://api.sharpencode.com/rest/message"),
            Headers = {
                { HttpRequestHeader.Authorization.ToString(), "Bearer xxxxxxxxxxxxxxxxxxxx" },
                { HttpRequestHeader.Accept.ToString(), "application/json" },
                { "X-Version", "1" }
            },
            Content = new StringContent(JsonConvert.SerializeObject(svm))
        };

    var  response = client.SendAsync(httpRequestMessage).Result;
We discussed the Role of custom Http Message handler in the HttpClient pipeline, now let's discuss what are the scenarios where we can create a custom HTTP message handler on the server-side that is in the web API pipeline.
Custom Message Handlers into the web API pipeline
we can create and add a custom message handler to the web API pipeline for several reasons, some of them are as follows.
• To add a custom header to every response message.
• To Check for an API Key in the request.
• To add support for X-HTTP-Method-Override.
We will use the same Employee Service web API, that we have created a few minutes back, And will try to add different custom message Handlers into the pipeline one by one. Remove all the unnecessary code from the Employee Controller, now your Controller should look like below.
  namespace WebAPITest.Controllers
   {
    public class EmployeeController : ApiController
    {
        public HttpResponseMessage Get()
        {
            try
            {

                    var emps = LoadEmpData();
                    if (emps != null)
                    {
                        return Request.CreateResponse(HttpStatusCode.OK, emps);
                    }

                    return Request.CreateErrorResponse(HttpStatusCode.NoContent, "No Employees found");

            }
            catch(Exception ex)
            {
               return Request.CreateErrorResponse(HttpStatusCode.InternalServerError,ex.Message);
            }
        }

        public List<Employee> LoadEmpData()
        {
            List<Employee> Employees = new List<Employee>(){
                    new Employee(){Name="ramesh",Age=20},
                    new Employee(){Name="Rihana",Age=21},
                    new Employee(){Name="Michael",Age=34}

                };
            return Employees;
        }
    }
  }
Adding a Custom Response Header
We have already learnt how to create a custom Message handler , we just need to inherit the class from DelegatingHandler and override the ,b>SendAsync() method.
Step 1.Create a folder and Name it Handlers into the Web API project.
Step 2.Add a Class file into the Handlers folder and Name it as ResponseHeaderMessageHandler.
Step 3.Inherit the class from Delegating handler and override the SendAsync() method like below.
  namespace WebAPITest.Handlers
   {
    public class ResponseHeaderMessageHandler:DelegatingHandler
    {
       async protected override System.Threading.Tasks.Task SendAsync(HttpRequestMessage request,
    CancellationToken cancellationToken)
        {
               HttpResponseMessage response = await base.SendAsync(request, cancellationToken);
                response.Headers.Add("X-Custom-Header", "This is my custom header.");
              return response;
        }
    }
  }
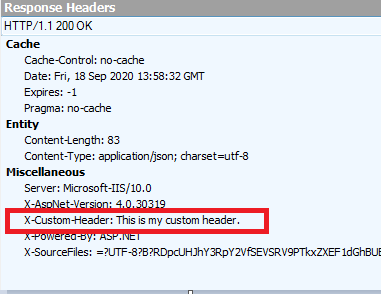
First, the handler calls base.SendAsync to pass the request to the inner message handler. The inner handler returns a response message, but it does so asynchronously using a Task
Step 4. Add the message handler into the web API pipeline. I have already discussed ,how to add a message handler into the web API pipeline in the beginning of the article.
• Go to App_Start folder and open webApiConfig.cs class and add one line of code in the Register() method like below.
    public static class WebApiConfig
    {
        public static void Register(HttpConfiguration config)
        {
            // Web API configuration and services

            // Web API routes
            config.MapHttpAttributeRoutes();

            //Add Message Handlers
            config.MessageHandlers.Add(new ResponseHeaderMessageHandler());


            config.Routes.MapHttpRoute(
                name: "DefaultApi",
                routeTemplate: "api/{controller}/{id}",
                defaults: new { id = RouteParameter.Optional }
            );
        }
    }
Step 5.Run the web API and send a get request from windows Client Application using HttpClient (with LoggerHandler added into the HttpClientPipeline) that we had created earlier or use any standalone Http Client like fiddler. I am using fiddler to check the response headers.
Checking for an API Key
Many times web API asks for an API key for authorizing the client, We can create a Message handler to check for a valid API key in the request.
step 1.Add a new class file into the Handlers folder and name it as APIKeyHandler.
step 2.Inherit the class from DelegatingHandler and override the SendAsync() method like below.
   namespace WebAPITest.Handlers
   {
    public class APIKeyHandler: DelegatingHandler
    {
        //set a default API key
        private const string yourApiKey = "X-some-key";

        protected override async Task SendAsync(HttpRequestMessage request, CancellationToken
      cancellationToken)
        {
            bool isValidAPIKey = false;
            IEnumerable<string> lsHeaders;
            //Validate that the api key exists

            var checkApiKeyExists = request.Headers.TryGetValues("API_KEY", out lsHeaders);

            if (checkApiKeyExists)
            {
                if (lsHeaders.FirstOrDefault().Equals(yourApiKey))
                {
                    isValidAPIKey = true;
                }
            }

            //If the key is not valid, return an http status code.
            if (!isValidAPIKey)
                return request.CreateResponse(HttpStatusCode.Forbidden, "Bad API Key");

            //Allow the request to process further down the pipeline
            var response = await base.SendAsync(request, cancellationToken);

            //Return the response up the chain
            return response;
        }
     }
   }
• This handler looks for an API key (API_KEY) in the header of every HTTP request, and passes the request to the controller only if a valid API key is present in the request header.
• If the request does not have a valid key, the handler creates a response message with status 403, Forbidden. In this case, the handler does not call base.SendAsync, so the inner handler never receives the request, nor does the controller. Therefore, the controller can assume that all incoming requests have a valid API key.
Step 3.Add the message handler into the web API pipeline.
   public static class WebApiConfig
    {
        public static void Register(HttpConfiguration config)
        {
            // Web API configuration and services

            // Web API routes
            config.MapHttpAttributeRoutes();

            //Add Message Handlers
            config.MessageHandlers.Add(new ResponseHeaderMessageHandler());
            config.MessageHandlers.Add(new APIKeyHandler());


            config.Routes.MapHttpRoute(
                name: "DefaultApi",
                routeTemplate: "api/{controller}/{id}",
                defaults: new { id = RouteParameter.Optional }
            );
        }
    }
Step 4.First time ,Issue a get request without passing any API_Key and check the response.

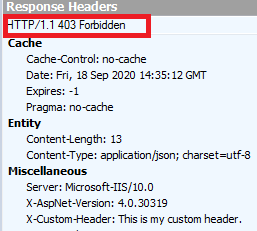
As you can see, in the response body we are getting Bad API Key, and in the response header we are getting 403 forbidden status code, so clearly the request has not reached to the web API Controller.
Step 5.Issue the get request with a valid API key and check the response header and response body.

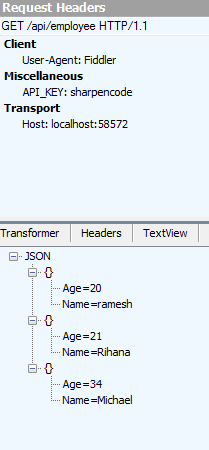
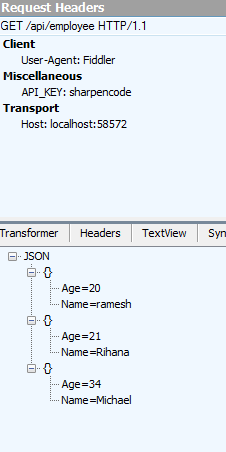
As we can see, when a valid API key has been issued , we get the Employees data in the response body and 200 ok status code in the response header.