Once we have our Web API developed, before exposing it to our clients, based upon our needs we may need to secure some or all parts of our API Service so that only verified users can access our API service. For example, paid customers can be allowed to access more functionalities while free subscribers can only be allowed to access certain features of the API, similarly a few clients may have the authority to create resources on our server while other clients can only have got access, Such security can be achieved using the authentication and authorization mechanisms.
In general terms Authentication and authorization are cornerstones for application security. Authentication means establishing the identity of a user by validating the credentials he provides, while authorization means determining whether the user is allowed to perform the requested action or not. A Web API is considered secured if it authenticates all the requests and authorizes access to the resources based on the provided identity.
• Authentication simply means to validate the user's credentials to identify his identity For example, clients log in with their username and password, and the server uses the password to authenticate them.
• Authorization simply means checking whether a user has access to a certain resource or not. For example, A particular client may have the permission to get a resource but not to create a resource.
Now, when you know, what exactly the authentication and authorization is, you must be wondering how a web API developer secure his API and implement Authentication and authorization.
Before going for the implementation , remember one thing
• You can implement authentication both at the host level and the application level but
• Authorization is always an application-level thing.
Authentication
Authentication at the host level
Now you must be wondering, what is meant by host level and application level? A web application is hosted on IIS that uses HTTP modules for authentication. The IIS provides us built-in HTTP modules for authentication, but we can also write our own HTTP module to perform custom authentication.
Q1.How the IIS will authenticate the request by itself?
Answer:- There are some inbuilt HTTP module called Authentication module is present in the IIS and you just need to configure it. The authentication module basically gives you several options (modes or methods) to select, the options are nothing but different HTTP authentication schemes Like-
• Anonymous Authentication.
• Basic Authentication.
• Windows Authentication.
• Forms Authentication and
• Digest Authentication etc.
Q2.How to define custom authentication logic at the host level?
Answer:-All the authentication methods available in IIS except forms authentication uses windows user account to authenticate the client or user, but in the real world you may have a requirement to authenticate the client against the user information saved in the database table, also you do not want the request to enter into the web API pipeline if the request is from an invalid user. In such a scenario, you can write your own HTTP module to perform custom authentication.
Authentication at the application level
You can authenticate the client at the application level with following approaches:-
1. By putting authentication logic into HttpMessageHandler.
2. By putting authentication logic into Authentication Filter.
3. By extending authorization filter for custom authentication.
Authorization
I have already told you that authorization is a complete application level thing, because you obviously want to secure some resources from the unauthorized client, securing a resource technically means not allow the method to execute which is returning the actual resource, for example, if List of Employee is a resource then securing this resource would simply mean to not let the method to execute which returns the List of Employee.
This is the reason, authorization happens later in the pipeline, closer to the controller. That lets us make more granular choices when we grant access to resources.
To secure any resource or simply to restrict any method for execution we use an authorization filter in web API. Authorization filters run before the controller action. If the request is not authorized, the filter returns an error response with a 401 status code and the corresponding action is not invoked.
Web API provides a built-in authorization filter, AuthorizeAttribute. This filter checks whether the user is authenticated. If not, it returns an HTTP status code 401 stating Unauthorized request, and Action is not executed..
filter can be applied at several levels like globally, at the controller level, or the level of individual actions.
Now the question that may come to your mind is, how the authorized attribute validates the request.
Authorize attribute verifies the request's IPrincipal, checks its Identity.IsAuthenticated property, and returns a 401 Unauthorized HTTP status if the value is false and the requested action method will not be executed.
Now the next question that is coming to your mind is, where and when the request's IPrincipal is set and who actually sets the IPrincipal and what actually this IPrincipal mean?
An IPrincipal object, represents the security context under which code is running.
• When the host authenticates the user, it creates a principal, which is an IPrincipal object. and attaches the principal to the current thread by setting Thread.CurrentPrincipal. The principal contains an associated Identity object , this identity object contains information about the user. If the user is a valid user, the Identity.IsAuthenticated property returns true. For anonymous requests or unauthenticated users, IsAuthenticated returns false.
• we should always set the principal in two places using :
1. Thread.CurrentPrincipal. that is the standard way to set the thread's principal in .NET.
2. HttpContext.Current.User. it is specific to ASP.NET.

Is it all? And is there no other mechanism to secure a rest api in 2020?
No , there are many other ways and authentication logic that can be used. validating a user against database or windows account are not the only option , the other ways are as follows:-
• API Keys
An API Key is a unique generated value that is assigned to each first-time user by the server. When the user attempts to re-enter the system, this unique key is used to prove that they’re the same user as before.
• OAuth 2 (the most preferred, my favorite and readymade Owin middleware support in web API template):-
OAuth 2 is currently the most preferred security mechanism that is used to secure a Rest API.
There are different flows defined in Oauth 2, the Web API template uses the resource owner password flow defined in OAuth2.
1. The user enters a name and password into the client.
2. The client sends these credentials to the authorization server.
3. The authorization server authenticates the credentials and returns an access token.
4. To access a protected resource, the client includes the access token in the Authorization header of the HTTP request.
Knowing multiple solutions for a problem is great but identifying which solution will serve your requirement is always a challenge, unnecessarily going for the complex solution just because it is recommended by Microsoft or because big enterprises follow that approach doesn't mean it would also be a perfect fit for your requirement.
Let's consider different real-world scenarios where selecting a solution among multiple available solutions will only depend on your intelligence and problem-solving skills.
Scenario 1. You are developing an API using the asp.net web API framework for your company and the API will be used by the developers of that company only.
Solution:- Obviously, you know the API is not for public use, so you should go for Windows authentication. For an intranet environment, it would be a perfect fit.
So, your solution is configuring IIS to use windows authentication.
Boring right? I too don't like theories much, and yes a real practical implementation can only help you to understand a concept.
so, let's jump into practical implementation. The obvious steps would be:-
Step 1.Creating a Rest service with Web API 2.
Here we will create an EmployeeService which will expose Employee's data to the outside world and only the authorized user can create an employee on the server and authenticate but the unauthorized users will have only get access.
Step 2.Creating a Client Application(MVC or JavaScript) which will consume our API.
Here we will use Jquery to call the API.
Step 3.Validating the user. (Authentication)
It will depend upon the authentication mechanism we choose for security like
• Basic Authentication
• windows authentication
• API Key Authentication
• Token based authentication (OAuth 2)
• External authentication (authentication using FB,Google etc (OAuth 2))
• Forms Authentication etc
Step 4.Secure resources with Authorize attribute.
As I have said earlier, the authorize attribute verifies the request's IPrincipal, meaning it discover the identity or the role of a principal through an IPrincipal object, In .Net all principal (ClaimPrincipal or GenericPrincipal) are inherited from IPrincipal, so we can create an IPrincipal object by instantiating GenericPrincipal, the generic principle contains the identity object and the roles associated with that Identity.
we can also create a custom role provider, then the authorized attribute will find the roles associated with the identity via our role provider.
Now , Let's discuss the exact requirement and different possible flow .
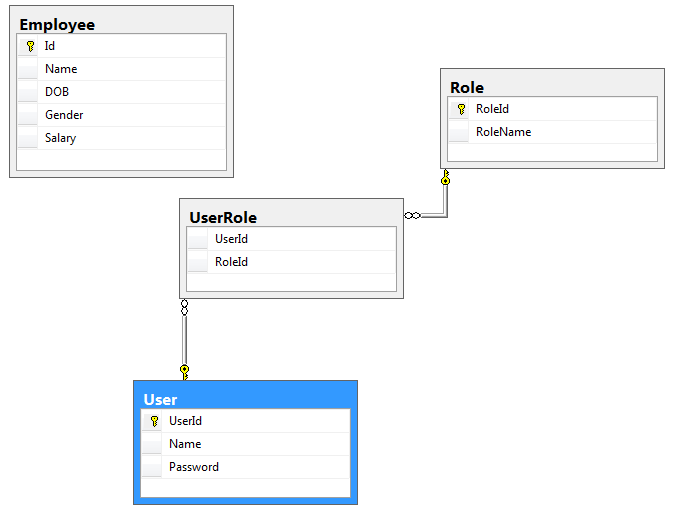
The requirement is, the users which are in the role of "CanPost" will only be authorized to create a resource and the rest can only be able to get resources. so, we have to create a database with two tables user and roles, for the intranet environment, the users are validated against the windows account, in that case, we will create our own custom role provider so that we can have our own application-specific roles without moving users into AD groups. So we will also save all the windows account names as the user name and their roles in the database.
In this article we will create the EmployeeService API and a Jquery client App. later we will check all techniques of authentication and authorization one by one.
Step 1.Create a database and name it EmployeeService and run the below script to generate required tables.
   SET ANSI_NULLS ON
   GO
  SET QUOTED_IDENTIFIER ON
  GO
  SET ANSI_PADDING ON
  GO
  CREATE TABLE [dbo].[Employee](
	[Id] [int] IDENTITY(1,1) NOT NULL,
	[Name] [varchar](50) NULL,
	[DOB] [date] NULL,
	[Gender] [varchar](50) NULL,
	[Salary] [int] NULL,
   CONSTRAINT [PK_Employee] PRIMARY KEY CLUSTERED
    (
	[Id] ASC
  )WITH (PAD_INDEX = OFF, STATISTICS_NORECOMPUTE = OFF, IGNORE_DUP_KEY = OFF, ALLOW_ROW_LOCKS = ON,
   ALLOW_PAGE_LOCKS = ON) ON [PRIMARY]
    ) ON [PRIMARY]

   GO
  SET ANSI_PADDING OFF
  GO
      /****** Object:  Table [dbo].[Role]    Script Date: 9/1/2020 11:22:40 AM ******/
   SET ANSI_NULLS ON
   GO
   SET QUOTED_IDENTIFIER ON
   GO
  SET ANSI_PADDING ON
  GO
  CREATE TABLE [dbo].[Role](
	[RoleId] [int] IDENTITY(1,1) NOT NULL,
	[RoleName] [varchar](50) NULL,
  CONSTRAINT [PK_Role] PRIMARY KEY CLUSTERED
  (
	[RoleId] ASC
  )WITH (PAD_INDEX = OFF, STATISTICS_NORECOMPUTE = OFF, IGNORE_DUP_KEY = OFF,
  ALLOW_ROW_LOCKS = ON, ALLOW_PAGE_LOCKS = ON) ON [PRIMARY]
  ) ON [PRIMARY]

GO

   GO
    SET ANSI_PADDING OFF
   GO
    /****** Object:  Table [dbo].[User]    Script Date: 9/1/2020 11:22:40 AM ******/
    SET ANSI_NULLS ON
   GO
   SET QUOTED_IDENTIFIER ON
   GO
   SET ANSI_PADDING ON
   GO
   CREATE TABLE [dbo].[User](
	[UserId] [int] IDENTITY(1,1) NOT NULL,
	[Name] [varchar](50) NULL,
	[Password] [varchar](50) NULL,
    CONSTRAINT [PK_User] PRIMARY KEY CLUSTERED
    (
	[UserId] ASC
    )WITH (PAD_INDEX = OFF, STATISTICS_NORECOMPUTE = OFF, IGNORE_DUP_KEY = OFF, ALLOW_ROW_LOCKS = ON,
    ALLOW_PAGE_LOCKS = ON) ON [PRIMARY]
    ) ON [PRIMARY]

    GO
   SET ANSI_PADDING OFF
   GO
    /****** Object:  Table [dbo].[UserRole]    Script Date: 9/1/2020 11:22:40 AM ******/
   SET ANSI_NULLS ON
   GO
   SET QUOTED_IDENTIFIER ON
   GO
   CREATE TABLE [dbo].[UserRole](
	[UserId] [int] NOT NULL,
	[RoleId] [int] NOT NULL
   ) ON [PRIMARY]

   GO
   ALTER TABLE [dbo].[UserRole]  WITH CHECK ADD  CONSTRAINT [FK_UserRole_Role] FOREIGN KEY([RoleId])
   REFERENCES [dbo].[Role] ([RoleId])
   GO
   ALTER TABLE [dbo].[UserRole] CHECK CONSTRAINT [FK_UserRole_Role]
   GO
   ALTER TABLE [dbo].[UserRole]  WITH CHECK ADD  CONSTRAINT [FK_UserRole_User] FOREIGN KEY([UserId])
   REFERENCES [dbo].[User] ([UserId])
   GO
   ALTER TABLE [dbo].[UserRole] CHECK CONSTRAINT [FK_UserRole_User]
    GO
It will generate 4 tables like below.
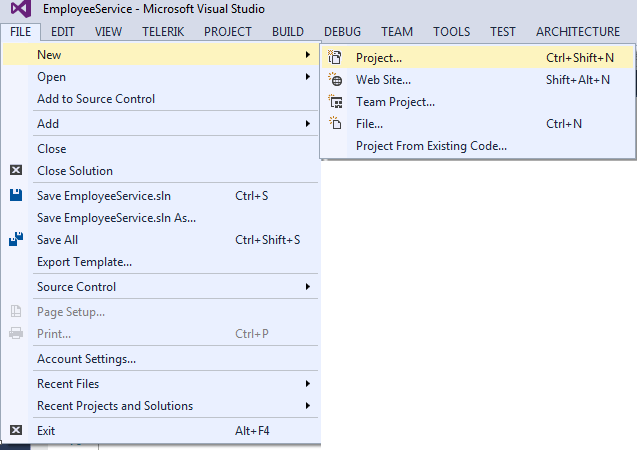
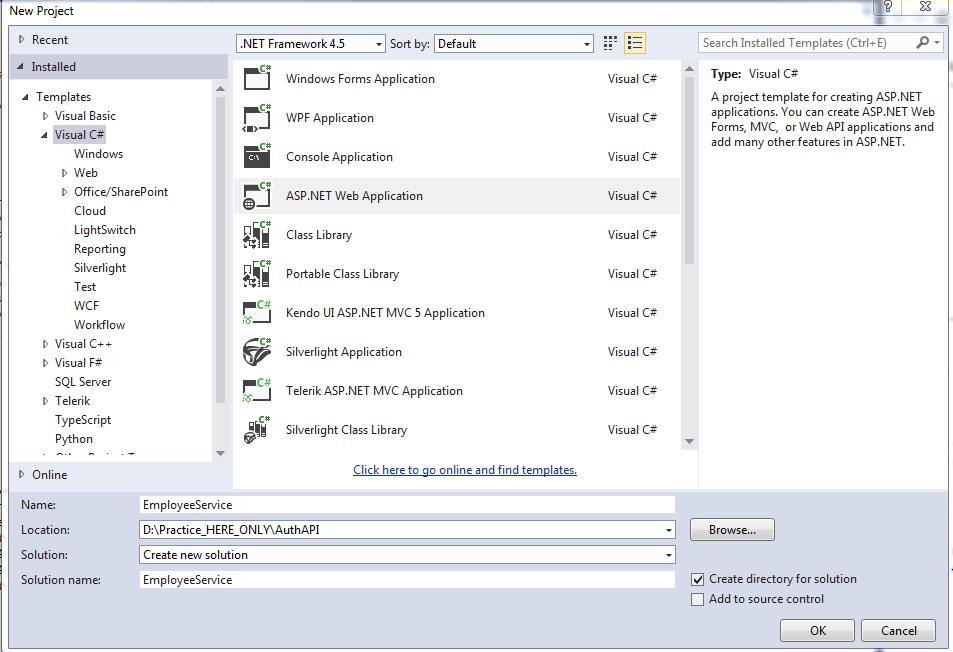
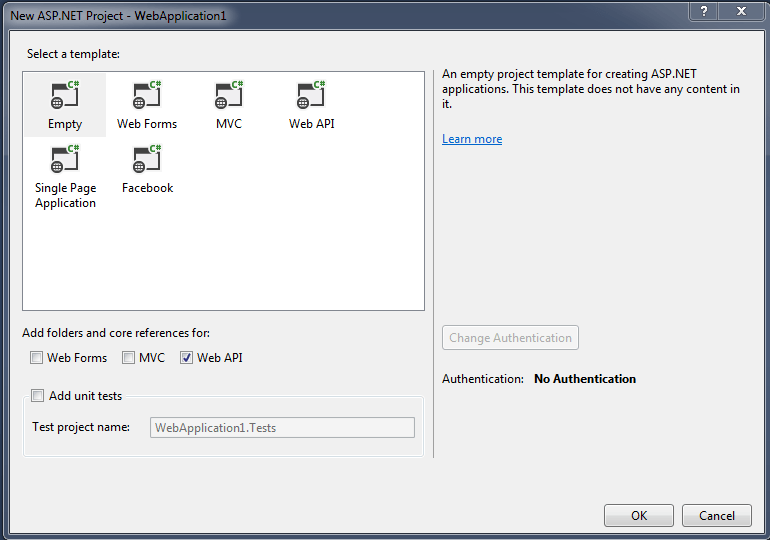
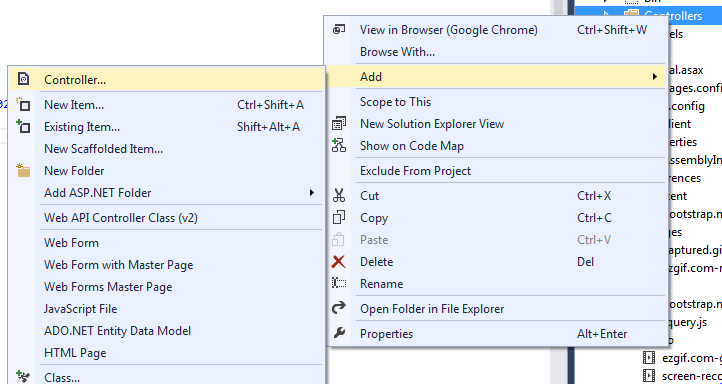
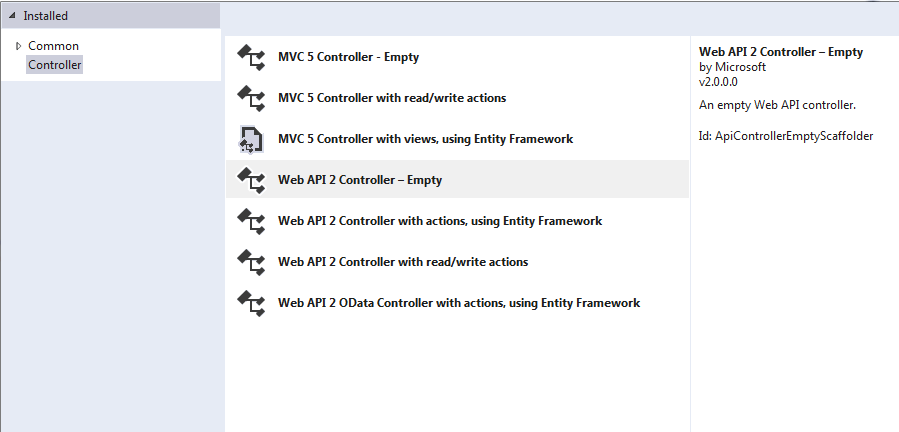
Step 2.Create a web api empty project and name it EmployeeService. and Create a web api 2 empty controller and name it employeecontroller.
• Go to file and select new and then select project .
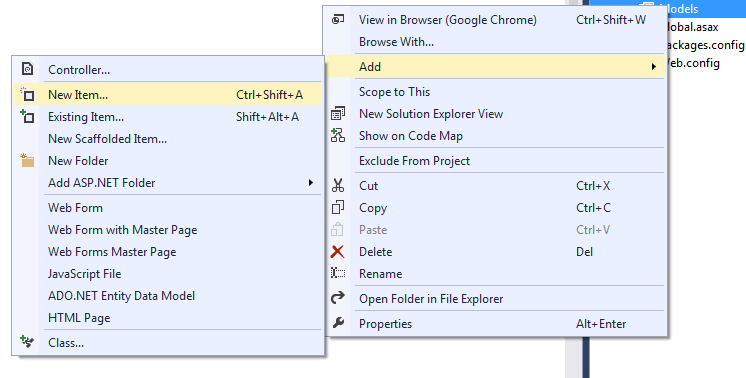
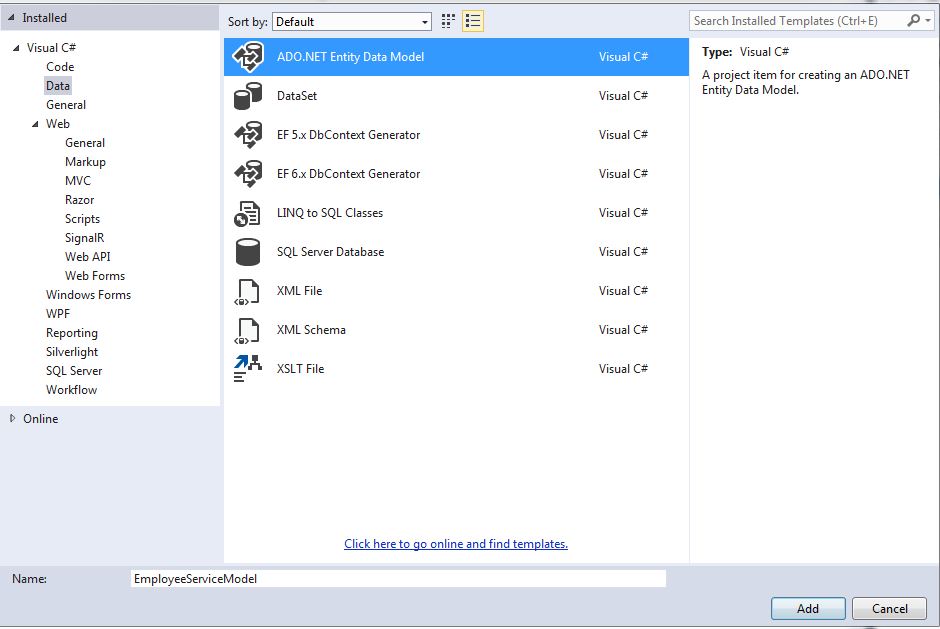
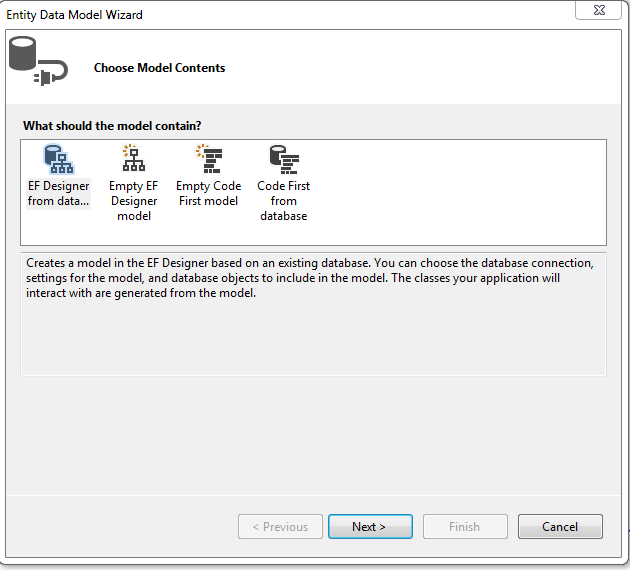
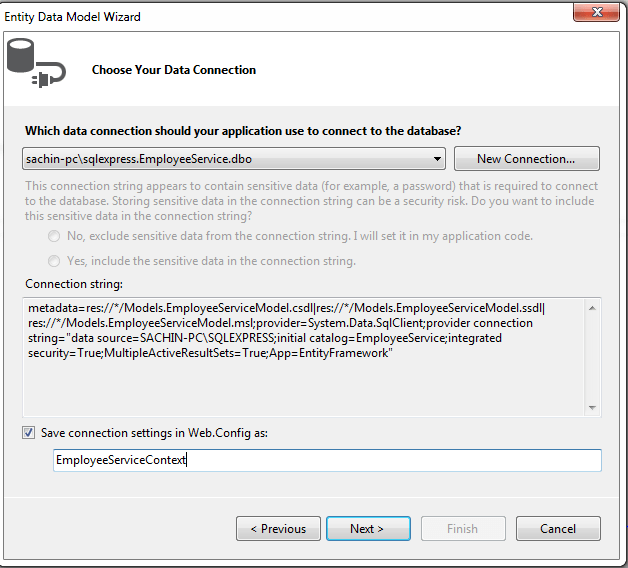
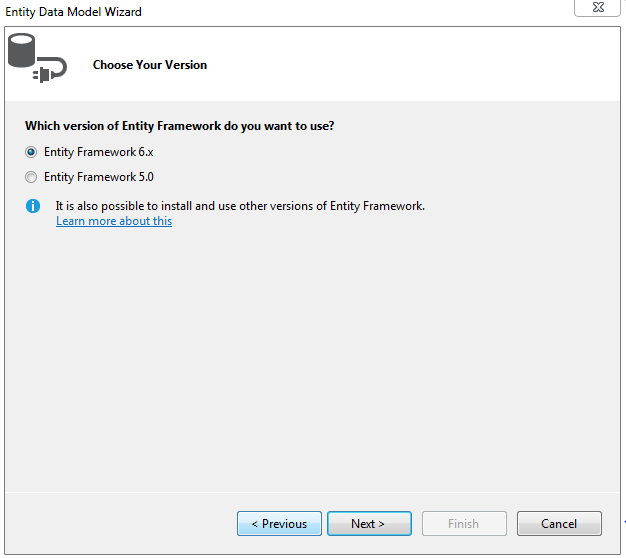
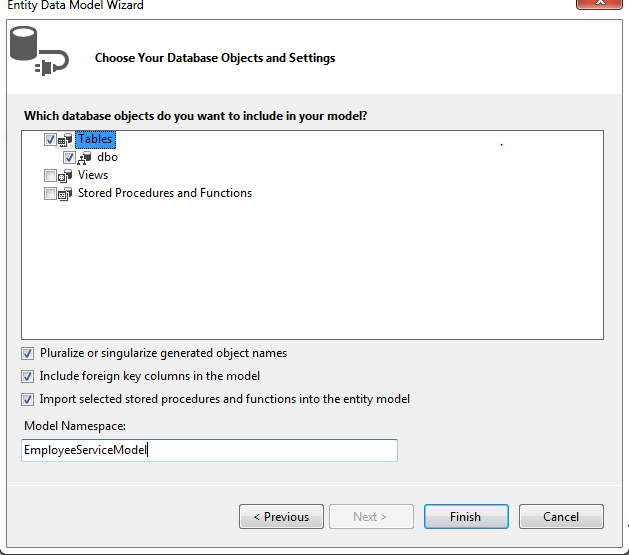
Step 3.Generate entity model from database in the models folder of the project as shown below.
• Right click on the models folder and select add then select new item.
Step 3.Create three methods in the Employee Controller as shown below.
   // [EnableCors(origins: "*", headers: "*", methods: "*", exposedHeaders: "Location", SupportsCredentials = true)]
   // do not uncomment this right now , we will uncomment it later
   public class EmployeeController : ApiController
    {

        EmployeeServiceDbContext db = new EmployeeServiceDbContext();

        public HttpResponseMessage Get()
        {
            try
            {

                var data = db.Employees.ToList();
                if (data != null)
                {
                    return Request.CreateResponse(HttpStatusCode.OK, data);
                }
                return Request.CreateErrorResponse(HttpStatusCode.NotFound, "No result found");
            }
            catch
            {
                return new HttpResponseMessage(HttpStatusCode.InternalServerError);
            }
        }

        public HttpResponseMessage Get(int Id)
        {
            try
            {
                var data = db.Employees.Find(Id);
                if (data != null)
                {
                    return Request.CreateResponse(HttpStatusCode.OK, data);

                }
                return Request.CreateErrorResponse(HttpStatusCode.NotFound, "No Data Found");
            }
            catch
            {
                return new HttpResponseMessage(HttpStatusCode.InternalServerError);
            }
        }

        public HttpResponseMessage Post([FromBody] Employee obj)
        {
            try
            {
                db.Employees.Add(obj);
                db.SaveChanges();
                var msg = Request.CreateResponse(HttpStatusCode.Created, obj);
                msg.Headers.Location = new Uri(Request.RequestUri + obj.Id.ToString());
                return msg;
            }
            catch
            {
                return new HttpResponseMessage(HttpStatusCode.InternalServerError);
            }
        }
       }
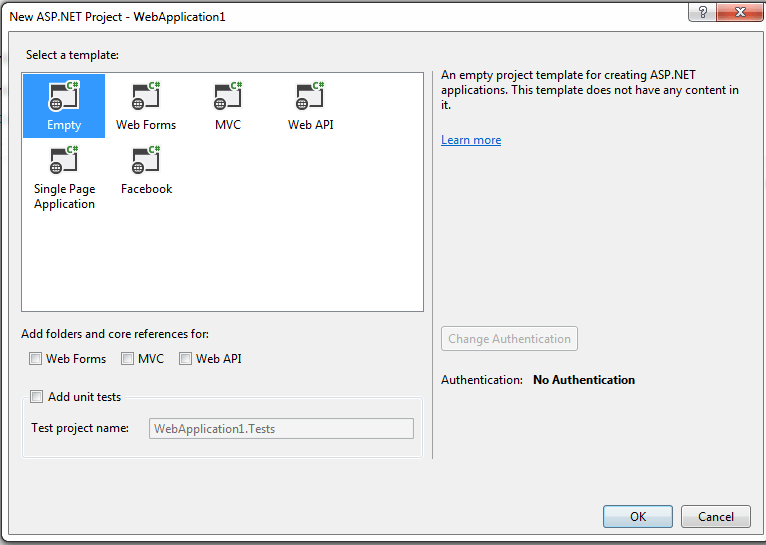
Step 4.Add another project in the solution and name it as JqueryClient and click ok. And in the next window just select empty template and do not tick anything for core refrences.

Step 5.Add an Html page in the JqueryClient Project and Name it ClientOne.
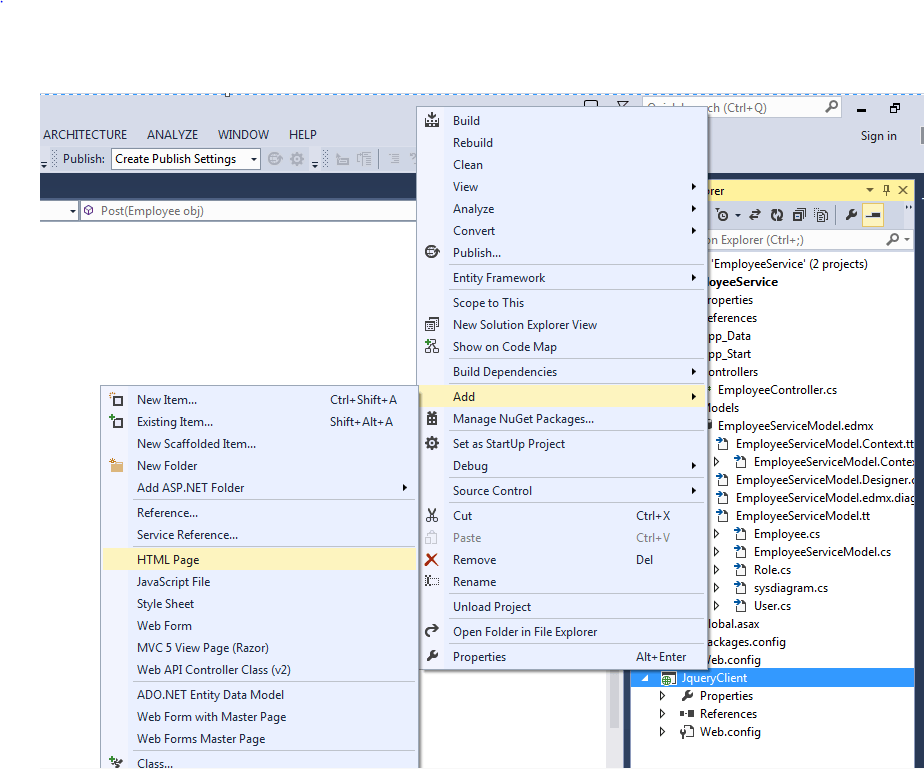
Step 6.Add the Jquery reference in the Html page and paste the below code.
    <div class="container">
        <!DOCTYPE html>
    <html xmlns="http://www.w3.org/1999/xhtml">
    <head>
        <title>ClientOne</title>
        <link href="Content/bootstrap.min.css" rel="stylesheet" />
        <script src="JS/Jquery.js"></script>
        <script src="JS/bootstrap.min.js"></script>
    </head>
    <body>
        <div class="container">
            <table class="table table-bordered mt-5">
                <tr>
                    <td>Name</td>
                    <td><input type="text" name="name" value="" id="txtName" /></td>
                </tr>
                <tr>
                    <td>DOB</td>
                    <td><input type="date" name="dob" value="" id="txtDOB" /></td>
                </tr>
                <tr>
                    <td>Gender</td>
                    <td>
                        <input type="radio" name="Gender" value="Male" />Male
                        <input type="radio" name="Gender" value="Female" />Female
                    </td>
                </tr>
                <tr>
                    <td>Salary</td>
                    <td><input type="number" name="Salary" value="" id="txtSalary" /></td>
                </tr>
                <tr>
                    <td>
                        <button onclick="getEmployeeById()" class="btn btn-danger">Get Employee by Id</button>
                    </td>
                    <td>
                        <input type="number" name="Id" value="" id="Id" placeholder="Enter employee Id" />


                    </td>

                </tr>
                <tr>
                    <td>
                        <button onclick="getEmployee()" class="btn btn-primary">Get All Employee</button>
                        <button onclick="Refresh()" class="btn btn-primary">Refresh</button>
                    </td>
                    <td><button onclick="SaveEmployee()" class="btn btn-success">Add New</button></td>
                </tr>
            </table>

            <table class="table table-bordered" id="main" style="display:none">
                <thead>
                    <tr>
                        <th>Id</th>
                        <th>Name</th>
                        <th>DOB</th>
                        <th>Salary</th>
                        <th>Gender</th>
                    </tr>
                </thead>
                <tbody></tbody>
            </table>

        </div>

        <script>

            function SaveEmployee() {
                debugger;
                var model = {
                    Name: $("#txtName").val(),
                    Salary: $("#txtSalary").val(),
                    Gender: $(":input[name=Gender]:checked").val(),
                    DOB: $("#txtDOB").val(),


                }

                $.ajax({

                    "type": "Post",
                    "url": "http://localhost:1268/api/employee",
                    "dataType": "json",

                    "contentType": "application/json;charset=utf-8",
                    "data": JSON.stringify(model),

                    "dataTpe": "Json",

                    "cache": false,
                    "success": function (data, status, xhr) {
                        debugger;

                        alert(xhr.getResponseHeader('Location'));
                    },

                    "error": function (request, message, error) {
                        handleException(request, message, error);
                    }
                })

            }

            function getEmployeeById() {
                var id = $("#Id").val();
                debugger;
                $.ajax({
                    "type": "get",
                    "url": "http://localhost:1268/api/employee",
                    "data": { Id: id },
                    "dataTpe": "Json",
                    "cache": false,
                    "success": function (data) {
                        debugger;

                        $("#txtName").val(data.Name);
                        $("#txtSalary").val(data.Salary);
                        $(":input[name=Gender][value=" + data.Gender + "]").prop('checked', true);
                        var dob = CovertToDate(data.DOB);
                        $("#txtDOB").val(dob);
                    },

                    "error": function (request, message, error) {
                        handleException(request, message, error);
                    }
                })
            }

            function Refresh() {
                debugger;
                $("#txtName").val("");
                $("#txtSalary").val("");
                $(":input[name=Gender]").prop('checked', false);
                $("#txtDOB").val("");
                $("#Id").val("");
            }

            function handleException(request, message, error) {
                var msg = "";
                msg += "Code: " + request.status + "\n";
                msg += "Text: " + request.statusText + "\n";
                if (request.responseJSON != null) {
                    msg += "Message: " +
                           request.responseJSON.Message + "\n";
                }
                alert(msg);
            }

            function CovertToDate(date) {
                debugger;
                var dob;
                var d = new Date(date);
                var day = ("0" + d.getDate()).slice(-2);
                var month = ("0" + (d.getMonth() + 1)).slice(-2);
                dob = d.getFullYear() + "-" + (month) + "-" + (day);

                return dob;
            }


            function getEmployee() {
                debugger;
                $.ajax({
                    "type": "get",
                    "url": "http://localhost:1268/api/employee",
                    "dataTpe": "Json",
                    "cache": false,
                    "success": function (data) {

                        $(data).each(function (i, y) {
                            var trr = document.createElement("tr");
                            var dob = CovertToDate(y.DOB);
                            $(trr).append("<td>" + y.Id + "</td>").append("<td>" + y.Name + "</td>").append("<td>" + dob +
     "</td>").append("<td>" + y.Salary + "</td>").append("<td>" + y.Gender + "</td>");
                            $("#main tbody").append(trr);
                        });
                        $("#main").show();

                    },
                })
            }

         </script>
      </body>
   </html>
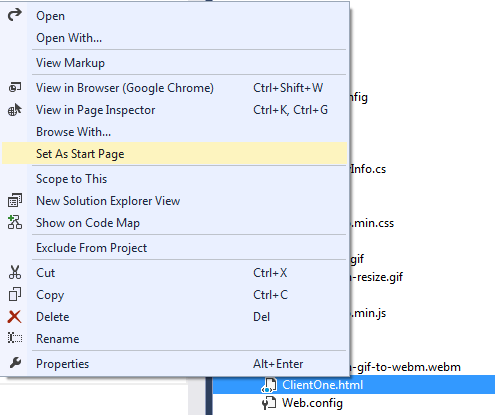
Step 7. Make the ClientOne.html start page of the application.
• Right click on the ClientOne.html and
• Select set as start page.
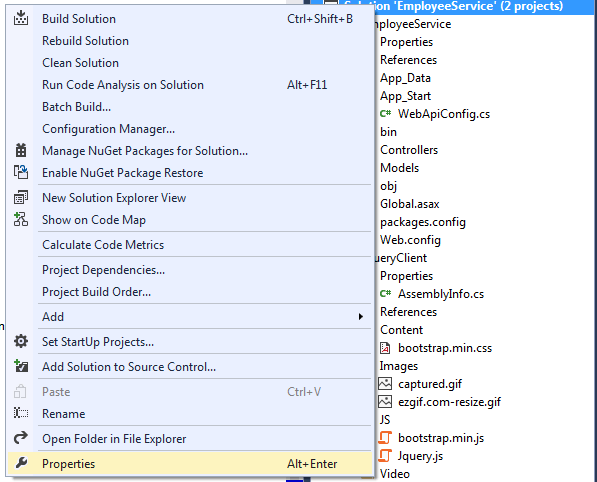
Step 8. Configure the solution to run both the project (API and Client App) at the same time.
• Right click on the solution (EmployeeService) and Go to properties.
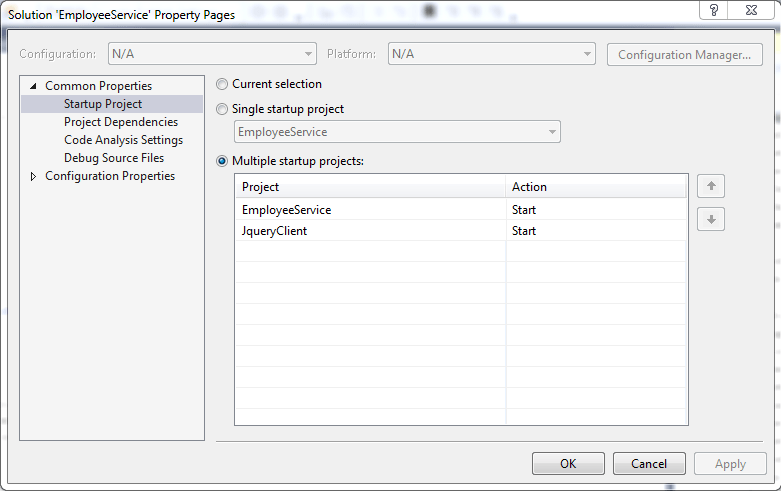
Step 8.Run the application by pressing ctrl+f5 or start button on the menu bar. You will get the below output.
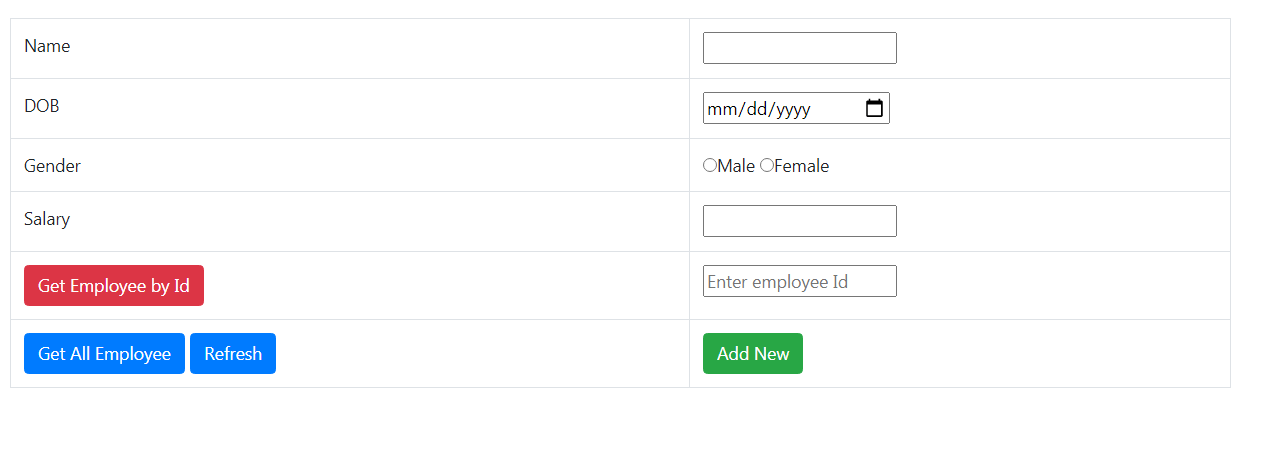
Fill all the fields except Id and click add new button.
At this moment you will get Cors related error which is logical and self explanatory , In real time the client app have different origin , here different origin means different domain name or port number or scheme(http or https) that is the reason i have created the client App as a different project so that you can take feel of real time project and face the problems that may occur in a live project.

As you can see from the error , browser is not allowing ClientApp to access the resource ('http://localhost:1268/api/employee?Id=1) because the clientApp has the origin http://localhost:1274/ClientOne.html , both have different port number , which is violation of same origin policy.
In order to overcome this problem and to allow the clientApp to access resources on our server , we have to Enable cross-origin requests in ASP.NET Web API 2.
Now , i am considering that you have gone through the article how to enable cross origin request in web api 2 , now it is time to uncomment the Cors attribute on Employee controller and re run the application. if you have followed every step you will get a nice looking client app and an api like explained in video.
In the next article we will try to secure our API with basic authentication with role based authorization.