Before getting into the topic of Basic Authentication, Let's first understand the terms which are necessary to understand at this moment of your life.
1. Protocol :In networking, a protocol is a set of rules for formatting and processing data. Network protocols are like a common language for computers. The computers within a network may use vastly different software and hardware; however, the use of protocols enables them to communicate with each other regardless.
Standardized protocols are like a common language that computers can use, similar to how two people from different parts of the world may not understand each other's native languages, but they can communicate using a shared third language.
2. Http : Http is an application layer protocol. An application layer protocol defines how application processes (clients and servers), running on different end systems, pass messages to each other. In particular, an application layer protocol defines:
• The types of messages, e.g., request messages and response messages.
• The syntax of the various message types, i.e., the fields in the message and how the fields are passed.
• The semantics of the fields, i.e., the meaning of the information that the field is supposed to contain. and
• Rules for determining when and how a process sends messages and responds to messages.
In layman's terms Http protocol says, to ensure smooth communication between computers, the information should be passed as messages, the messages should contain header and body which are known as HTTP Request Header, HTTP Request Body(optional), HTTP Response Header and HTTP Response Body. Where HTTP headers let the client and the server pass additional information with an HTTP request or response. An HTTP header consists of its case-insensitive name followed by a colon (:), then by its value. Each name has its predefined meaning.
3. HTTP Client and HTTP Server : An HTTP "client" is a program (Web browser or any other client) that establishes a connection to a server to send one or more HTTP request messages. An HTTP "server" is a program ( generally a web server like Apache Web Server or Internet Information Services IIS, etc. ) that accepts connections to serve HTTP requests by sending HTTP response messages.
Http is a protocol that means just a theory, some predefined set of rules, it is the duty of HTTP Client developers and HTTP Server developers to actually implement the HTTP and write programs to construct HTTP Messages as defined by HTTP protocol and then throw it to the network. The HTTP Client and HTTP Server developers have successfully followed the rules defined for Http and we do not need to think much about it .
4.Javascript: is a client-side language which can be used to make HTTP request, we just need to follow let's say Ajax syntax to make an HTTP request but at the end of the day, it is the HTTP Client like browser who actually construct the message and make a request either synchronously or asynchronously with the help of JavaScript engine it contains.
Now let's come to the actual point, among various HTTP headers there exist an Authorization header that tells the server who is the requester and asks the server something like "Are you sure and want to send the resource the requester has asked for?" if not then I (HTTP) have another header which is www-Authenticate, assign one challenge to it so that I could tell the user why his request is being denied as unauthorized request. We can easily achieve such security by programming in web API and IIS.
Remember, IIS is an HTTP Server that is smart enough to construct the HTTP message and send it to the browser and the browser is smart enough to recognize the meaning of the message and take appropriate steps like showing a popup (login dialog) to enter credential, because both the IIS server and the browser are designed to construct and deliver HTTP messages as per the common rules defined for the HTTP, in short, these are the software who actually implements the HTTP.
Now you know HTTP protocol has implemented successfully by Browser developers and web Server developers, We the normal web developer just need to know what HTTP offers and how to use them in our application.
Http offers different authentication schemes or methods, These mechanisms are all based around the use of the 401 status code and the WWW-Authenticate response header.
The most widely used HTTP authentication mechanisms are:
| Basic | The client sends the user name and password as unencrypted base64 encoded text. It should only be used with HTTPS, as the password can be easily captured and reused over HTTP. |
| Digest | The client sends a hashed form of the password to the server. Although, the password cannot be captured over HTTP, it may be possible to replay requests using the hashed password. |
| NTLM | This uses a secure challenge/response mechanism that prevents password capture or replay attacks over HTTP. However, the authentication is per connection and will only work with HTTP/1.1 persistent connections. For this reason, it may not work through all HTTP proxies and can introduce large numbers of network roundtrips if connections are regularly closed by the web server. |
Basic Authentication
If an HTTP Server (Web Server) receives an anonymous request for a protected resource it can force the use of Basic authentication by rejecting the request with a 401 (Access Denied) status code and setting the WWW-Authenticate response header as shown below:

The word Basic in the WWW-Authenticate selects the authentication mechanism that the HTTP client (Web browser) must use to access the resource. The realm string can be set to any value to identify the secure area and may used by HTTP clients to manage passwords.
Most web browsers will display a login dialog when this response is received, allowing the user to enter a username and password. This information is then used to retry the request with an Authorization request header:

The Authorization specifies the authentication mechanism (in this case Basic) followed by the username and password. Although, the string U2FjaGluOlNpbmdo may look encrypted it is simply a base64 encoded version of

Advantages of Basic Authentication
• Internet standard.
• Supported by all major browsers.
• Relatively simple method.
Disadvantages
• User credentials are sent with every request as plaintext.
• No way to log out, except by ending the browser session.
• Vulnerable to cross-site request forgery (CSRF); requires anti-CSRF measures.
In Forms Authentication, a cookie having user credential is saved on the client, if any request is made to the same origin then the browser sends the cookie too, which makes it easier for the hackers to perform a CSRF attack.
In basic Authentication there is no cookie stored in the browser however browser saves the HTTP Auth Credential in the cache and sends the credential with every subsequent request to the same domain, for the duration of the session. This includes AJAX requests as well, which makes the basic authentication vulnerable to CSRF attack.
Now it's time to secure our Employee Service that we had created in the previous article with basic authentication. At the same time we also want Role-Based access to the web API, meaning only the user who is in the role of "CanPost", can create an employee on the server other users will only have to Get access.
Following are the steps to achieve basic authentication and Role-based authorization.
Step 1.The Html Client (ClientOne in our case) will make a get or post request to the web API (Employee service) without passing the credential.
Step 2. As per the basic Authentication principle we have to reject the request with a 401 (Access Denied) status code and setting the WWW-Authenticate response to Basic.
Step 3.When the user will make another request with the correct credential then we have to create a Principal object with the Roles he possesses by retrieving the roles from the database and Set the Thread.principal and HttpContext.Principal.
Actually there are multiple ways to achieve the same, Authentication and Authorization is that flexible that you may be confused while selecting the right approach, so it's better to discuss all the approaches with their pros and cons.
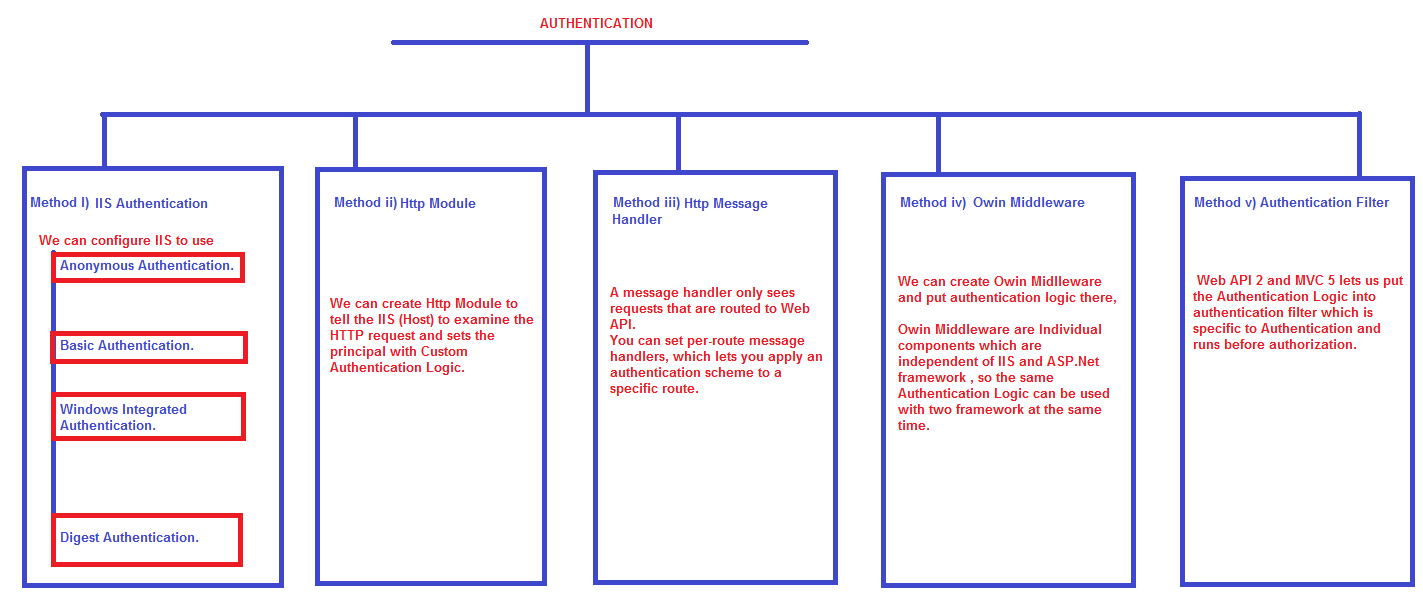
As you can see there are 5 different approaches, we can take to authenticate a request and set the principal, many developers take the 6th approach which is not mentioned here, is putting the Authentication Logic into Authorization Filter, which I will never recommend for obvious reasons. You should be very clear that Authentication Filter is for Authentication logic and Authorization Filter is made for Authorization Logic.
From the above figure, it should be clear that any among the 5 approaches can be used for basic authentication. I will explain each of the approaches one by one and it will depend on your logical reasoning ability that what do you select for your project.
Basic Authentication with IIS
IIS supports Basic authentication, but there is a caveat: The user is authenticated against their Windows credentials. That means the user must have an account on the server's domain. In our case, we do not only want Authentication but also the custom Role based authorization. Let's try to achieve the same.
Step 1. Deploy Web API project to IIS.
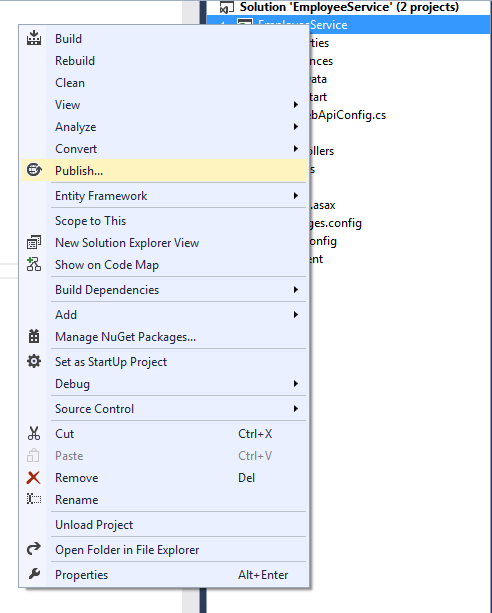
• Right-click on the EmployeeService project and select Publish.
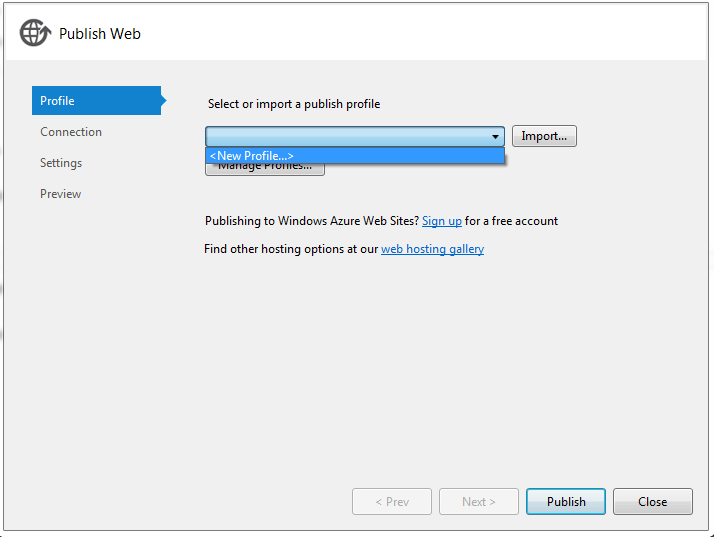
• Create a new publish profile.
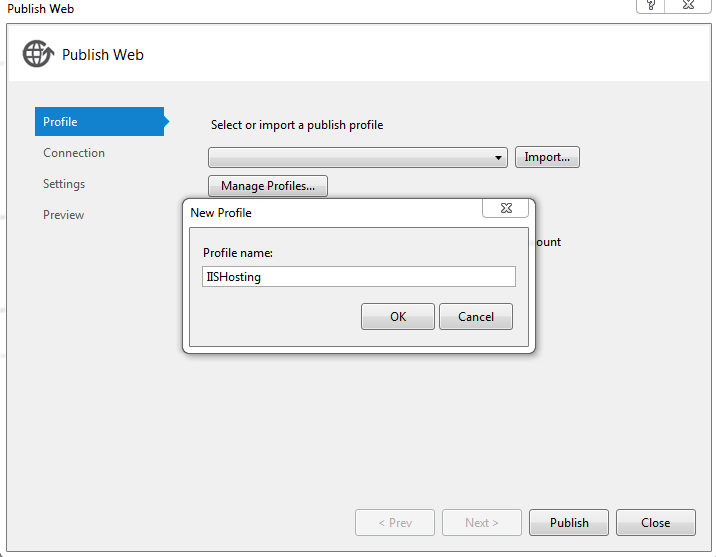
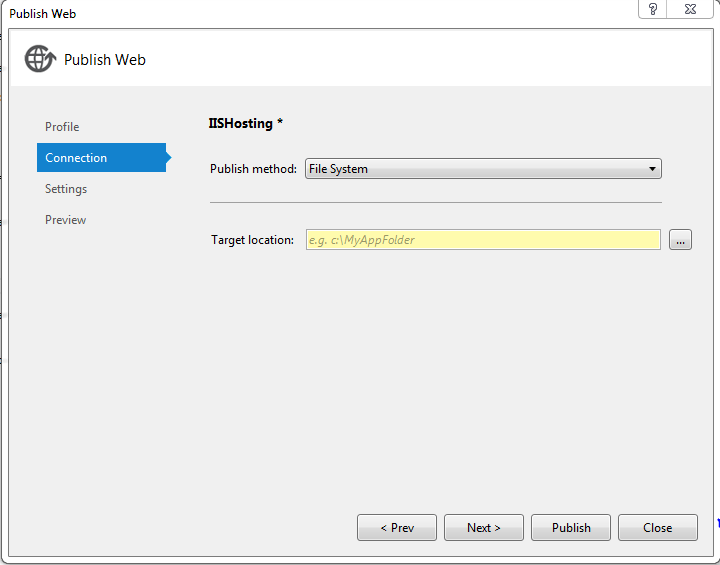
• Give the profile a Name like IISHosting and click ok.
• In the connection tab Select File System as Publish Method and Select the location on your computer where you want to publish the project and click on next.
• In the settings tab select Release mode as configuration and click publish.

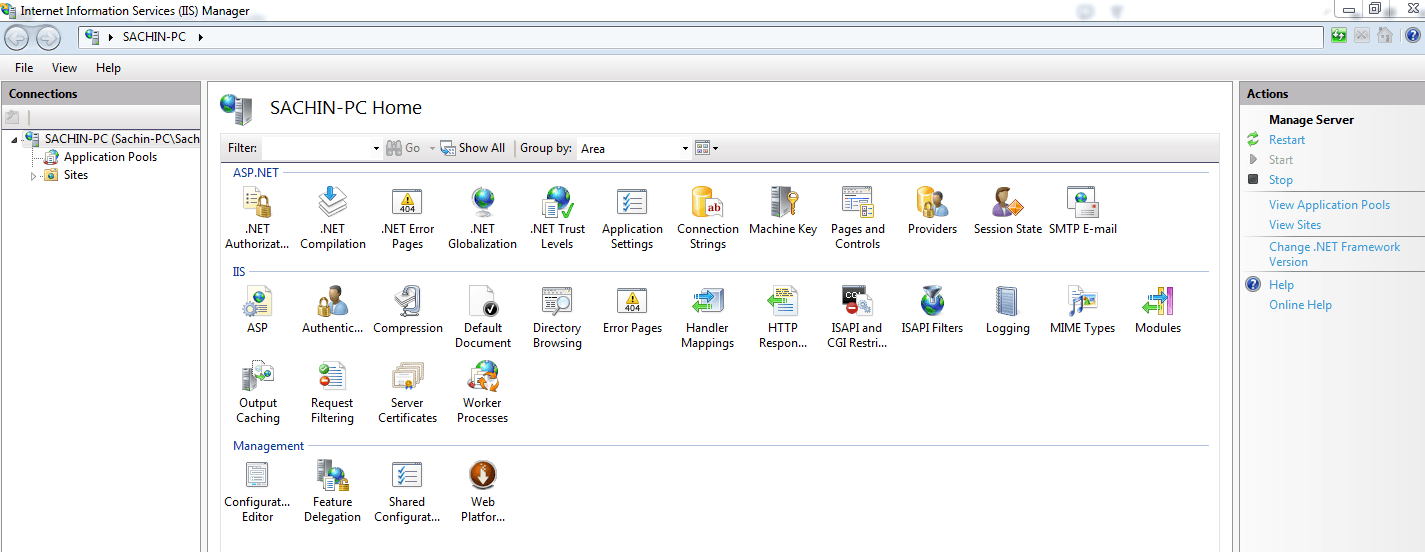
• Open IIS Manager ( press window+R and type inetmgr and click open)
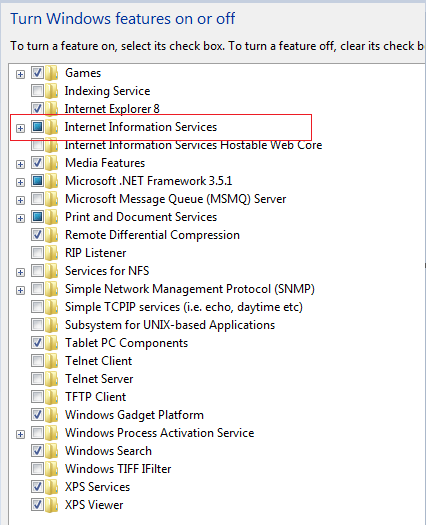
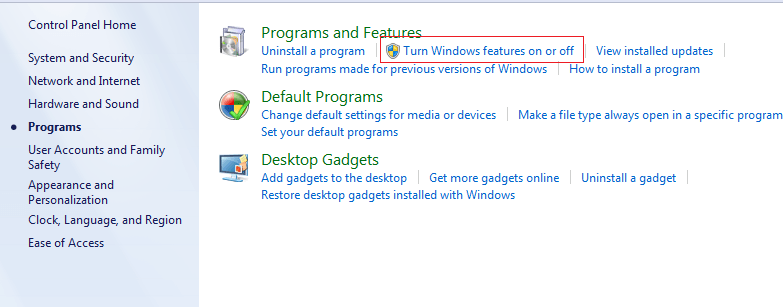
If inetmgr command is not working ,means Run window is unable to find any program with this name then it simply means IIS is not installed on your machine, in that case go to Control Panel--->Programs--->Programs and Features----> Turn windows feature On or Off and Select Internet information services and click ok.
• Right Click on the Application Pool tab and select add application pool.
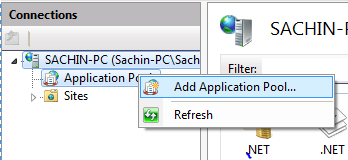
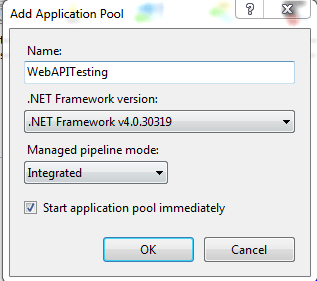
• Give the application pool a name and select .net framework version as .net 4.0 and Managed Pipeline mode as integrated and click ok.
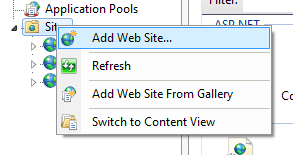
• Right click on the Sites tab and select add new website. Though Web API is not a website ,IIS handles both the same way.
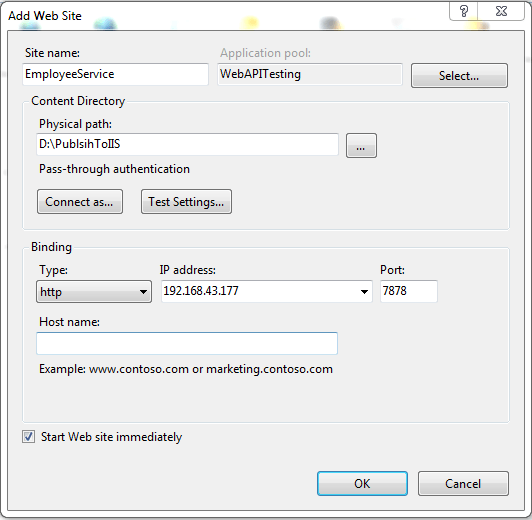
• In the Add Website window, you should be careful while filling the fields.
1. Site Name : EmployeeService.
2. Application Pool : Select the application that we had just created (WebAPITesting).
3. Physical Path :The path on your computer where you have published your web API.
4. Bindings : Type(Http), IP Address (Select the last one in the list),Port (Anything other than 80).
This step is mandatory if you want to test your API from any device on the same network without creating a host.
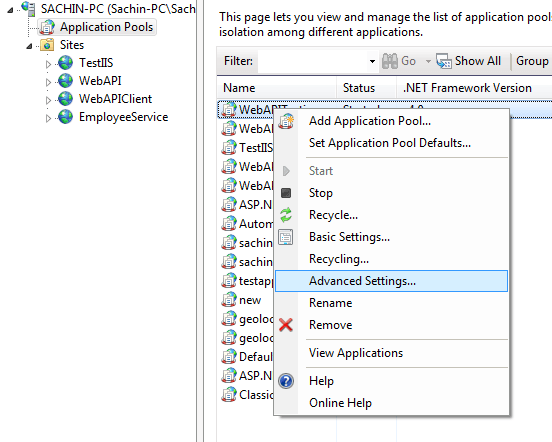
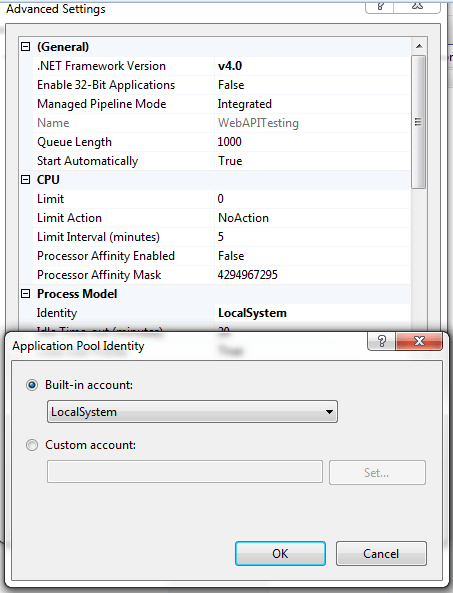
• Double Click the application pools tab, it will open the application pool window where all your application pools will be listed. Here select the application pool that we had created in the earlier step and Right-click on that and go to Advanced settings.
• In the Advance Settings window go to process model and click on identity and select Local System as built-in account.
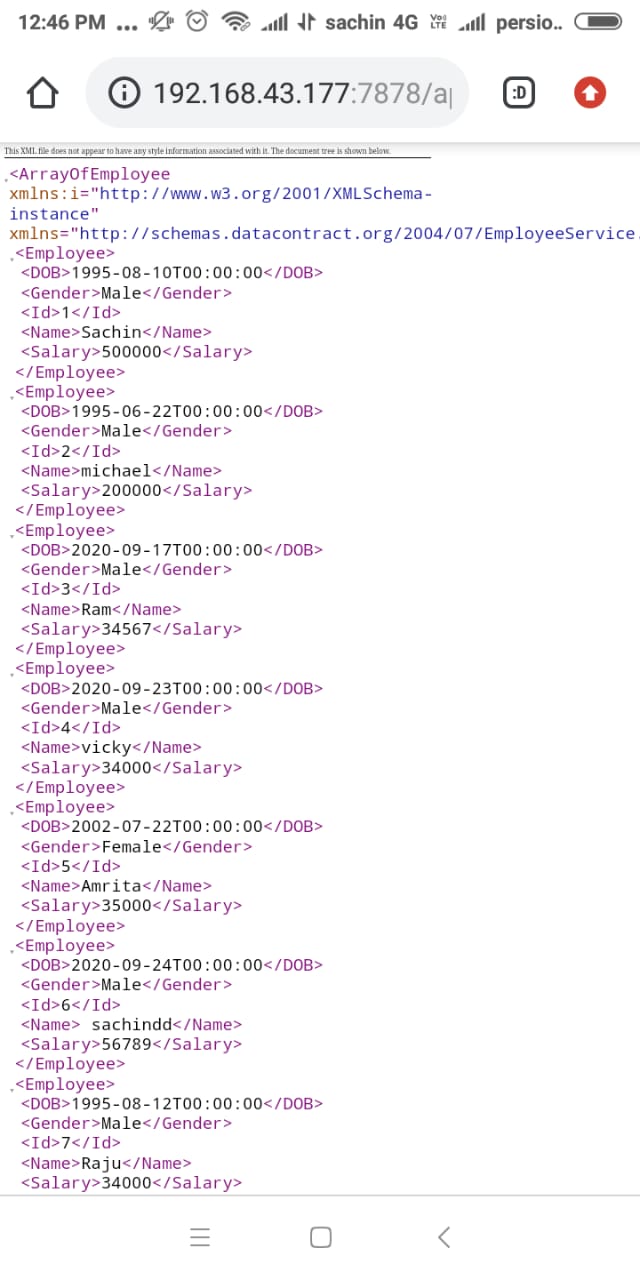
Congratulation you have successfully published your web API to IIS , now connect at least 4 devices to the same network , if you are a student and your house owner has not provided you WIFI, connect your laptop with your mobile hotspot in this way you will have at least 2 device on the same network.
Open any browser on any device on the network and type the URL http://192.168.43.177:7878/api/employee , you will get the following result.
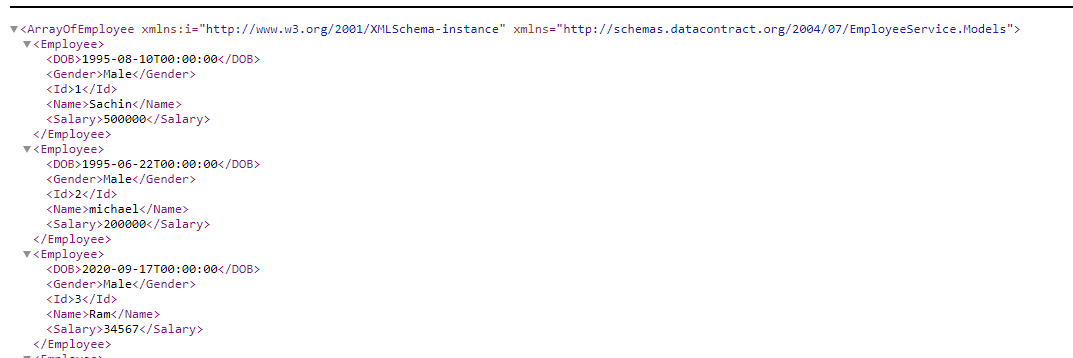
All the idea behind creating a local network is to make you familiar with intranet environment.
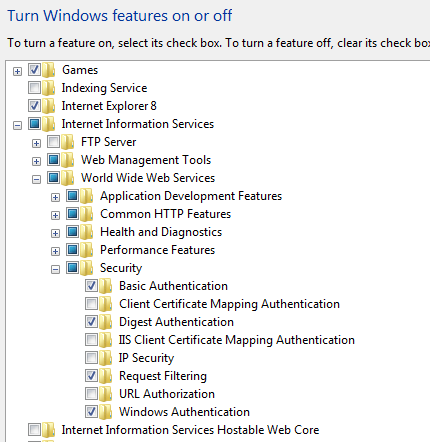
Step 2. Go to control panel --> Programs---> program and features ---> Turn windows feature on or off and Select Internet Information Services.
Under Internet Information Services go to World wide web services and under that go to Security and Check Basic Authentication, Digest Authentication and windows authentication as shown below.
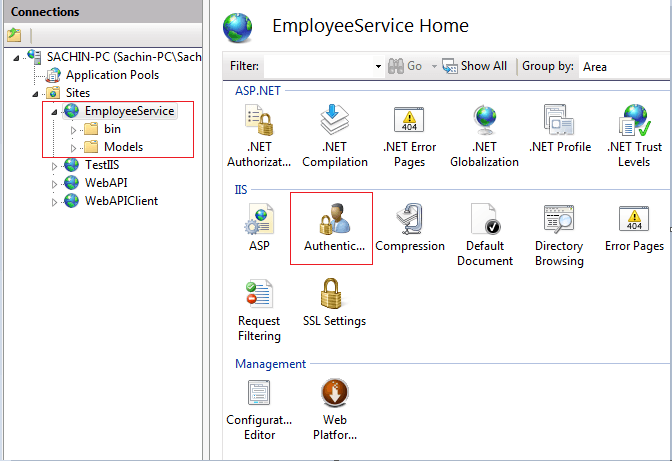
Step 3. Open IIS Manager (in the run window type inetmgr and hit Enter).
• Open Sites and double click on the recently added web API project that is EmployeeService.
• Double click on Authentication under IIS submenu, it will open the authentication schemes window as shown below.

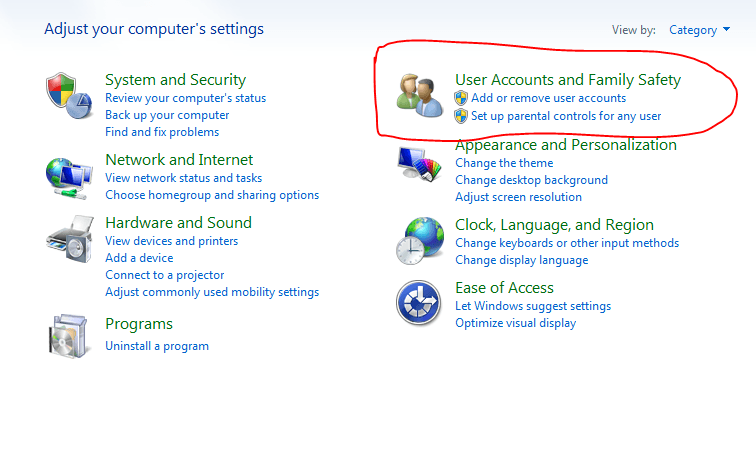
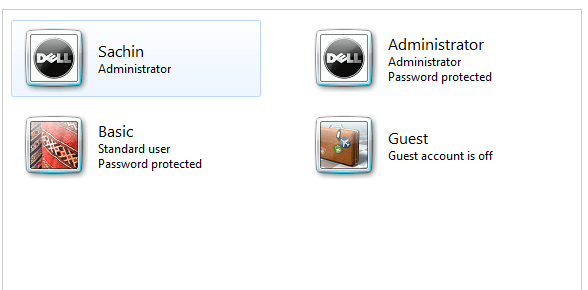
Step 4. Create some users on your machine, for testing purpose at least create two user accounts.
• Go to control panel ---> User Accounts and Family Safety --->Add or Remove User accounts.
• Add some accounts.
Step 5. Open EmployeeService web API project , go to controller and mark all the methods as Authorize using Authorize attribute, for post method use overloaded version of Authorize attribute and define roles='CanPost' and Republish the EmployeeService controller, it will publish the modified version.
  namespace EmployeeService.Controllers
    {
      [EnableCors(origins: "*", headers: "*", methods: "*", exposedHeaders: "Location", SupportsCredentials = true)]
      public class EmployeeController : ApiController
       {
         EmployeeServiceDbContext db = new EmployeeServiceDbContext();
         [Authorize]
        public HttpResponseMessage Get()
        {
            try
            {

                var data = db.Employees.ToList();
                if (data != null)
                {
                    return Request.CreateResponse(HttpStatusCode.OK, data);
                }
                return Request.CreateErrorResponse(HttpStatusCode.NotFound, "No result found");
            }
            catch
            {
                return new HttpResponseMessage(HttpStatusCode.InternalServerError);
            }
        }

    [Authorize]
        public HttpResponseMessage Get(int Id)
        {
         try
            {
                var data = db.Employees.Find(Id);
                if (data != null)
                {
                    return Request.CreateResponse(HttpStatusCode.OK, data);

                }
                return Request.CreateErrorResponse(HttpStatusCode.NotFound, "No Data Found");
            }
            catch
            {
                return new HttpResponseMessage(HttpStatusCode.InternalServerError);
            }
         }

          [Authorize(Roles="CanPost")]
          public HttpResponseMessage Post([FromBody]Employee emp)
           {
             try
             {
                db.Employees.Add(emp);
                db.SaveChanges();
                var msg = Request.CreateResponse(HttpStatusCode.Created, emp);
                msg.Headers.Location = new Uri(Request.RequestUri +"/"+ emp.Id.ToString());
                return msg;
            }
            catch
            {
                return new HttpResponseMessage(HttpStatusCode.InternalServerError);
            }
        }
      }

     }
Step 6. Open our Client App i.e. ClientOne.html and make two Changes
• Change the url parameter of Ajax function from Old url to New url that means from "http://localhost:portno/api/emplyee" to "http://192.168.43.177:7878/api/employee" in every Ajax call.
• Add Authorization Header and pass user name and Password of any of the recently created user accounts as below.
  <!DOCTYPE html>
  <html xmlns="http://www.w3.org/1999/xhtml">
  <head>
      <title>ClientOne</title>
      <link href="Content/bootstrap.min.css" rel="stylesheet" />
      <script src="JS/Jquery.js"></script>
      <script src="JS/bootstrap.min.js"></script>
  </head>
  <body>
    <div class="container">
        <table class="table table-bordered mt-5">
            <tr>
                <td>Name</td>
                <td><input type="text" name="name" value="" id="txtName" /></td>
            </tr>
            <tr>
                <td>DOB</td>
                <td><input type="date" name="dob" value="" id="txtDOB" /></td>
            </tr>
            <tr>
                <td>Gender</td>
                <td>
                    <input type="radio" name="Gender" value="Male" />Male
                    <input type="radio" name="Gender" value="Female" />Female
                </td>
            </tr>
            <tr>
                <td>Salary</td>
                <td><input type="number" name="Salary" value="" id="txtSalary" /></td>
            </tr>
            <tr>
                <td>
                    <button onclick="getEmployeeById()" class="btn btn-danger">Get Employee by Id</button>
                </td>
                <td>
                    <input type="number" name="Id" value="" id="Id" placeholder="Enter employee Id" />
                </td>
            </tr>
            <tr>
                <td>
                    <button onclick="getEmployee()" class="btn btn-primary">Get All Employee</button>
                    <button onclick="Refresh()" class="btn btn-primary">Refresh</button>
                </td>
                <td><button onclick="SaveEmployee()" class="btn btn-success">Add New</button></td>
            </tr>
        </table>

        <table class="table table-bordered" id="main" style="display:none">
            <thead>
                <tr>
                    <th>Id</th>
                    <th>Name</th>
                    <th>DOB</th>
                    <th>Salary</th>
                    <th>Gender</th>
                </tr>
            </thead>
            <tbody></tbody>
        </table>
    </div>

    <script>

        function SaveEmployee() {
            debugger;
            var model = {
           Name:$("#txtName").val(),
           Salary: $("#txtSalary").val(),
           Gender: $(":input[name=Gender]:checked").val(),
           DOB: $("#txtDOB").val()
            }

            $.ajax({

                "type": "Post",
                "url": "http://192.168.43.177:7878/api/employee",
                "dataType": "json",

                "contentType": "application/json;charset=utf-8",
                "data": JSON.stringify(model),
                "traditional": true,
                "xhrFields": {
                    "withCredentials": true
                },
                "dataTpe": "Json",
                "headers": {
                    "Authorization": "Basic " + btoa("Basic" + ":" + "sachin"),

                },
                "cache": false,
                "crossDomain": true,
                "success": function (data,status,xhr) {
                    debugger;

                    alert(xhr.getResponseHeader('Location'));
                },

                "error": function (request, message, error) {
                    handleException(request, message, error);
                }

            })

        }

        function getEmployeeById() {
            var id = $("#Id").val();
            debugger;
            $.ajax({
                "type": "get",
                "url": "http://192.168.43.177:7878/api/employee",
                "data":{Id:id},
                "dataType": "Json",
                "cache": false,
                "success": function (data) {
                    debugger;

                    $("#txtName").val(data.Name);
                    $("#txtSalary").val(data.Salary);
                    $(":input[name=Gender][value=" + data.Gender + "]").prop('checked', true);
                    var dob = CovertToDate(data.DOB);
                    $("#txtDOB").val(dob);
                },

                "error": function (request, message, error) {
                    handleException(request, message, error);
                }
            })
        }

        function Refresh() {
            debugger;
            $("#txtName").val("");
            $("#txtSalary").val("");
            $(":input[name=Gender]").prop('checked', false);
            $("#txtDOB").val("");
            $("#Id").val("");
        }

        function handleException(request, message, error) {
            var msg = "";
            msg += "Code: " + request.status + "\n";
            msg += "Text: " + request.statusText + "\n";
            if (request.responseJSON != null) {
                msg += "Message: " +
                       request.responseJSON.Message + "\n";
            }
            alert(msg);
        }

        function CovertToDate(date)
        {
            debugger;
            var dob;
            var d = new Date(date);
            var day = ("0" + d.getDate()).slice(-2);
            var month = ("0" + (d.getMonth() + 1)).slice(-2);
             dob = d.getFullYear() + "-" + (month) + "-" + (day);

            return dob;
        }


        function getEmployee() {
            debugger;
            $.ajax({
                "type": "get",
                "url": "http://192.168.43.177:7878/api/employee",
                "dataType": "Json",
                "headers": {
                    "Authorization": "Basic " + btoa("Basic" + ":" + "sachin"),

                },
                "cache": false,
              "success": function (data) {

                    $(data).each(function (i, y) {
                        var trr = document.createElement("tr");
                        var dob = CovertToDate(y.DOB);
                        $(trr).append("<td>" + y.Id + "</td>").append("<td>" + y.Name + "</td>").append("<td>" + dob +
      "</td>").append("<td>" + y.Salary + "</td>").append("<td>" + y.Gender + "</td>");
                        $("#main tbody").append(trr);
                    });
                    $("#main").show();

                },
            })
        }

    </script>
    </body>
   </html>
Step 6. If you want to test this in an intranet environment (Like from your phone on the same network) then deploy the Client App in IIS as well, the steps are the same as you have deployed web API.
At this moment run the client App from anywhere on the same network, and you will successfully be able to Get All Employees and Get a particular Employee by Id but you will not be able to Create Employee because of the Role Constraint.
Role Based Authorization with Basic Authentication
Step 1.Open Employee Service web API project and create a folder with name Repository. Under Repository Folder create a class and name it as UserRepository, obviously in the real-time project you should create another layer for it .
In the user repository we are going to create an in-memory user object with user name as windows account name and password as windows password and assign roles to them, you can save your windows user name and password in the database as well but saving windows user accounts in the database is not making sense to me, so I am creating in-memory objects. Remember we had generated our entities in the model folder and we have all Entities that we need right now.
  namespace EmployeeService.Repository
   {
    public class UserRepository
    {

        public static IEnumerable<User> Get()
        {
            List<User> users = new List<User>() {
             new User(){UserId=1,Name="Sachin-PC\\Basic",Roles=new List<Role>(){
                 new Role(){RoleId=1,RoleName="Administrator"},new Role(){RoleId=2,RoleName="CanPost"}}},
              new User(){UserId=2,Name="Vikash",Roles=new List<Role>(){
                 new Role(){RoleId=1,RoleName="User"}}},
           };

            return users;
        }

        public static List<string> GetRoles(string Name)
        {
            List<string> allRoles = new List<string>();
            List<Role> roles = Get().Where(x => x.Name == Name).SelectMany(x => x.Roles).ToList();
            foreach (var role in roles)
            {
                allRoles.Add(role.RoleName);
            }
            return allRoles;
        }
      }
   }
Note : The user Name will be your windows accounts name , which should be your {PC name}\\{userAccount name}
Step 2.Open Employee Service web API project and Create a folder with name RoleProviders. Inside that create a class and name it CustomRoleProvider and paste the below code. The Code is self explanatory.
Note : Inherit CustomRoleProvider from RoleProvider (Namespace:- System.Web.Security;)
  public class CustomRoleProvider : RoleProvider
    {
        public CustomRoleProvider() { }

        public override bool IsUserInRole(string username, string roleName)
        {
            List<string> roles = UserRepository.GetRoles(username);
            return roles.Count != 0 && roles.Contains(roleName);
        }

        public override string[] GetRolesForUser(string username)
        {
            List<string> roles = UserRepository.GetRoles(username);
            return roles.ToArray();
        }

        #region Not Implemented Methods

        public override void AddUsersToRoles(string[] usernames, string[] roleNames)
        {
            throw new NotImplementedException();
        }

        public override string ApplicationName
        {
            get
            {
                throw new NotImplementedException();
            }
            set
            {
                throw new NotImplementedException();
            }
        }

        public override void CreateRole(string roleName)
        {
            throw new NotImplementedException();
        }

        public override bool DeleteRole(string roleName, bool throwOnPopulatedRole)
        {
            throw new NotImplementedException();
        }

        public override string[] FindUsersInRole(string roleName, string usernameToMatch)
        {
            throw new NotImplementedException();
        }

        public override string[] GetAllRoles()
        {
            throw new NotImplementedException();
        }

        public override string[] GetUsersInRole(string roleName)
        {
            throw new NotImplementedException();
        }

        public override void RemoveUsersFromRoles(string[] usernames, string[] roleNames)
        {
            throw new NotImplementedException();
        }

        public override bool RoleExists(string roleName)
        {
            throw new NotImplementedException();
        }

        #endregion
    }
Step 3.Open Web.config and under System.web section paste below code.
   <roleManager cacheRolesInCookie="true" defaultProvider="CustomRoleProvider" enabled="true">
      <providers>
        <clear />
        <add name="CustomRoleProvider" type="EmployeeService.RoleProviders.CustomRoleProvider,EmployeeService" />
      </providers>
Note : type={Fully qualified name of your role provider class which is namespace name(dot)ClassName , Assembly Name}
Step 3. Obviously we have added some new folders and classes to EmployeeService (web API) project , so republish the project. Don't worry it will not take time , only the first publish takes time.
Step 4. Run the client app , and this time you will be able to create employee.
Thus, we have successfully implemented basic authentication and Role Based Authorization with IIS.Note: If you pass wrong credential in the JQuery Ajax Authorization Header then , browser will show a Authentication Popup window , this is the default behavior of browsers. Whenever a browser receives www-Authenticate response header , it opens a Login Popup window , so make sure you are passing right credential through JQuery Ajax.
Basic Authentication with Http Module
We have learnt that the Basic Authentication built into IIS uses Windows credentials. That means we need to create accounts for our users on the hosting server , also When the host authenticates the user and creates a principal( which is an IPrincipal object by setting Thread.CurrentPrincipal. The principal contains an associated Identity object that contains information about the user), there is no way for host to create a principal with custom Roles along with identity , So we had to create Custom Role Provider.
It would be awesome if anyhow we could tell IIS to use our custom logic to Authenticate a request and create a principal object that contains both the identity and custom Role of a user , in this way we can get rid of Custom Role provider and at the same time we will be able to authenticate the user against user information saved in our database. This can easily be achieved with Http Module.
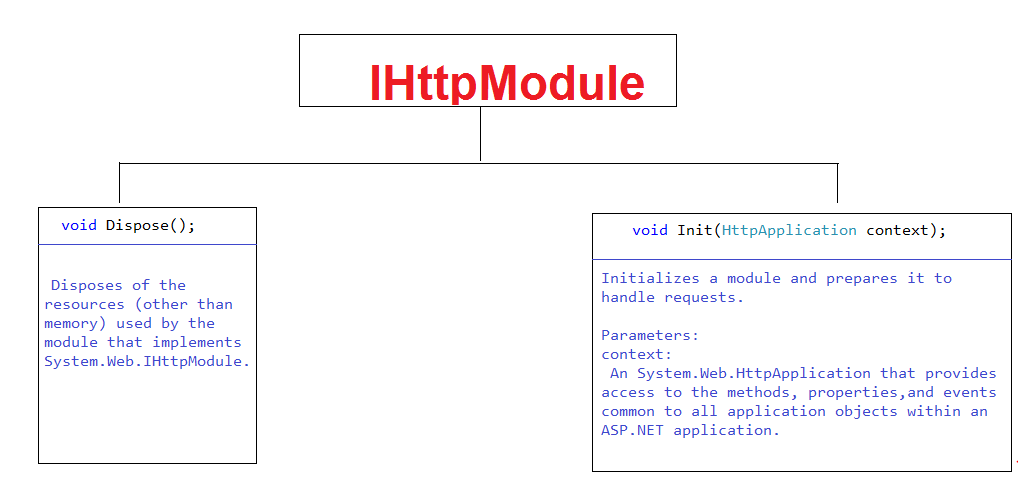
Step 1. Create a Folder in the EmployeeService web API project and name it HttpModules. Under the folder create a Class and Name it BasicAuthHttpModule. Inherit the class from IHttpModule and implement the interface as below.
The interface contains two Abstract methods Dispose() and Init(), we have to take advantage of Init() method.
 namespace EmployeeService.HttpModules
  {
    public class BasicAuthHttpModule : IHttpModule
    {
        private const string Realm = "My Realm";
       public void Init(HttpApplication context)
        {
            // Register event handlers
            context.AuthenticateRequest += OnApplicationAuthenticateRequest;
            context.EndRequest += OnApplicationEndRequest;
        }

        private static void SetPrincipal(IPrincipal principal)
        {
            Thread.CurrentPrincipal = principal;
            if (HttpContext.Current != null)
            {
                HttpContext.Current.User = principal;
            }
        }

        private static bool CheckPassword(string username, string password)
        {
            EmployeeServiceDbContext db = new EmployeeServiceDbContext();

            return db.Users.Any(x => x.Name == username && x.Password == password);
        }

        private static void AuthenticateUser(string credentials)
        {
            try
            {
                var encoding = Encoding.GetEncoding("iso-8859-1");
                credentials = encoding.GetString(Convert.FromBase64String(credentials));

                int separator = credentials.IndexOf(':');
                string name = credentials.Substring(0, separator);
                string password = credentials.Substring(separator + 1);

                if (CheckPassword(name, password))
                {
                    EmployeeServiceDbContext db = new EmployeeServiceDbContext();
                    List<string> Roles = new List<string>();
                    List<Role> roles = db.Users.Where(x => x.Name == name).SelectMany(x => x.Roles).ToList();
                    foreach (var role in roles)
                    {
                        Roles.Add(role.RoleName);
                    }

                    var identity = new GenericIdentity(name);
                    SetPrincipal(new GenericPrincipal(identity, Roles.ToArray()));
                }
                else
                {
                    // Invalid username or password.
                    HttpContext.Current.Response.StatusCode = 401;
                }
            }
            catch (FormatException)
            {
                // Credentials were not formatted correctly.
                HttpContext.Current.Response.StatusCode = 401;
            }
        }

        private static void OnApplicationAuthenticateRequest(object sender, EventArgs e)
        {
            var request = HttpContext.Current.Request;
            var authHeader = request.Headers["Authorization"];
            if (authHeader != null)
            {
                var authHeaderVal = AuthenticationHeaderValue.Parse(authHeader);


                if (authHeaderVal.Scheme.Equals("basic",
                        StringComparison.OrdinalIgnoreCase) &&
                    authHeaderVal.Parameter != null)
                {
                    AuthenticateUser(authHeaderVal.Parameter);
                }
            }
        }

        // If the request was unauthorized, add the WWW-Authenticate header
        // to the response.
        private static void OnApplicationEndRequest(object sender, EventArgs e)
        {
            var response = HttpContext.Current.Response;
            if (response.StatusCode == 401)
            {
                response.Headers.Add("WWW-Authenticate",
                    string.Format("Basic realm=\"{0}\"", Realm));
            }
        }

        public void Dispose()
        {
        }
    }
  }
The code is self explanatory :
• We are registering two events on init() method , OnApplicationAuthenticateRequest event and OnApplicationEndRequest event.
• The first event has used to authenticate the request and setting the principal with roles , in case of Authentication failure ,status code 401 is being sent with response.
• The second event has been used to add www-Authenticate response header with challenge and realm, if response contains 401 status code.
Step 2. To enable the HTTP module, add the following to your web.config file in the system.webServer section:
  <modules>
    <add name="BasicAuthHttpModule"
      type="EmployeeService.HttpModules.BasicAuthHttpModule, EmployeeService"/>
  <modules>
Step 3. Remove (Comment out) CustomRoleProvider that we had added under system.web section previously.
Step 4.Republsih the web API , and disable every Authentication scheme from IIS except anonymous authentication.
Step 5.Add some users and Roles to the EmployeeService database.
  SET IDENTITY_INSERT [dbo].[Role] ON
  INSERT INTO [dbo].[Role] ([RoleId], [RoleName]) VALUES (1, N'Admin')
  INSERT INTO [dbo].[Role] ([RoleId], [RoleName]) VALUES (2, N'CanPost')
  INSERT INTO [dbo].[Role] ([RoleId], [RoleName]) VALUES (3, N'CanGetOnly')
  SET IDENTITY_INSERT [dbo].[Role] OFF
  SET IDENTITY_INSERT [dbo].[User] ON
  INSERT INTO [dbo].[User] ([UserId], [Name], [Password]) VALUES (1, N'Admin', N'Admin123')
  INSERT INTO [dbo].[User] ([UserId], [Name], [Password]) VALUES (2, N'Editor', N'Editor123')
  INSERT INTO [dbo].[User] ([UserId], [Name], [Password]) VALUES (3, N'User', N'User123')
  SET IDENTITY_INSERT [dbo].[User] OFF

  INSERT INTO [dbo].[UserRole] ([UserId], [RoleId]) VALUES (1, 1)
  INSERT INTO [dbo].[UserRole] ([UserId], [RoleId]) VALUES (1, 2)
  INSERT INTO [dbo].[UserRole] ([UserId], [RoleId]) VALUES (2, 2)
  INSERT INTO [dbo].[UserRole] ([UserId], [RoleId]) VALUES (3, 3)
Step 6.In the Jquery Ajax method, pass right credential to Authorization Header , Only the Client with user name as Editor and password Editor123 is in role of CanPost , so modify the Ajax Authorization header as below.
   "headers": {
         "Authorization": "Basic " + btoa("Editor" + ":" + "Editor123"),
       },
At this moment run the client app and you will successfully be able to Get and Post employees. This is how we implement Basic Authentication with Role Based Authorization using Http Modules.
Note: If you pass wrong credential in the JQuery Ajax Authorization Header then , browser will show a Authentication Popup window , this is the default before of browsers. Whenever a browser receives www-Authenticate response header , it opens a Popup window , so make sure you are passing right credential through JQuery Ajax.
Basic Authentication with Http Message Handlers
I strongly recommend you to go through the article
• An HTTP module sees all requests that go through the ASP.NET pipeline. A message handler only sees requests that are routed to Web API.
• You can set per-route message handlers, which lets you apply an authentication scheme to a specific route.
• HTTP modules are specific to IIS. Message handlers are host-agnostic, so they can be used with both web-hosting and self-hosting.
Instead of using the host for authentication, you can put authentication logic into an HTTP message handler. In that case, the message handler examines the HTTP request and sets the principal.
If you have gone through my article onSo Let's create a Message Handler that will add support for the basic authentication to our web API.
Step 1.Create a Folder in the Web API (Employee Service) project and name it as Handlers.
Step 2.Add a class file inside the folder with the Name BasicAuthHandler.
Step 3.Inherit the class from DelegatingHandler and override the SendAsync method like below.
 namespace EmployeeService.Handlers
  {
    public class BasicAuthHandler: DelegatingHandler
    {
        protected override async Task<HttpResponseMessage> SendAsync(HttpRequestMessage request, CancellationToken
          cancellationToken)
        {
           //if the credentials are validated,
            //set CurrentPrincipal and Current.User
            string UserName = null;
            if (ValidateCredentials(request.Headers.Authorization, out UserName))
            {
                 UserRepository ur = new UserRepository();
                 string[] Roles = ur.GetRoles(UserName);
                 IIdentity id = new GenericIdentity(UserName);
                 IPrincipal principal = new GenericPrincipal(id, Roles);
                 SetPrincipal(principal);
            }
            //Execute base.SendAsync to execute default
            //actions and once it is completed,
            //capture the response object and add
            //WWW-Authenticate header if the request
            //was marked as unauthorized.

            //Allow the request to process further down the pipeline
            var response = await base.SendAsync(request, cancellationToken);

            if (response.StatusCode == HttpStatusCode.Unauthorized
                && !response.Headers.Contains("WwwAuthenticate"))
            {
                response.Headers.Add("WwwAuthenticate", "Basic");
            }

            return response;
        }

        private void SetPrincipal(IPrincipal principal)
        {
            Thread.CurrentPrincipal = principal;
            if (HttpContext.Current != null)
            {
                HttpContext.Current.User = principal;
            }
        }

        private bool ValidateCredentials(AuthenticationHeaderValue authenticationHeaderVal, out string Username)
        {
            string userName = null;
            try
            {
                if (authenticationHeaderVal != null
                    && !String.IsNullOrEmpty(authenticationHeaderVal.Parameter))
                {
                    string[] decodedCredentials
                    = Encoding.ASCII.GetString(Convert.FromBase64String(
                    authenticationHeaderVal.Parameter))
                    .Split(new[] { ':' });

                    //now decodedCredentials[0] will contain
                    //username and decodedCredentials[1] will
                    //contain password.
                    userName = decodedCredentials[0];
                    Username = userName;
                    string Password = decodedCredentials[1];

                    UserRepository ur = new UserRepository();
                    return ur.ValidateUser(userName, Password);

                }
                Username = userName;
                return false;//request not authenticated.
            }
            catch
            {
                Username = userName;
                return false;
            }
        }
    }
  }
Step 4.Add the Message Handler to the web API pipeline.
• Go to App_Start folder and open WebApiConfig.cs file.
• Add below lines of code in Register() method to add the Message handler to Message handler collection.
   public static class WebApiConfig
     {
        public static void Register(HttpConfiguration config)
        {

            //var JsonpFormatter = new             JsonpMediaTypeFormatter(config.Formatters.JsonFormatter);
            //config.Formatters.Insert(0, JsonpFormatter);
            // Web API configuration and services

            // Web API routes
            config.MapHttpAttributeRoutes();
            config.EnableCors();
            //add MessageHandlers
            config.MessageHandlers.Add(new BasicAuthHandler());

            config.Routes.MapHttpRoute(
                name: "DefaultApi",
                routeTemplate: "api/{controller}/{id}",
                defaults: new { id = RouteParameter.Optional }
            );
        }
    }
Step 5. Remove (Comment out) the Module section in Web.config, that we have added while doing Authentication using Http Module.
At this moment run the client app (jqueryClient) and you will successfully be able to Get and Post employees. This is how we implement Basic Authentication with Role Based Authorization using Http Message Handler.
Basic Authentication with Authentication Filter
Authentication filters let us set an authentication scheme for individual controllers or actions. That means we can set different authentication mechanisms for different HTTP resources.
In Web API, authentication filters implement the System.Web.Http.Filters.IAuthenticationFilter interface. They should also inherit from System.Attribute, in order to be applied as attributes.
The IAuthenticationFilter interface has two methods:
• AuthenticateAsync authenticates the request by validating credentials in the request, if present.
• ChallengeAsync adds an authentication challenge to the HTTP response, if needed.
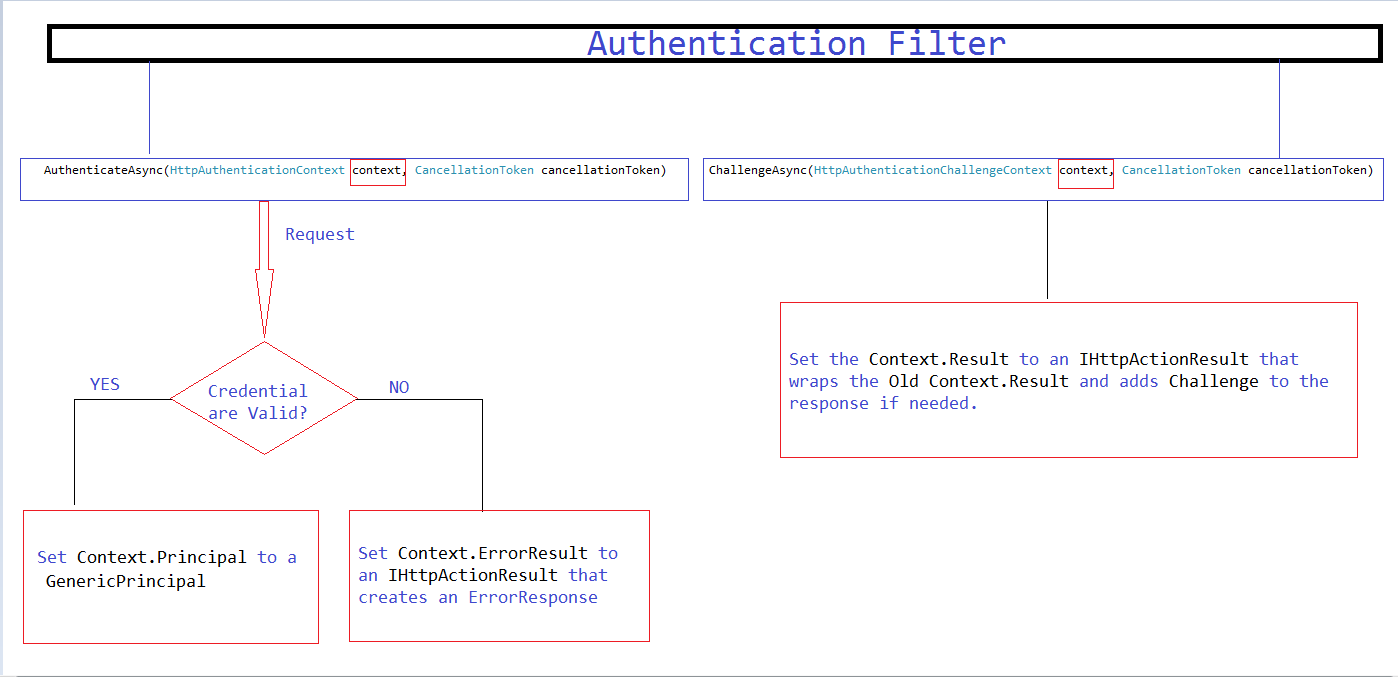
Step 1.See the above diagram 5 times, if you need to zoom it ,please do.
Step 2.Add a folder in your web API project and name it as Filters.
Step 3.Add a class file into the folder and Name it BasicAuthenticationFilter.
Step 4.Inherit the class from Attribute class and IAuthenticationFilter interface.
Step 5. follow the instructions in the diagram ,In order to implement the AuthenticateAsync method.
As you can see, according to the diagram :
1.If the Credential are Valid , we have to set the Context.Principal to GenericPrincipal. so let's first create a method which will verify the credentials in the request.
   private bool ValidateCredentials(AuthenticationHeaderValue authenticationHeaderVal, out string Username)
        {
            string userName = null;
            try
            {
                if (authenticationHeaderVal != null
                    && !String.IsNullOrEmpty(authenticationHeaderVal.Parameter))
                {
                    string[] decodedCredentials
                    = Encoding.ASCII.GetString(Convert.FromBase64String(
                    authenticationHeaderVal.Parameter))
                    .Split(new[] { ':' });

                    //now decodedCredentials[0] will contain
                    //username and decodedCredentials[1] will
                    //contain password.
                    userName = decodedCredentials[0];
                    Username = userName;
                    string Password = decodedCredentials[1];

                    UserRepository ur = new UserRepository();
                    return ur.ValidateUser(userName, Password);

                }
                Username = userName;
                return false;//request not authenticated.
            }
            catch
            {
                Username = userName;
                return false;
            }
        }
The method is simple, it is simply checking whether the user is valid or not and returning the user name as Out parameter. 2.If the credential are not valid , we have to set the context.ErrorResult to an IHttpActionResult that creates an error Response. So let's create a class which implements the IHttpActionResult (ExecuteAsync() method) and creates an error response. Always remember, an Error Response must know about two things :
• The reason lead to the error. ( Reason Phrase)
• The request causing the Error. (Request)
With all these concepts in mind let's create the class , I am going to name the class as AuthenticationFailureResult.
   public class AuthenticationFailureResult : IHttpActionResult
    {
        public AuthenticationFailureResult(string reasonPhrase, HttpRequestMessage request)
        {
            ReasonPhrase = reasonPhrase;
            Request = request;
        }

        public string ReasonPhrase { get; private set; }

        public HttpRequestMessage Request { get; private set; }
        public Task<HttpResponseMessage> ExecuteAsync(CancellationToken cancellationToken)
        {
            HttpResponseMessage response = new HttpResponseMessage(HttpStatusCode.Unauthorized);
            response.RequestMessage = Request;
            response.ReasonPhrase = ReasonPhrase;
            return Task.FromResult(response);
        }
    }
The method is simple, as we have already discussed ,the Error response must know about the request causing the error and the reason leads to that error , we are simply creating an Http Response Message with status code unauthorized and setting the Request Message and Reason Phrase, obviously when we will set the Context.ErrorResult to this IHttpActionResult by creating the object of the above class, we will have to pass the reason and the request.
Now , we have the setup ready and it's time to actually implement the AuthenticateAsync Method.
  public  Task AuthenticateAsync(HttpAuthenticationContext context, CancellationToken cancellationToken)
        {
            // 1. Look for credentials in the request.
            HttpRequestMessage request = context.Request;
            AuthenticationHeaderValue authorization = request.Headers.Authorization;
            string UserName=null;

            if (authorization != null && string.Equals(authorization.Scheme, "Basic", StringComparison.OrdinalIgnoreCase)
    &!string.IsNullOrEmpty(authorization.Parameter))
            {
                if (ValidateCredentials(request.Headers.Authorization, out UserName))
                {
                    UserRepository ur = new UserRepository();
                    string[] Roles = ur.GetRoles(UserName);
                    IIdentity id = new GenericIdentity(UserName);
                    IPrincipal principal = new GenericPrincipal(id, Roles);
                     context.Principal = principal;                }
                else
                {
                    context.ErrorResult = new AuthenticationFailureResult("Invalid username or password", request);
                }

            }
            else
            {
                context.ErrorResult = new AuthenticationFailureResult("Missing auth", context.Request);
            }

          return  Task.FromResult(0);
        }
The code needs no explanation as everything is as per the diagram. We are just setting the context.Principal to a GenericPrincipal if the request is valid, otherwise we are setting the context.ErrorResult to an IHttpActionResult.
Now let's talk about the challengeAsync method, As per the diagram in order to implement the method, we have to first implement an IHttpActionResult which wraps the old context.result and adds challenge to the response if request is not authorized. So, let's create a class and inherit it from IHttpActionResult and implement the ExecuteAsync method accordingly. I am naming the method as AddChallenegeOnUnAuthorizedResult.
   public class AddChallengeOnUnauthorizedResult : IHttpActionResult
    {
        public AddChallengeOnUnauthorizedResult(AuthenticationHeaderValue challenge, IHttpActionResult innerResult)
        {
            Challenge = challenge;
            InnerResult = innerResult;
        }

        public AuthenticationHeaderValue Challenge { get; private set; }

        public IHttpActionResult InnerResult { get; private set; }

        public async Task<HttpResponseMessage> ExecuteAsync(CancellationToken cancellationToken)
        {
            HttpResponseMessage response = await InnerResult.ExecuteAsync(cancellationToken);

            if (response.StatusCode == HttpStatusCode.Unauthorized)
            {
                // Only add one challenge per authentication scheme.
                if (!response.Headers.WwwAuthenticate.Any((h) => h.Scheme == Challenge.Scheme))
                {
                    response.Headers.WwwAuthenticate.Add(Challenge);
                }
            }
            return response;
        }
    }
Obviously , we will have to pass theinnerResult (old context.Result) and challenge when we will create the object of it inside ChallengeAsync method.
Now, when the setup is ready it's time to actually implement the ChallengeAsync method.
     public Task ChallengeAsync(HttpAuthenticationChallengeContext context, CancellationToken cancellationToken)
        {
            var challenge = new AuthenticationHeaderValue("Basic");
            context.Result = new AddChallengeOnUnauthorizedResult(challenge, context.Result);
            return Task.FromResult(0);
        }
The code is self explanatory, everything is according to the diagram only. We are setting the context.Result to an IHttpActionResult which wraps the old context.Result and adds challenge to the response.
The complete implementation of Basic Authentication Filter looks like below.
  namespace EmployeeService.Filters
    {
    public class BasicAuthenticationFilter:Attribute,IAuthenticationFilter
    {
        public  Task AuthenticateAsync(HttpAuthenticationContext context, CancellationToken cancellationToken)
        {
            // 1. Look for credentials in the request.
            HttpRequestMessage request = context.Request;
            AuthenticationHeaderValue authorization = request.Headers.Authorization;
            string UserName=null;

            if (authorization != null && string.Equals(authorization.Scheme, "Basic", StringComparison.OrdinalIgnoreCase)
   &!string.IsNullOrEmpty(authorization.Parameter))
            {
                if (ValidateCredentials(request.Headers.Authorization, out UserName))
                {
                    UserRepository ur = new UserRepository();
                    string[] Roles = ur.GetRoles(UserName);
                    IIdentity id = new GenericIdentity(UserName);
                    IPrincipal principal = new GenericPrincipal(id, Roles);
                    context.Principal = principal;
                }

                else
                {
                    context.ErrorResult = new AuthenticationFailureResult("Invalid username or password", request);
                }

            }
            else
            {
                context.ErrorResult = new AuthenticationFailureResult("Missing auth", context.Request);
            }

          return  Task.FromResult(0);
        }
        public Task ChallengeAsync(HttpAuthenticationChallengeContext context, CancellationToken cancellationToken)
        {
            var challenge = new AuthenticationHeaderValue("Basic");
            context.Result = new AddChallengeOnUnauthorizedResult(challenge, context.Result);
            return Task.FromResult(0);
        }

         private void SetPrincipal(IPrincipal principal)
        {
            Thread.CurrentPrincipal = principal;
            if (HttpContext.Current != null)
            {
                HttpContext.Current.User = principal;
            }
        }


         private bool ValidateCredentials(AuthenticationHeaderValue authenticationHeaderVal, out string Username)
        {
            string userName = null;
            try
            {
                if (authenticationHeaderVal != null
                    && !String.IsNullOrEmpty(authenticationHeaderVal.Parameter))
                {
                    string[] decodedCredentials
                    = Encoding.ASCII.GetString(Convert.FromBase64String(
                    authenticationHeaderVal.Parameter))
                    .Split(new[] { ':' });

                    //now decodedCredentials[0] will contain
                    //username and decodedCredentials[1] will
                    //contain password.
                    userName = decodedCredentials[0];
                    Username = userName;
                    string Password = decodedCredentials[1];

                    UserRepository ur = new UserRepository();
                    return ur.ValidateUser(userName, Password);

                }
                Username = userName;
                return false;//request not authenticated.
            }
            catch
            {
                Username = userName;
                return false;
            }
        }

         public bool AllowMultiple
         {
             get { throw new NotImplementedException(); }
         }
     }

    public class AuthenticationFailureResult : IHttpActionResult
    {
        public AuthenticationFailureResult(string reasonPhrase, HttpRequestMessage request)
        {
            ReasonPhrase = reasonPhrase;
            Request = request;
        }

        public string ReasonPhrase { get; private set; }

        public HttpRequestMessage Request { get; private set; }
        public Task<HttpResponseMessage> ExecuteAsync(CancellationToken cancellationToken)
        {
            HttpResponseMessage response = new HttpResponseMessage(HttpStatusCode.Unauthorized);
            response.RequestMessage = Request;
            response.ReasonPhrase = ReasonPhrase;
            return Task.FromResult(response);
        }
    }
    public class AddChallengeOnUnauthorizedResult : IHttpActionResult
    {
        public AddChallengeOnUnauthorizedResult(AuthenticationHeaderValue challenge, IHttpActionResult innerResult)
        {
            Challenge = challenge;
            InnerResult = innerResult;
        }

        public AuthenticationHeaderValue Challenge { get; private set; }

        public IHttpActionResult InnerResult { get; private set; }

        public async Task<HttpResponseMessage> ExecuteAsync(CancellationToken cancellationToken)
        {
            HttpResponseMessage response = await InnerResult.ExecuteAsync(cancellationToken);

            if (response.StatusCode == HttpStatusCode.Unauthorized)
            {
                // Only add one challenge per authentication scheme.
                if (!response.Headers.WwwAuthenticate.Any((h) => h.Scheme == Challenge.Scheme))
                {
                    response.Headers.WwwAuthenticate.Add(Challenge);
                }
            }

            return response;
        }
    }
  }
The code for User Repository is shown below.
   namespace EmployeeService.Repository
   {
    public class UserRepository
    {
        EmployeeServiceDbContext db = new EmployeeServiceDbContext();
        public static IEnumerable<User> Get()
        {
            List<User> users = new List<User>() {
             new User(){UserId=1,Name="Sachin-PC\\Basic",Roles=new List<Role>(){
                 new Role(){RoleId=1,RoleName="Administrator"},new Role(){RoleId=2,RoleName="CanPost"}}},
              new User(){UserId=2,Name="Vikash",Roles=new List<Role>(){
                 new Role(){RoleId=1,RoleName="Admin"}}},
           };

            return users;

        }


        public  string[] GetRoles(string UserName)
        {
            List<string> allRoles = new List<string>();
            List<Role> roles = db.Users.Where(x => x.Name == UserName).SelectMany(x => x.Roles).ToList();
            foreach (var role in roles)
            {
                allRoles.Add(role.RoleName);
            }
            return allRoles.ToArray();
        }
        public bool ValidateUser(string userName,string Password)
        {
            bool UserExist = db.Users.Any(x => x.Name == userName && x.Password == Password);
            if (UserExist)
            {
                return true;
            }
            return false;
        }
    }
  }
Like other filters, authentication filters can be applied per-controller, per-action, or globally to all Web API controllers. To apply the filter to all Web API controllers, add it to GlobalConfiguration.Filters.
  public static class WebApiConfig
   {
    public static void Register(HttpConfiguration config)
    {
        config.Filters.Add(new BasicAuthenticationFilter());

        // Other configuration code not shown...
    }
  }
At this moment run both the application that is your Client App and web API. Pass the right credential through the Ajax Authorization Header and you will be successfully able to get and create employees.
Basic Authentication with Owin Middleware
OWIN is an acronym for Open Web Interface for .NET. OWIN is just a specification, it’s not a framework that you can download and install or get from NuGet Package Manager. It’s just a specification and it can have many implementations. Katana is one such implementation of OWIN that Microsoft has written for .NET web developers and introduced into the ASP.NET 4 framework release.
We just need to configure OWIN (Katana) into our project as per our requirement. There is currently no Katana middleware provided by Microsoft (e.g.Microsoft.Owin.Security.Basic) that can protect your application using Basic Authentication out of the box. Articles on creating your own OWIN component for basic authentication have been done to death, whether it’s implemented using the AuthenticationHandler middleware class or not. But why implement your own when there’s a perfectly good open-source library tested and maintained by the team behind Identity Server.
First we'll need the following NuGet package:
  Install-Package Thinktecture.IdentityModel.Owin.BasicAuthentication
  Install-Package Microsoft.AspNet.WebApi.OwinSelfHost
  Install-Package Microsoft.Owin.Host.SystemWeb
This will also pull down the required Microsoft.Owin.Security package.
Step 1.Add a class file into the root directory of web API project and name it as Startup.cs
.The middleware requires the usual AuthenticationOptions required by Authentication middleware. This implementation (BasicAuthenticationOptions) requires the realm and a function for validating the username and password that returns a collection of claims. So we can add something like the following to our OWIN Startup class:
  namespace EmployeeService
   {
    public class Startup
    {
        public void Configuration(IAppBuilder app)
        {

            var config = new HttpConfiguration();
            config.MapHttpAttributeRoutes();

            app.UseBasicAuthentication(new BasicAuthenticationOptions("Basic", Authenticate));


            app.UseWebApi(config);
        }

        private Task<IEnumerable<Claim>> Authenticate(string username, string password)
        {
            List<Claim> claims = new List<Claim>();
            UserRepository ur = new UserRepository();
            if(ur.ValidateUser(username,password)){

              var roles=  ur.GetRoles(username);
                foreach (var role in roles){
                    claims.Add(new Claim(ClaimTypes.Role, role));
                }
            }
            // authenticate user

            return Task.FromResult(claims as IEnumerable<Claim>);
        }
    }
  }
Remove (comment out) the Authentication Filter that we had added in the Register() method of webAapiconfig.cs.
  public static class WebApiConfig
   {
    public static void Register(HttpConfiguration config)
    {
       // config.Filters.Add(new BasicAuthenticationFilter());

        // Other configuration code not shown...
    }
 }
At this moment run both the application, pass the right credential to the Authorization header of the Ajax method and you will successfully be able to get and create employees. This is how we can implement role based basic authentication with OWIN middleware.
This was really a big article , but after going through the article you will have a depth knowledge of following:
• Basic Authentication.
• Custom Role provider.
• Authentication Filter.
• IIS Authentication modes.
• How Authorize attribute actually works.
• Http Modules.
• Http Message Handlers and
• How to deploy web API to IIS.