We know C# is itself a Type-Safe Language, meaning the Types of the variables are known at the compile time, so any operation between two unrelated types gives us a compile-time error, which is very good for developers, as they have time to correct the errors during the build time only.
Consider below example
  int x=1;
  string y="Sachin";
  string z= x+y; // Not valid
The third statement is absolutely not valid, as there is no meaning to add a string with an integer, however, we can always concatenate two strings, but the compiler does not know about our actual requirement that whether we want to concatenate both variables as a string or we want to add them, so it throws a compilation time error which is self-explanatory and good.
Getting compilation time error is always good than catching them at run time, This is one of the benefits of Type Safe language. At the same time, if types are known at compilation time, then we can access all the methods and properties of the type easily, visual studio also gives IntelliSense support for our convenience, which makes coding very friendly.
For example if we declare a variable as a string, then we can easily access all methods and properties of the string class on that variable. for example, Length is a property of string, so we can use this property on any variable of type string, similarly, ToUpper() is a method of String class, so we can easily use it.
   string Name="Sachin";
   int length=Name.Length;
   string NameUpper= Name.ToUpper();
Along the same line, Typed variables are always faster than the untyped variable or variable of an object type, consider the below example.
    private bool IsEqual(object x, object y)
        {
            return x.Equals(y);
        }
   bool IsValid= IsEqual(1,2);
The above code will decide whether two values are equal or not, but the Actual Type of variables will be known at Run time and then the compiler will take it's decision. So , we can say Objects are converted into Actual type at Run time , this process is called as unboxing.
Thus, with variables of object type there is one additional disadvantage of boxing and unboxing.
At this time , we know strongly typed variables are always better than the Object Type variables , because of following Reasons
1. Gives intellisense support.
2. Shows error at the compile time.
3. Doesn't do boxing and unboxing. And
4. Class members like properties and Methods become available to use.
Due to all of the above advantages, Ado.Net provides us a way to create Typed DataSets, which has a huge advantage over the untyped dataset, for example, consider below code which has been used to access a column value .
This accesses the EmployeeId column in the first row of the Employees table.
string EmployeeIdValue = EmployeesDataSet.Employees[0].EmployeeId;
In contrast, if you are working with an untyped dataset, the equivalent code is:
string customerIDValue = (string)dataset1.Tables["Customers"].Rows[0]["CustomerID"];
From, the above code, it is very clear that with Typed DataSet, accessing column value becomes much easier, also there is a need for conversion, and we also get the IntelliSense support and the errors are displayed at the compile time itself.
Steps to generate a typed dataset using visual studio
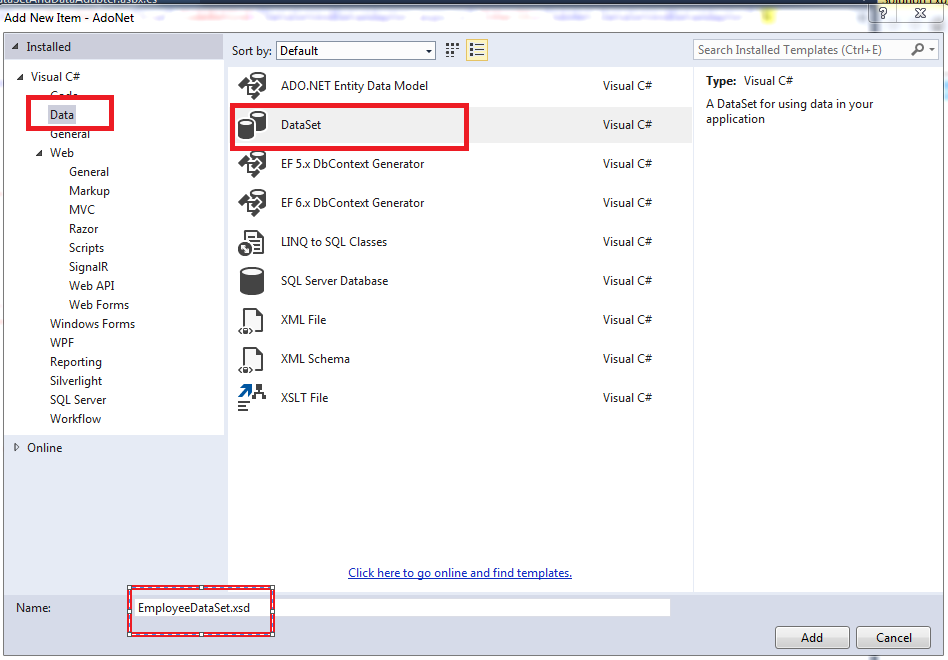
1. Right click on the Project Name in solution explorer and select "Add - New Item"

Update Database Table with TypedDataSet
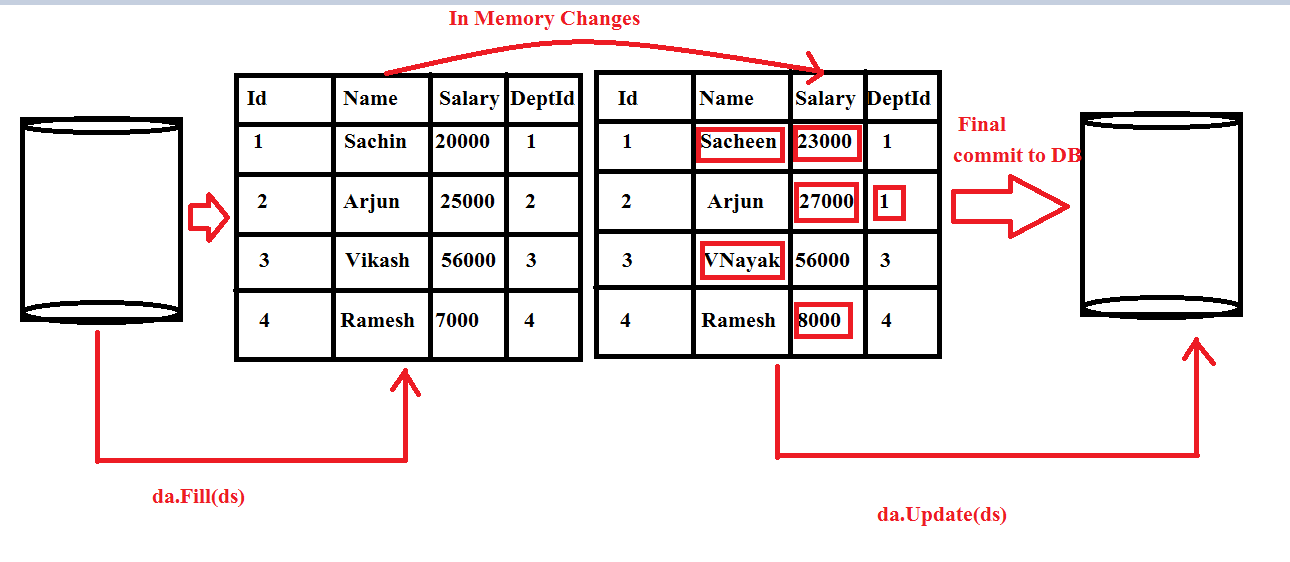
Let's discuss the same requirement that we have discussed in previous article and try to achieve it with strongly Typed DataSet.
Step 1.Retrieve information of all employee from database.
Step 2. Display it in a Gridview.
Step3. Modify some of the information of some or all employee.
Step4. View the changes in a Grid. and when you are completely satisfied with the changes then
Step 5.Commit all the changes in the database in one go.
Go through the figure shown below to understand the steps.
Step 1.Retrieve Data from Database and Bind the Gridview.
    protected void Page_Load(object sender, EventArgs e)
        {
            if (!IsPostBack)
            {
                BindGrid();
            }

        }
        private void BindGrid()
        {
            GridView1.DataSource = GetEmployee();
            GridView1.DataBind();
        }
        private EmployeeDataSet GetEmployee()
        {
            EmployeeDataSet ds = new EmployeeDataSet();
            if (Session["ds"] == null)
            {
                using (SqlConnection con = new SqlConnection(cs))
                {
                    SqlDataAdapter da = new SqlDataAdapter("select * from Employee", con);
                    da.Fill(ds, "Employee");
                }
                Session["ds"] = ds;
                return ds;
            }
             ds = (EmployeeDataSet)Session["ds"];
            return ds;
        }
Step 2.Modify Details and Save Changes to DataSet.
   protected void GridView1_RowEditing(object sender, GridViewEditEventArgs e)
        {
            GridView1.EditIndex = e.NewEditIndex;
            BindGrid();
        }

        protected void GridView1_RowUpdating(object sender, GridViewUpdateEventArgs e)
        {
            EmployeeDataSet ds = GetEmployee();
            ds.Employee[e.RowIndex].Name= e.NewValues[0].ToString();
            ds.Employee[e.RowIndex].Salary = Convert.ToInt32(e.NewValues[1]);
            ds.Employee[e.RowIndex].DepartmentId=Convert.ToInt32(e.NewValues[2]);
            Session["ds"] = ds;
            GridView1.EditIndex = -1;
            BindGrid();
        }

        protected void GridView1_RowCancelingEdit(object sender, GridViewCancelEditEventArgs e)
        {
            GridView1.EditIndex = -1;
            BindGrid();
        }
Step 3.On button update click ,commit all changes to database.
    protected void Button1_Click(object sender, EventArgs e)
        {
            using (SqlConnection con = new SqlConnection(cs))
            {
                SqlDataAdapter da = new SqlDataAdapter("select * from Employee", con);

                SqlCommandBuilder builder = new SqlCommandBuilder(da);
                da.Update((EmployeeDataSet)Session["ds"],"Employee");
            }
        }
Note:- The DataAdapter's Update() method requires an update command to update changes to database, here we have used SqlCommandBuilder object which automatically build update command based on select command used in SqlDataAdapter.
The complete source code looks like below.
The code behind (aspx.cs)
  public partial class StronglyTypedExample : System.Web.UI.Page
    {
        string cs = "Data Source=SACHIN-PC\\SQLEXPRESS;Initial Catalog=Test;Integrated Security=True";
        protected void Page_Load(object sender, EventArgs e)
        {
            if (!IsPostBack)
            {
                BindGrid();
            }

        }
        private void BindGrid()
        {
            GridView1.DataSource = GetEmployee();
            GridView1.DataBind();
        }
        private EmployeeDataSet GetEmployee()
        {
            EmployeeDataSet ds = new EmployeeDataSet();
            if (Session["ds"] == null)
            {
                using (SqlConnection con = new SqlConnection(cs))
                {
                    SqlDataAdapter da = new SqlDataAdapter("select * from Employee", con);
                    da.Fill(ds, "Employee");
                }
                Session["ds"] = ds;
                return ds;
            }
             ds = (EmployeeDataSet)Session["ds"];
            return ds;
        }
        protected void GridView1_RowEditing(object sender, GridViewEditEventArgs e)
        {
            GridView1.EditIndex = e.NewEditIndex;
            BindGrid();
        }

        protected void GridView1_RowUpdating(object sender, GridViewUpdateEventArgs e)
        {
            EmployeeDataSet ds = GetEmployee();
            ds.Employee[e.RowIndex].Name= e.NewValues[0].ToString();
            ds.Employee[e.RowIndex].Salary = Convert.ToInt32(e.NewValues[1]);
            ds.Employee[e.RowIndex].DepartmentId=Convert.ToInt32(e.NewValues[2]);
            Session["ds"] = ds;
            GridView1.EditIndex = -1;
            BindGrid();
        }

        protected void GridView1_RowCancelingEdit(object sender, GridViewCancelEditEventArgs e)
        {
            GridView1.EditIndex = -1;
            BindGrid();
        }

        protected void Button1_Click(object sender, EventArgs e)
        {
            using (SqlConnection con = new SqlConnection(cs))
            {
                SqlDataAdapter da = new SqlDataAdapter("select * from Employee", con);
                SqlCommandBuilder builder = new SqlCommandBuilder(da);
                da.Update((EmployeeDataSet)Session["ds"],"Employee");
            }
        }
    }
Aspx page
<form id="form1" runat="server">
    <div>
        <asp:GridView ID="GridView1" runat="server" AutoGenerateColumns="False" DataKeyNames="Id"
         OnRowCancelingEdit="GridView1_RowCancelingEdit" OnRowEditing="GridView1_RowEditing" OnRowUpdating="GridView1_RowUpdating">
            <Columns>
                <asp:CommandField ShowEditButton="True" />
                <asp:BoundField DataField="Id" HeaderText="Id" InsertVisible="False" ReadOnly="True" SortExpression="Id" />
                <asp:BoundField DataField="Name" HeaderText="Name" SortExpression="Name" />
                <asp:BoundField DataField="Salary" HeaderText="Salary" SortExpression="Salary" />
                <asp:BoundField DataField="DepartmentId" HeaderText="DepartmentId" SortExpression="DepartmentId" />
            </Columns>
        </asp:GridView>
        <br />
        <asp:Button ID="Button1" runat="server" Text="Commit Changes to Database" OnClick="Button1_Click" />
    </div>
    </form>
Now, Run the application and Modify some records, on Update button click , you will be successfully able to save changes to the database at one go.
So,What are strongly typed datasets
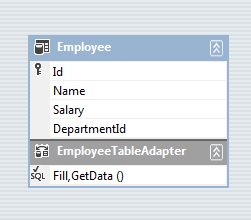
A typed dataset is derived from the base DataSet class, so it inherits all of the functionality of the DataSet class. A typed DataSet is generated with the help of Dataset Designer, which is stored in a .xsd file, As soon as we drop the table into the designer area, it first collects all the necessary information from the schema like tables, columns, and so on then compile that into a new dataset class as a set of first-class objects and properties.
In Brief, we can conclude
1. Strongly Typed Dataset is generated based on the Database Schema.
2. Strongly Typed Dataset derive form DataSet
3. Like an ORM tool converts tables to classes, In a strongly typed dataset the table columns become the properties of the DataSet class.
Advantage of using strongly typed datasets over untyped datasets
Since, in a strongly typed dataset the database table columns become properties and the type associated with each column is also known at design time
1. Development is much easier as we will have intellisense
2. Any errors related to misspell column names can be detected at compile time, rather than at runtime.