In order to understand SqlCommandBuilder , observe the figure shown below.
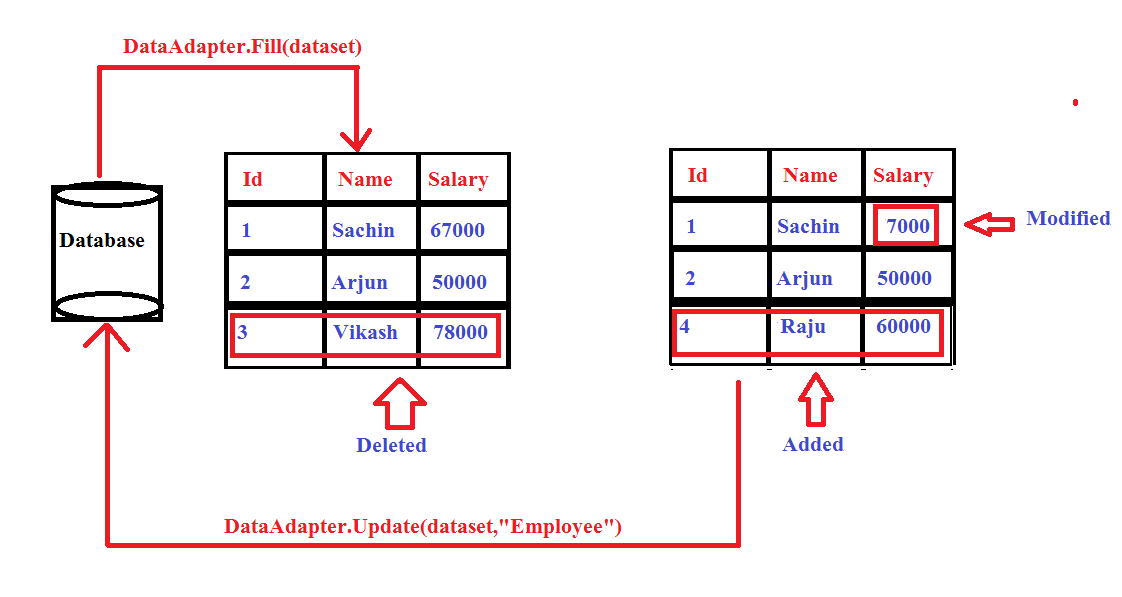
From the above figure, You can notice , three changes has been made to dataset since the last time it was loaded
1. the salary column of First row has been Modified.
2. the third row has been deleted and
3. A new row has been added to the dataset
ADO.NET command builder
Now , if we want to update database based on these changes then , we will have to provide Insert,Update and Delete T-Sql query to the DataAdapter, Because The SqlDataAdapter does not automatically generate the Transact-SQL statements required to reconcile changes made to a DataSet with the associated instance of SQL Server. If we don't want to write all transact_SQL statements by our self ,then we use SqlCommandBuilder object.
SqlCommandBuilder automatically generates INSERT, UPDATE and DELETE sql statements based on the SELECT statement for a single table ,meaning if you set the SelectCommand property of the SqlDataAdapter. Then, the rest of the necessary Transact-SQL statements that you do not set are automatically generated by the SqlCommandBuilder.
We need to follow just three simple steps to generate necessary T-SQL using SqlCommandBuilder
Step 1. Set the "SelectCommand" property of the SqlDataAdapter object
    SqlDataAdapter dataAdapter = new SqlDataAdapter();
    dataAdapter.SelectCommand = new SqlCommand("SELECT_Query", con);
Step 2. Create an instance of SqlCommandBuilder class .
Step 3.Associate the SqlDataAdapter object using DataAdapter property of the SqlCommandBuilder object.
    SqlCommandBuilder builder = new SqlCommandBuilder();
    builder.DataAdapter = dataAdapter;
Please Note: we can also achieve the stpe 2 with just one line of code by passing in the SqlDataAdapter instance as an argument to SqlCommandBuilder class constructor as shown below
SqlCommandBuilder builder = new SqlCommandBuilder(dataAdapter);
Example
Step 1.Retrieve information of all employee from database.Step 2. Display it in a Gridview.
Step3. Modify some of the information of some or all employee.
Step4. Add a new record to the dataset
Step5. Delete some Rows from DataSet
Step4. View the changes in a Grid. and when you are completely satisfied with the changes then
Step 5.Commit all the changes in the database in one go.
Following Table have been used in the above example, Open SQL Server Management Studio and Run below script, it will create a database with the name Test and Two tables Employee and Department and populate them with some Test Data.
   CREATE TABLE [dbo].[Department] (
    [Id]   INT          IDENTITY (1, 1) NOT NULL,
    [Name] VARCHAR (50) NULL,
    CONSTRAINT [PK_Department] PRIMARY KEY CLUSTERED ([Id] ASC)
   );
  CREATE TABLE [dbo].[Employee] (
    [Id]           INT          IDENTITY (1, 1) NOT NULL,
    [Name]         VARCHAR (50) NULL,
    [Salary]       INT          NULL,
    [DepartmentId] INT          NULL,
    CONSTRAINT [PK_Employee] PRIMARY KEY CLUSTERED ([Id] ASC),
    CONSTRAINT [FK_Employee_Department] FOREIGN KEY ([DepartmentId]) REFERENCES [dbo].[Department] ([Id])
    );
  SET IDENTITY_INSERT [dbo].[Department] ON
  INSERT INTO [dbo].[Department] ([Id], [Name]) VALUES (1, N'HR')
  INSERT INTO [dbo].[Department] ([Id], [Name]) VALUES (2, N'Development')
  INSERT INTO [dbo].[Department] ([Id], [Name]) VALUES (3, N'Database')
  INSERT INTO [dbo].[Department] ([Id], [Name]) VALUES (4, N'Business')
  SET IDENTITY_INSERT [dbo].[Department] OFF
  SET IDENTITY_INSERT [dbo].[Employee] ON
  INSERT INTO [dbo].[Employee] ([Id], [Name], [Salary], [DepartmentId]) VALUES (1, N'sachin', 100000, 1)
  INSERT INTO [dbo].[Employee] ([Id], [Name], [Salary], [DepartmentId]) VALUES (2, N'arjun', 23000, 1)
  INSERT INTO [dbo].[Employee] ([Id], [Name], [Salary], [DepartmentId]) VALUES (3, N'vikash', 30000, 2)
  INSERT INTO [dbo].[Employee] ([Id], [Name], [Salary], [DepartmentId]) VALUES (4, N'pocha', 43000, 3)
  INSERT INTO [dbo].[Employee] ([Id], [Name], [Salary], [DepartmentId]) VALUES (5, N'Nivedita', 24000, 4)
  SET IDENTITY_INSERT [dbo].[Employee] OFF
Step 1.Retrieve Data from Database and Bind the Gridview.
    private DataSet GetEmployee()
        {
            DataSet ds = new DataSet();
            using (SqlConnection con = new SqlConnection(cs))
            {
                SqlDataAdapter da = new SqlDataAdapter("select * from Employee",con);
                da.Fill(ds);
            }
            Cache["ds"] = ds;
            return ds;
        }
     private void BindGrid()
        {
            if (Cache["ds"] != null)
            {
                GridView1.DataSource = (DataSet)Cache["ds"];
                GridView1.DataBind();
            }
            else
            {
                GridView1.DataSource = GetEmployee();
                GridView1.DataBind();
            }
        }
Step 2.Modify Details and Save Changes to DataSet.
    protected void GridView1_RowEditing(object sender, GridViewEditEventArgs e)
        {
            GridView1.EditIndex = e.NewEditIndex;
            BindGrid();
        }

        protected void GridView1_RowUpdating(object sender, GridViewUpdateEventArgs e)
         {
            DataSet ds = (DataSet)Cache["ds"];
            DataRow dr = ds.Tables[0].Rows[e.RowIndex];
            dr[1] = e.NewValues[0].ToString();
            dr[2] = e.NewValues[1].ToString();
            dr[3] = Convert.ToInt32(e.NewValues[2]);
            Cache["ds"] = ds;
            GridView1.EditIndex = -1;
            BindGrid();
        }

        protected void GridView1_RowCancelingEdit(object sender, GridViewCancelEditEventArgs e)
        {
            GridView1.EditIndex = -1;
            BindGrid();
        }
Step 3.Delete Rows and save changes to DataSet.
     protected void GridView1_RowDeleting(object sender, GridViewDeleteEventArgs e)
        {
            DataSet ds = (DataSet)Cache["ds"];
            DataRow dr = ds.Tables[0].Rows[e.RowIndex];
            ds.Tables[0].Rows.Remove(dr);
            Cache["ds"] = ds;
            BindGrid();
        }
Step 4.Insert new and save changes to database.
     protected void Button1_Click(object sender, EventArgs e)
        {
            DataSet ds = (DataSet)Cache["ds"];
            DataTable dt = ds.Tables[0];
            DataRow dr = dt.NewRow();
            dr[0] = ds.Tables[0].Rows.Count + 1; // this has no impact , it is just to look dataset good

            dr[1] = txtName.Text;
            dr[2] = Convert.ToInt32(txtSalary.Text);
            dr[3] = Convert.ToInt32(ddlDepartment.SelectedItem.Value);
            dt.Rows.Add(dr);
            Cache["ds"] = ds;
            BindGrid();
        }
     protected void Button2_Click(object sender, EventArgs e)
        {
            using (SqlConnection con = new SqlConnection(cs))
            {
                SqlDataAdapter da = new SqlDataAdapter("select * from Employee", con);
                SqlCommandBuilder builder = new SqlCommandBuilder(da);
                da.Update((DataSet)Cache["ds"]);
            }
        }
The complete source code looks like below.
The code behind (aspx.cs)
   public partial class DataSetAndDataAdapter : System.Web.UI.Page
    {
        string cs = "Data Source=SACHIN-PC\\SQLEXPRESS;Initial Catalog=Test;Integrated Security=True";
        protected void Page_Load(object sender, EventArgs e)
        {
            if(!IsPostBack){
                BindGrid();
                BindDepartment();
            }
        }

        private void BindDepartment()
        {
            DataSet ds = new DataSet();
            using (SqlConnection con = new SqlConnection(cs))
            {
                SqlDataAdapter da = new SqlDataAdapter("select * from Department", con);
                da.Fill(ds);
            }
            ListItem li = new ListItem() { Text = "Please Select", Value = "-1" };
            ddlDepartment.Items.Insert(0, li);
            ddlDepartment.DataSource = ds;
            ddlDepartment.DataBind();
        }
        private void BindGrid()
        {
            GridView1.DataSource = GetEmployee();
            GridView1.DataBind();
        }

        private DataSet GetEmployee()
        {
            DataSet ds = new DataSet();
            if (Cache["ds"] == null)
            {
                using (SqlConnection con = new SqlConnection(cs))
                {
                    SqlDataAdapter da = new SqlDataAdapter("select * from Employee", con);
                    da.Fill(ds,"Employee");
                    // Set ID column as the primary key
                    ds.Tables["Employee"].PrimaryKey =
                        new DataColumn[] { ds.Tables["Employee"].Columns["Id"] };
                }
                Cache["ds"] = ds;
            }
            ds = (DataSet)Cache["ds"];
            return ds;
        }


        protected void GridView1_RowEditing(object sender, GridViewEditEventArgs e)
        {
            GridView1.EditIndex = e.NewEditIndex;
            BindGrid();
        }

        protected void GridView1_RowUpdating(object sender, GridViewUpdateEventArgs e)
        {
            DataSet ds = (DataSet)Cache["ds"];
            DataRow dr = ds.Tables[0].Rows.Find(e.Keys["Id"]);// find row using primary key
            dr[1] = e.NewValues[0].ToString();
            dr[2] = e.NewValues[1].ToString();
            dr[3] = Convert.ToInt32(e.NewValues[2]);
            Cache["ds"] = ds;
            GridView1.EditIndex = -1;
            BindGrid();
        }

        protected void GridView1_RowCancelingEdit(object sender, GridViewCancelEditEventArgs e)
        {
            GridView1.EditIndex = -1;
            BindGrid();
        }

        protected void Button2_Click(object sender, EventArgs e)
        {
            using (SqlConnection con = new SqlConnection(cs))
            {
                SqlDataAdapter da = new SqlDataAdapter("select * from Employee", con);
                SqlCommandBuilder builder = new SqlCommandBuilder(da);
                da.Update((DataSet)Cache["ds"],"Employee");
                lblMessage.Text = "Database updated successfully";
                lblMessage.ForeColor = System.Drawing.Color.Green;
            }
        }

        protected void Button1_Click(object sender, EventArgs e)
        {
            DataSet ds = (DataSet)Cache["ds"];
            DataTable dt = ds.Tables[0];
            DataRow dr = dt.NewRow();
            dr[0] = ds.Tables[0].Rows.Count + 1; // this has no impact , it is just to look dataset good
            dr[1] = txtName.Text;
            dr[2] = Convert.ToInt32(txtSalary.Text);
            dr[3] = Convert.ToInt32(ddlDepartment.SelectedItem.Value);
            dt.Rows.Add(dr);
            Cache["ds"] = ds;
            BindGrid();
        }

        protected void GridView1_RowDeleting(object sender, GridViewDeleteEventArgs e)
        {
            DataSet ds = (DataSet)Cache["ds"];
            DataRow dr = ds.Tables[0].Rows[e.RowIndex];
            ds.Tables[0].Rows.Remove(dr);
            Cache["ds"] = ds;
            BindGrid();
        }
    }
Aspx page
   <form id="form1" runat="server">
    <div>
        <table>
            <tr>
                <td>Name</td>
                <td> <asp:TextBox ID="txtName" runat="server"></asp:TextBox></td>
            </tr>
            <tr>
                <td>Salary</td>
                <td><asp:TextBox ID="txtSalary" runat="server"></asp:TextBox></td>
            </tr>
            <tr>
                <td>Department</td>
                <td>
                    <asp:DropDownList ID="ddlDepartment" runat="server" DataTextField="Name" DataValueField="Id"></asp:DropDownList>
                </td>
            </tr>
           <tr>
               <td colspan="2">
                     <asp:Button ID="Button1" runat="server" Text="Insert" OnClick="Button1_Click" />
               </td>
           </tr>
        </table>
        <asp:GridView ID="GridView1" runat="server" AutoGenerateColumns="False" DataKeyNames="Id"
       OnRowCancelingEdit="GridView1_RowCancelingEdit" OnRowEditing="GridView1_RowEditing" OnRowUpdating="GridView1_RowUpdating"
        OnRowDeleting="GridView1_RowDeleting">
            <Columns>
                <asp:CommandField ShowEditButton="True" ShowDeleteButton="true" />
                <asp:BoundField DataField="Id" HeaderText="Id" InsertVisible="False" ReadOnly="True" SortExpression="Id" />
                <asp:BoundField DataField="Name" HeaderText="Name" SortExpression="Name" />
                <asp:BoundField DataField="Salary" HeaderText="Salary" SortExpression="Salary" />
                <asp:BoundField DataField="DepartmentId" HeaderText="DepartmentId" SortExpression="DepartmentId" />
            </Columns>
        </asp:GridView>
        <asp:Label ID="lblMessage" runat="server" Text=""></asp:Label>
        <br />
        <asp:Button ID="Button2" runat="server" Text="Updata Database" OnClick="Button2_Click" />
    </div>
    </form>
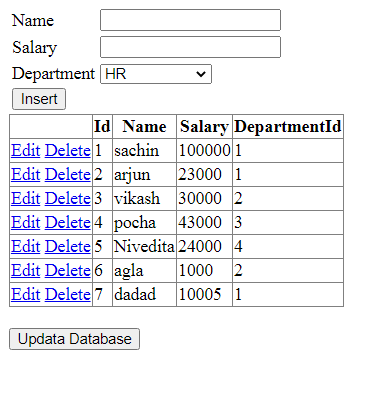
Now, Run the application and Modify some records,delete some records and add new records, on Update button click , you will be successfully able to save changes to the database at one go.
For troubleshooting, testing or performance tunning purposes, if you want to see the autogenerated commands, then follow below code
To see the generated INSERT statements use GetInsertCommand()
string insertQuery = builder.GetInsertCommand().CommandText;
To see the generated Update statements use GetUpdateCommand()
string updateQuery = builder.GetUpdateCommand().CommandText;
To see the generated Delete statements use GetDeleteCommand()
string deleteQuery = builder.GetDeleteCommand().CommandText;