To understand DataSet and DataAdapter, first we need to understand the types of relation between the .NET application and the data source. Consider the following scenario where:
- Step 1. You have to retrieve information of all employees from the database.
- Step 2. Display it in a Gridview.
- Step3. Modify some of the information of some or all employees.
- Step4. View the changes in a grid.
- Step 5.When you are completely satisfied with the changes, commit all the changes in the database in one go.
How do you think you will achieve this requirement?
If you use SqlDataReader to read data from database and ExecuteNonQuery() method of SqlCommand class to save changes to database, it becomes very tough to achieve the above requirement, because SqlDataReader and SqlCommand requires an open and active connection throughout the life time of operation, meaning any changes will not be saved in memory temporarily rather the changes will immediately commit to database as soon as ExecuteNonQuery will execute the command.
But in our case, we want to commit changes to the database after being assured that the changes are as per the requirement, and meanwhile, we want to store the changes somewhere in memory temporarily.
That is why the ADO.NET framework supports two models of Data Access Architecture:
- Connected architecture or Connection Oriented Data Access Architecture and
- Disconnected architecture or Disconnected Data Access Architecture.
In Connection Oriented Architecture, the application establishes a connection to the data source and interacts with it through SQL requests using that connection. The problem is that the application remains connected to the database, even when it is not performing any database operations.
On the other hand, with the disconnected approach, we don't need to maintain a connection to the data source.
So we can say that a connected mode of operation in ADO.NET is one in which the connection to the underlying database is alive throughout the lifetime of the operation. Whereas a disconnected mode of operation is one in which ADO.Net retrieves data from the underlying database, stores the retrieved data temporarily in memory, and then closes the connection to the database.
SqlDataReader and SqlCommand objects are used for connection oriented architecture but Dataset and SqlDataAdapter are used in disconnected data access architecture.
ADO.Net DataSet
You can think of a DataSet as an in-memory data store that stores tables, just like a database does. A DataSet can store multiple tables simultaneously. DataSets only hold data but do not interact with the data source; it does not know the data source. It is the SqlDataAdapter that performs all the connection-related work.
With DataSet, the connections are opened only for a certain amount of time as long as the DataSet needs it, then the DataAdapter closes the connection, and in this way it provides security to the database and, along the same line, reduces the impact on the server
DataSet Class Signature
public class DataSet : System.ComponentModel.MarshalByValueComponent, System.ComponentModel.IListSource, System.ComponentModel.ISupportInitializeNotification, System.Runtime.Serialization.ISerializable, System.Xml.Serialization.IXmlSerializable
ADO.NET DataAdapter
In Connection-Oriented Data Access, we use a DataReader that requires an open and active connection to the data source. However, unlike the DataReader, the DataSet is not connected directly to a data source through a connection object when we populate it. Then, who opens the connection, executes the command, fills the DataSet and closes the connection?
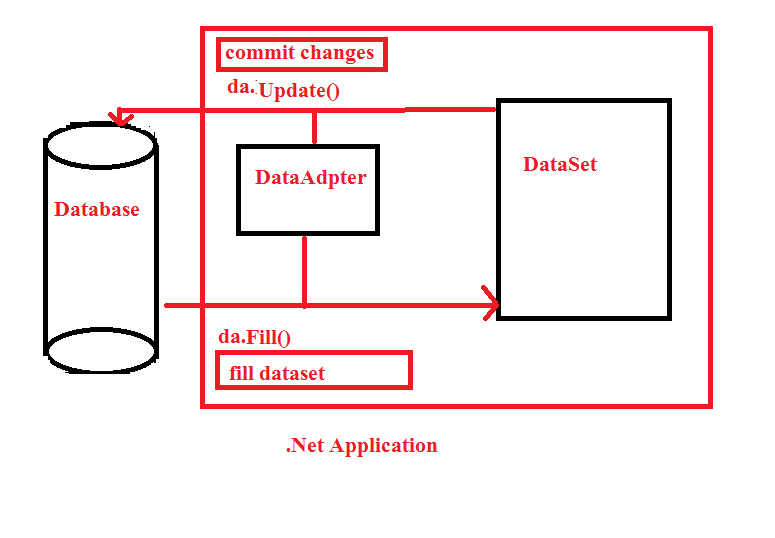
It is the DataAdapter that manages the connection between the data source and the dataset and fills the data from the data source to the dataset. In short, the SqlDataAdapter is the one that gives a disconnected behavior to the dataset. Thus, we can say that the DataAdapter acts as a bridge between connected and disconnected objects. We know that every change we make to the DataSet doesn't reflect in the database; it is just stored in memory. When we are sure, we can commit all the changes to the database by using DataAdapter's Update() method.
How to work with DataSet and DataAdapter?
In our previous articles, we have discussed about SqlCommand object. To create an instance of the SqlCommand class, we need to pass two parameters to the SqlCommand class constructor:
- First, the command (T-SQL) that we want to execute.
- The SqlConnection object specifies on which data source we want to execute the command.
- The SQL command or T-SQL that we want to execute.
- The connection object that specifies the connection on which we want to execute the command.
In the example shown below:
- First, we are creating an instance of SqlDataAdapter, where we are passing in the required parameters like SqlCommandText and the Connection object.
- Then, we are creating an instance of the DataSet object.
- Finally, the Fill() method of the SqlDataAdapter class is being invoked. The Fill() method performs most of the work, including opening the connection to the database, executing the SQL command, populating the dataset with data, and then closing the connection. Opening and closing of connections are handled for us. The DataAdapter keeps the connection open only as long as it is needed.
- The dataset object, is then assigned as DataSource of the GridView1 control.
- Finally, we are calling DataBind() method that binds the data to the GridView control.
using (SqlConnection con = new SqlConnection("Data Source=SACHIN-PC\\SQLEXPRESS;Initial Catalog=Test;Integrated Security=True"))
{
SqlDataAdapter da= new SqlDataAdapter("select * from Employee", con);
DataSet ds = new DataSet();
da.Fill(ds);
GridView1.DataSource = ds;
GridView1.DataBind();
}
Why is it called disconnected when we need a connection to fill the data?
Many beginners ask me this question: when we still need a SqlConnection, even if we are using SqlDataAdapter and DataSet, then how does it give a disconnected mechanism?
The answer is, we only need a connection to fill the DataSet, and then there is no need for a connection. The DataAdapter automatically closes the connection, and after that, any changes made to DataSet don't commit to the database until we call the Update() method of SqlDataAdapter, thus it gives us a disconnected model.
How to Execute Stored Procedure using the SqlDataAdapter?
Let's first create a Stored Procedure to fetch all employees from the Employee table of the test database.
Create procedure spGetEmployee
as
Begin
Select * from Employee
End
If you want to execute a stored procedure spGetEmployee, using the SqlDataAdapter, specify the name of the procedure instead of the in-line SQL statement.
using (SqlConnection con = new SqlConnection("Data Source=SACHIN-PC\\SQLEXPRESS;Initial Catalog=Test;Integrated Security=True"))
{
SqlDataAdapter da = new SqlDataAdapter("spGetEmployee ", con);
da.SelectCommand.CommandType = CommandType.StoredProcedure;
DataSet ds = new DataSet();
dataAdapter.Fill(ds);
GridView1.DataSource = ds;
GridView1.DataBind();
}
How to Execute a Stored Procedure with parameters using SqlDataAdapter?
Create procedure spGetEmployeesByDepartment
@DepartmentId  int
as
Begin
Select * from Employee
where DepartmentId = @DepartmentId
End
To execute a stored procedure spGetEmployeesByDepartment, we need to associate parameter @EmployeeId to the SqlDataAdapter object's SelectCommand as shown below:
using (SqlConnection con = new SqlConnection("Data Source=SACHIN-PC\\SQLEXPRESS;Initial Catalog=Test;Integrated Security=True"))
{
SqlDataAdapter da = new SqlDataAdapter("spGetEmployeesByDepartment ", con);
da.SelectCommand.CommandType = CommandType.StoredProcedure;
da.SelectCommand.Parameters.AddWithValue("@DepartmentId ", 1);
DataSet dataset = new DataSet();
dataAdapter.Fill(dataset);
GridView1.DataSource = dataset;
GridView1.DataBind();
}
The following table has been used in the above example. Open the SQL Server Management Studio and run the following script. It will create a database named 'Test' with two tables, 'Employee' and 'Department', and populate them with some test data.
CREATE TABLE [dbo].[Department] (
[Id]   INT          IDENTITY (1, 1) NOT NULL,
[Name] VARCHAR (50) NULL,
CONSTRAINT [PK_Department] PRIMARY KEY CLUSTERED ([Id] ASC)
);
CREATE TABLE [dbo].[Employee] (
[Id]           INT          IDENTITY (1, 1) NOT NULL,
[Name]         VARCHAR (50) NULL,
[Salary]       INT          NULL,
[DepartmentId] INT          NULL,
CONSTRAINT [PK_Employee] PRIMARY KEY CLUSTERED ([Id] ASC),
CONSTRAINT [FK_Employee_Department] FOREIGN KEY ([DepartmentId]) REFERENCES [dbo].[Department] ([Id])
);
SET IDENTITY_INSERT [dbo].[Department] ON
INSERT INTO [dbo].[Department] ([Id], [Name]) VALUES (1, N'HR')
INSERT INTO [dbo].[Department] ([Id], [Name]) VALUES (2, N'Development')
INSERT INTO [dbo].[Department] ([Id], [Name]) VALUES (3, N'Database')
INSERT INTO [dbo].[Department] ([Id], [Name]) VALUES (4, N'Business')
SET IDENTITY_INSERT [dbo].[Department] OFF
SET IDENTITY_INSERT [dbo].[Employee] ON
INSERT INTO [dbo].[Employee] ([Id], [Name], [Salary], [DepartmentId]) VALUES (1, N'sachin', 100000, 1)
INSERT INTO [dbo].[Employee] ([Id], [Name], [Salary], [DepartmentId]) VALUES (2, N'arjun', 23000, 1)
INSERT INTO [dbo].[Employee] ([Id], [Name], [Salary], [DepartmentId]) VALUES (3, N'vikash', 30000, 2)
INSERT INTO [dbo].[Employee] ([Id], [Name], [Salary], [DepartmentId]) VALUES (4, N'pocha', 43000, 3)
INSERT INTO [dbo].[Employee] ([Id], [Name], [Salary], [DepartmentId]) VALUES (5, N'Nivedita', 24000, 4)
SET IDENTITY_INSERT [dbo].[Employee] OFF
How to change the Table Name inside DataSet?
If an SQL query returns two result sets, then each will be stored as a different table in DataSet. By default the tables in the DataSet will have table names as Table, Table1, Table2 etc. So, if you want to give the tables in the DataSet a meaningful name, we use the TableName property, as shown below:
dataset.Tables[0].TableName = "Employee";
dataset.Tables[1].TableName = "Department";
These table names can then be used when binding to a GridView control, instead of using the integral indexer, which makes your code more readable and maintainable.
GridViewEmployee.DataSource = dataset.Tables["Employee"];
GridViewEmployee.DataBind();
GridViewDepartment.DataSource = dataset.Tables["Department"];
GridViewDepartment.DataBind();
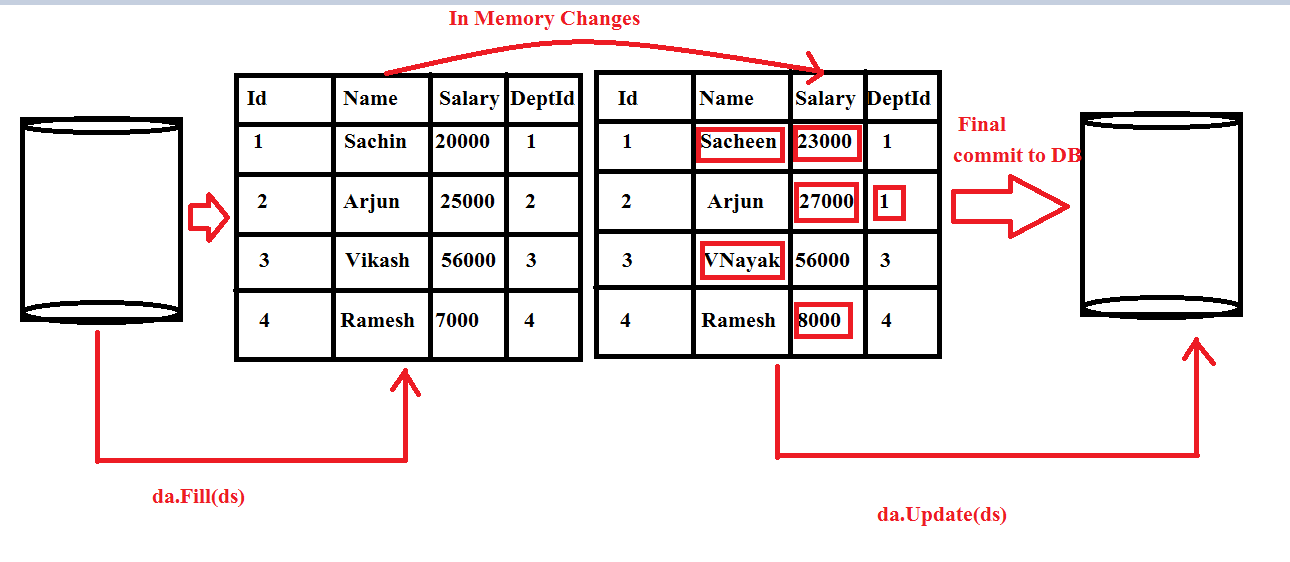
Let's come to the requirement with which we have started the article. We have to retrieve all Employee table data and display it in a GridView, and after modifying some of the details of some employee, we have to save the changes in the database in one go.
Now, we know how the DataAdapter works and how it fills the DataSet, which is an in-memory store, so it becomes very easy to achieve the requirement. Refer to the figure below to understand the steps:
- Step 1. Retrieve Data from Database and Bind the Gridview.
private DataSet GetEmployee()
{
DataSet ds = new DataSet();
using (SqlConnection con = new SqlConnection(cs))
{
SqlDataAdapter da = new SqlDataAdapter("select * from Employee",con);
da.Fill(ds);
}
Cache["ds"] = ds;
return ds;
}
private void BindGrid()
{
if (Cache["ds"] != null)
{
GridView1.DataSource = (DataSet)Cache["ds"];
GridView1.DataBind();
}
else
{
GridView1.DataSource = GetEmployee();
GridView1.DataBind();
}
}
protected void GridView1_RowEditing(object sender, GridViewEditEventArgs e)
{
GridView1.EditIndex = e.NewEditIndex;
BindGrid();
}
protected void GridView1_RowUpdating(object sender, GridViewUpdateEventArgs e)
{
DataSet ds = (DataSet)Cache["ds"];
DataRow dr = ds.Tables[0].Rows[e.RowIndex];
dr[1] = e.NewValues[0].ToString();
dr[2] = e.NewValues[1].ToString();
dr[3] = Convert.ToInt32(e.NewValues[2]);
Cache["ds"] = ds;
GridView1.EditIndex = -1;
BindGrid();
}
protected void GridView1_RowCancelingEdit(object sender, GridViewCancelEditEventArgs e)
{
GridView1.EditIndex = -1;
BindGrid();
}
protected void Button2_Click(object sender, EventArgs e)
{
using (SqlConnection con = new SqlConnection(cs))
{
SqlDataAdapter da = new SqlDataAdapter("select * from Employee", con);
SqlCommandBuilder builder = new SqlCommandBuilder(da);
da.Update((DataSet)Cache["ds"]);
}
}
Note: The DataAdapter's Update() method requires an update command to update changes to database. Here, we have used a SqlCommandBuilder object, which automatically builds an Update command based on the Select command used in a DataAdapter.
The complete source code looks like below:
The Code Behind (aspx.cs)
public partial class DataSetAndDataAdapter : System.Web.UI.Page
{
string cs = "Data Source=SACHIN-PC\\SQLEXPRESS;Initial Catalog=Test;Integrated Security=True";
protected void Page_Load(object sender, EventArgs e)
{
if(!IsPostBack)
{
BindGrid();
}
}
private DataSet GetEmployee()
{
DataSet ds = new DataSet();
using (SqlConnection con = new SqlConnection(cs))
{
SqlDataAdapter da = new SqlDataAdapter("select * from Employee",con);
da.Fill(ds);
}
Cache["ds"] = ds;
return ds;
}
private void BindGrid()
{
if (Cache["ds"] != null)
{
GridView1.DataSource = (DataSet)Cache["ds"];
GridView1.DataBind();
}
else
{
GridView1.DataSource = GetEmployee();
GridView1.DataBind();
}
}
protected void GridView1_RowEditing(object sender, GridViewEditEventArgs e)
{
GridView1.EditIndex = e.NewEditIndex;
BindGrid();
}
protected void GridView1_RowUpdating(object sender, GridViewUpdateEventArgs e)
{
DataSet ds = (DataSet)Cache["ds"];
DataRow dr = ds.Tables[0].Rows[e.RowIndex];
dr[1] = e.NewValues[0].ToString();
dr[2] = e.NewValues[1].ToString();
dr[3] = Convert.ToInt32(e.NewValues[2]);
Cache["ds"] = ds;
GridView1.EditIndex = -1;
BindGrid();
}
protected void GridView1_RowCancelingEdit(object sender, GridViewCancelEditEventArgs e)
{
GridView1.EditIndex = -1;
BindGrid();
}
protected void Button2_Click(object sender, EventArgs e)
{
using (SqlConnection con = new SqlConnection(cs))
{
SqlDataAdapter da = new SqlDataAdapter("select * from Employee", con);
SqlCommandBuilder builder = new SqlCommandBuilder(da);
da.Update((DataSet)Cache["ds"]);
}
}
}
Aspx Page
<form id="form1" runat="server">
<div>
<asp:GridView ID="GridView1" runat="server" AutoGenerateColumns="False" DataKeyNames="Id"
OnRowCancelingEdit="GridView1_RowCancelingEdit" OnRowEditing="GridView1_RowEditing" OnRowUpdating="GridView1_RowUpdating">
<Columns>
<asp:CommandField ShowEditButton="True" />
<asp:BoundField DataField="Id" HeaderText="Id" InsertVisible="False" ReadOnly="True" SortExpression="Id" />
<asp:BoundField DataField="Name" HeaderText="Name" SortExpression="Name" />
<asp:BoundField DataField="Salary" HeaderText="Salary" SortExpression="Salary" />
<asp:BoundField DataField="DepartmentId" HeaderText="DepartmentId" SortExpression="DepartmentId" />
</Columns>
</asp:GridView>
<br />
<asp:Button ID="Button2" runat="server" Text="Updata Database" OnClick="Button2_Click" />
</div>
</form>
Now, run the application and modify some records. On the Update button click, you will be successfully able to save changes to the database at one go.