Suppose you have to load all data from Table A (destination Table) to Table B (Source table), Then generally you will follow the code shown below
Insert into destinationTable values(select * from sourceTable)
This means ,sometimes we need to load a huge amount of data at once, from source to destination, like, from one table of SQL server to another table, this process is called bulk loading, The SqlBulkCopy class let us efficiently load data from source to destination in a bulk, you might be thinking that there are many other ways for example we can use "Insert into" statement with a "select" clause as we did in the above example, then why do we need SqlBulkCopy class, the answer is, dramatic performance gain, the SqlBulkCopy offers a significant performance advantage over other techniques.
With the help of SqlBulkCopy class we can transfer a huge amount of data to another table , but the destination table must be a Sql Server table, However we can bring data from any data source whether it be a Sql Server table or Oracle table , this means the data source is not limited to just Sql Sever, and we can choose any data source as long as the data can be loaded into a DataTable or can be read with an IDataReader instance .
Example : copying data from one table to another in sql server
The source and destination tables may be in the same database or in different databases and these database can be on the same sql server or in different servers
Step 1 : Create a new database. Name it SourceDBand execute the following scripts, it will create two tables and will populate them with some dummy data.
   Create Database SourceDB
   Go
   Use SourceDB
   Go
  CREATE TABLE [dbo].[Department] (
    [Id]   INT          IDENTITY (1, 1) NOT NULL,
    [Name] VARCHAR (50) NULL,
    CONSTRAINT [PK_Department] PRIMARY KEY CLUSTERED ([Id] ASC)
  );
  CREATE TABLE [dbo].[Employee] (
    [Id]           INT          IDENTITY (1, 1) NOT NULL,
    [Name]         VARCHAR (50) NULL,
    [Salary]       INT          NULL,
    [DepartmentId] INT          NULL,
    CONSTRAINT [PK_Employee] PRIMARY KEY CLUSTERED ([Id] ASC),
    CONSTRAINT [FK_Employee_Department] FOREIGN KEY ([DepartmentId]) REFERENCES [dbo].[Department] ([Id])
  );
  SET IDENTITY_INSERT [dbo].[Department] ON
  INSERT INTO [dbo].[Department] ([Id], [Name]) VALUES (1, N'HR')
  INSERT INTO [dbo].[Department] ([Id], [Name]) VALUES (2, N'Development')
  INSERT INTO [dbo].[Department] ([Id], [Name]) VALUES (3, N'Database')
  INSERT INTO [dbo].[Department] ([Id], [Name]) VALUES (4, N'Business')
  SET IDENTITY_INSERT [dbo].[Department] OFF
  SET IDENTITY_INSERT [dbo].[Employee] ON
  INSERT INTO [dbo].[Employee] ([Id], [Name], [Salary], [DepartmentId]) VALUES (1, N'sachin', 100000, 1)
  INSERT INTO [dbo].[Employee] ([Id], [Name], [Salary], [DepartmentId]) VALUES (2, N'arjun', 23000, 1)
  INSERT INTO [dbo].[Employee] ([Id], [Name], [Salary], [DepartmentId]) VALUES (3, N'vikash', 30000, 2)
  INSERT INTO [dbo].[Employee] ([Id], [Name], [Salary], [DepartmentId]) VALUES (4, N'pocha', 43000, 3)
  INSERT INTO [dbo].[Employee] ([Id], [Name], [Salary], [DepartmentId]) VALUES (5, N'Nivedita', 24000, 4)
  SET IDENTITY_INSERT [dbo].[Employee] OFF
Step 2 : Create another database, Name it DestinationDB. Execute the following SQL script to create the necessary tables. This time we have just created the structure of the tables with no data. We will be copying data from SourceDB tables to DestinationDB tables using SqlBulkCopy
   Create Database DestinationDB
   Go
   Use DestinationDB
   Go
   CREATE TABLE [dbo].[Department] (
    [Id]   INT          IDENTITY (1, 1) NOT NULL,
    [Name] VARCHAR (50) NULL,
    CONSTRAINT [PK_Department] PRIMARY KEY CLUSTERED ([Id] ASC)
    );
   CREATE TABLE [dbo].[Employee] (
    [Id]           INT          IDENTITY (1, 1) NOT NULL,
    [Name]         VARCHAR (50) NULL,
    [Salary]       INT          NULL,
    [DepartmentId] INT          NULL,
    CONSTRAINT [PK_Employee] PRIMARY KEY CLUSTERED ([Id] ASC),
    CONSTRAINT [FK_Employee_Department] FOREIGN KEY ([DepartmentId]) REFERENCES [dbo].[Department] ([Id])
   );
Step 3 : Open Visual Studio and Create a new empty asp.net web application project, name it DemoForSqlBulkCopy.
Step 4 :Add a webform to the project.
Step 5 : Include the following 2 connection strings for the Source and Destination databases in the configuartion file of the project
   <connectionStrings>
   <add name="SourceCS"connectionString="server=.;database=SourceDB;integrated security=true"/>
   <add name="DestinationCS"connectionString="server=.;database=DestinationDB;integrated security=true"/>
   </connectionStrings>
.
Step 4 :Drag and Drop a Button control into the designer of web forms , and double click on it to generate Button Click event handler, then Copy and paste the following code in the button click event handler method in the code-behind file.
    string sourceCS =
    ConfigurationManager.ConnectionStrings["SourceCS"].ConnectionString;
   string destinationCS = ConfigurationManager.ConnectionStrings["DestinationCS"].ConnectionString;
   using (SqlConnection sourceCon = new SqlConnection(sourceCS))
   {
    SqlCommand cmd = new SqlCommand("Select * from Departments", sourceCon);
    sourceCon.Open();
    using (SqlDataReader rdr = cmd.ExecuteReader())
    {
        using (SqlConnection destinationCon = new SqlConnection(destinationCS))
        {
            using (SqlBulkCopy bc = new SqlBulkCopy(destinationCon))
            {
                bc.DestinationTableName = "Departments";
                destinationCon.Open();
                bc.WriteToServer(rdr);
            }
        }
    }
    cmd = new SqlCommand("Select * from Employees", sourceCon);
    using (SqlDataReader rdr = cmd.ExecuteReader())
    {
        using (SqlConnection destinationCon = new SqlConnection(destinationCS))
        {
            using (SqlBulkCopy bc = new SqlBulkCopy(destinationCon))
            {
                bc.DestinationTableName = "Employees";
                destinationCon.Open();
                bc.WriteToServer(rdr);
            }
        }
     }
   }
As the column names in the source and destination tables are the same, column mappings were not required, But it is not necessary that column names in both the table would always be the same, in that case, we use column mappings property of SqlBulkCopy class.
SqlBulkCopy.ColumnMappings Property
It is not always necessary that the number of columns and the ordinal position of columns in the source table will always match to the destination table, in such cases we need to explicitly define the relationships between columns in the data source and columns in the destination. In order to explicitly define the relationship between the columns in the data source and the destination, Column Mappings are used, which make sure that data is copied into the correct columns. However, if the column count and the ordinal positions of columns in both the table are consistent, then we don't need to define ColumnMappings
Let's change the DepartmentId column of Employee table of DestinationDb to Dept_Id and Name column to EmployeeName, to understand the column mappings better.
    Use DestinationDB
    Go
   sp_rename 'Employee.Name, 'EmployeeName', 'COLUMN';
   sp_rename 'Employee.DepartmentId', 'Dep_Id', 'COLUMN';
Note: I have used System Store procedure sp_rename which is used to rename a column in SQL server.
To define column mappings we use Add() method of ColumnMappings , which takes source column name and destination column name as parameters.
bc.ColumnMappings.Add("Source Column","Destination Column");
   protected void Button1_Click(object sender, EventArgs e)
    {
      string sourceCS = ConfigurationManager.ConnectionStrings["SourceCS"].ConnectionString;
      string destinationCS =  ConfigurationManager.ConnectionStrings["DestinationCS"].ConnectionString;
      using (SqlConnection sourceCon = new SqlConnection(sourceCS))
       {
       SqlCommand cmd = new SqlCommand("Select * from Employee", sourceCon);
        sourceCon.Open();
         using (SqlDataReader rdr = cmd.ExecuteReader())
         {
          using (SqlConnection destinationCon = new SqlConnection(destinationCS))
           {
              using (SqlBulkCopy bc = new SqlBulkCopy(destinationCon))
                {
                 bc.DestinationTableName = "Employee";
                 bc.ColumnMappings.Add("Id","Id");
                 bc.ColumnMappings.Add("Name", "EmployeeName"); // notice here
                 bc.ColumnMappings.Add("Salary", "Salary");
                 bc.ColumnMappings.Add("DepartmentId", "Dep_Id"); //notice here
                 destinationCon.Open();
                 bc.WriteToServer(rdr);
                        }
                    }
                }
            }
        }
The complete source code looks like below
Aspx.cs (code behind file)
   public partial class SqlBulkExample : System.Web.UI.Page
    {
        string sourceCS =ConfigurationManager.ConnectionStrings["SourceCS"].ConnectionString;
        string destinationCS = ConfigurationManager.ConnectionStrings["DestinationCS"].ConnectionString;
        protected void Page_Load(object sender, EventArgs e)
        {
            if (!IsPostBack)
            {
                BindSourceGrid();
                BindDestinationGrid();
            }
        }
        private void BindSourceGrid()
        {
            DataSet ds = new DataSet();
            using (SqlConnection con = new SqlConnection(sourceCS))
                {
                    SqlDataAdapter da = new SqlDataAdapter("select * from Employee", con);
                    da.Fill(ds, "Employee");
                }
            GridView1.DataSource = ds;
            GridView1.DataBind();
        }
        private void BindDestinationGrid()
        {
            DataSet ds = new DataSet();
            using (SqlConnection con = new SqlConnection(destinationCS))
            {
                SqlDataAdapter da = new SqlDataAdapter("select * from Employee", con);
                da.Fill(ds, "Employee");
            }
            GridView2.DataSource = ds;
            GridView2.DataBind();
        }
        protected void Button1_Click(object sender, EventArgs e)
        {
          using (SqlConnection sourceCon = new SqlConnection(sourceCS))
            {
                SqlCommand cmd = new SqlCommand("Select * from Employee", sourceCon);
                sourceCon.Open();
                using (SqlDataReader rdr = cmd.ExecuteReader())
                {
                    using (SqlConnection destinationCon = new SqlConnection(destinationCS))
                    {
                        using (SqlBulkCopy bc = new SqlBulkCopy(destinationCon))
                        {
                            bc.DestinationTableName = "Employee";
                            bc.ColumnMappings.Add("Id","Id");
                            bc.ColumnMappings.Add("Name", "EmployeeName");
                            bc.ColumnMappings.Add("Salary", "Salary");
                            bc.ColumnMappings.Add("DepartmentId", "Dep_Id");

                            destinationCon.Open();
                            bc.WriteToServer(rdr);
                        }
                    }
                }
            }
            BindDestinationGrid();
        }
     }
Aspx page
    <form id="form1" runat="server">
    <div>
        <h1>source Table</h1>
        <asp:GridView ID="GridView1" runat="server"></asp:GridView>
        <br />
         <asp:Button ID="Button1" runat="server" Text="Copy Data to destinationDB" OnClick="Button1_Click" />
          <h1>Destination Table</h1>
        <asp:GridView ID="GridView2" runat="server"></asp:GridView>
    </div>
    </form>
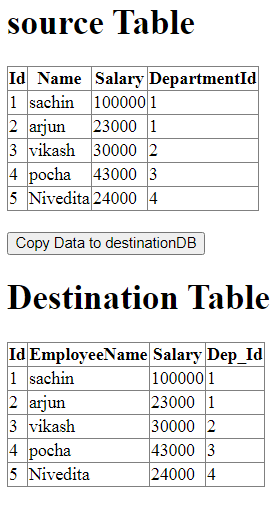
After running the application , you will get below results.