You have landed on this article, meaning either you have heard of Kendo UI from somewhere or your company has decided to use Kendo UI in their projects. It is also possible that you are a self-taught developer who wants to learn KendoUI and use components of this fantastic framework in your future ASP.NET MVC project. Yes, you are at the right place. In this article, we will explore the various features and components of Kendo UI, providing you with the knowledge and tools necessary to effectively integrate this powerful framework into your ASP.NET MVC projects. Whether you're looking to enhance user experience or streamline your development process, Kendo UI offers a robust set of tools to help you achieve your goals. With its rich set of UI components, such as grids, charts, and forms, Kendo UI can significantly reduce development time while providing a polished, professional look to your applications. As we delve deeper into this article, you'll discover practical examples and best practices to maximize the potential of Kendo UI within your ASP.NET MVC projects.
To use KendoUI widgets or components in your ASP.NET MVC project, you need to follow the below steps: -
1. Download/install Telerik UI for ASP.NET MVC, free or commercial version. Telerik UI for Asp.net MVC is a set of server side wrappers or HTML Helpers that allow us to use kendo UI widgets in ASP.NET MVC.
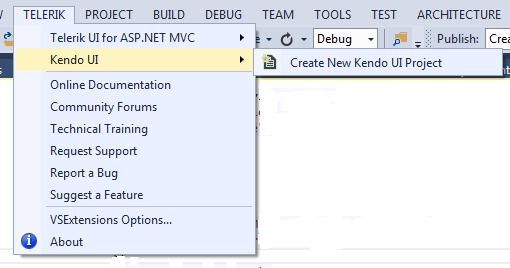
2. Open Visual Studio, and you will see a new extension with the name Telerik has been added to the menu bar. Go to Kendo UI and create a new Kendo UI project. It will add all the kendo CSS and Scripts to your content and Script folder of the project respectively.
or
if you have created the asp.net mvc project like you have always did earlier in your life, with File->New->Project->Asp.net MVC, then go to the location of installation usually it is C:\Program Files (x86)\Progress\Telerik UI for ASP.NET MVC R1 2020 Now copy and paste the Style and JS folder for Kendo into your project.
3.Add reference for Kendo.MVC
a.Right click the references
b.Add reference
c.Browse to the path C:\Program Files (x86)\Progress\Telerik UI for ASP.NET MVC R1 2020\wrappers\aspnetmvc\Binaries\Mvc5
d.select Kendo.MVC.dll and press ok.
4.Create Style and Script bundles for kendo CSS and JS scripts
a.Go to App Start
b.Bundle Config.cs
and create a style bundle as given below
bundles.Add(new StyleBundle("~/Content/Kendo")
.Include(
"~/Content/kendo/2020.1.219/kendo.common.min.css",
 "~/Content/kendo/2020.1.219/kendo.default.min.css" ));
Also create one script Bundle as mentioned below
bundles.Add(new ScriptBundle("~/bundles/kendo").Include(
"~/Scripts/kendo/2020.1.219/jquery.min.js",
"~/Scripts/kendo/2020.1.219/kendo.web.min.js",
"~/Scripts/kendo/2020.1.219/kendo.all.min.js",
 "~/Scripts/kendo/2020.1.219/kendo.aspnetmvc.min.js"
 ));
5.Render the Style and Script in your Layout.cshtml as below
<head>
<meta charset="utf-8" />
<meta name="viewport" content="width=device-width, initial-scale=1.0">
<title>@ViewBag.Title - My ASP.NET Application</title>
@Scripts.Render("~/bundles/kendo")
@Styles.Render("~/Content/Kendo")
Now you are completely ready to use Kendo UI components in your project . Using a kendo UI component is as easy as using Html helpers in ASP.NET MVC.
Create a controller and an action and add corresponding view to that action
public ActionResult Index()
{
 return View();
}
Now in the view paste the below code
@(Html.Kendo().TextBox().Name("txtName"))
Press Ctrl+F5, and if it is running without any error, then congrats, you have successfully used Kendo Textbox in your project.
Note: If you are getting the error that Kendo is not a function, then most probably you have included jQuery twice. Debug and resolve the issue.