Similar to Data Annotations, Entity Framework Fluent API is used to configure domain classes to override conventions and establish relationships among them. EF Fluent API is based on a Fluent API design pattern (a.k.a Fluent Interface) where the result is formulated by method chaining , as the method chaining thing looks like a flow (like river flowing in one direction) it is called as Fluent API.
In Entity Framework , the DbModelBuilder class acts as a Fluent API using which we override default conventions used by Entity Framework and estalish relationship among tables, Fluent API provides us more configuration options than data-annotations.
To write Fluent API configurations, we override the OnModelCreating() method of DbContext in a context class. The domain classes and context class are shown below.
  public class Customer
  {
    public Customer()
    {
        this.Product = new HashSet<Product >();
    }

    public int CustomerId { get; set; }
    public string CustomerName { get; set; }
    public virtual ICollection <Product> Products { get; set; }
 }

  public class Product
  {
    public Product ()
    {
        this.Customer = new HashSet<Customer>();
    }

    public int ProductId { get; set; }
    public string ProductName { get; set; }
    public virtual ICollection <Customer> Employees { get; set; }
  }
  public class Employee
  {
    public int EmployeeId { get; set; }
    public string FirstName { get; set; }
    public string LastName { get; set; }
    public string Email { get; set; }
    public int Phone { get; set; }
    public virtual AadhaarCard AadhaarCard { get; set; }
    public virtual EmployeeAddress Address { get; set; }
}

  public class EmployeeAddress
 {
    public int EmployeeAddressId { get; set; }
    public string Street { get; set; }
    public string City { get; set; }
    public int Zipcode { get; set; }
    public string State { get; set; }
    public string Country { get; set; }
    public virtual Employee Employee { get; set; }
}

 public class AadhaarCard
 {
    public int EmployeeId { get; set; }
     public int AadhaarCardNumber {get;set;}
    public virtual Employee Employee { get; set; }
 }
The following is the context class that includes the Employee , Product,Department , AadhaarCard and Customer entities.
  public class OrganizationDBContext : DBContext
   {
    public DbSet <Customer> Customers { get; set; }
    public DbSet <Product> Products { get; set; }
    public DbSet <Employee> Employees { get; set; }
    public DbSet <Department> Departments { get; set; }
    public DbSet <AadharCard> AadhaarCards { get; set; }

    protected override void OnModelCreating(DbModelBuilder modelBuilder)
    {
        // we write Fluent API configuration here
        base.OnModelCreating(modelBuilder);
    }
 }
One-to-Zero/One Relationship
Such a relationship exists when each record of one table is related to Zero or one record of the other table.
For example, If there are two entities 'Employee' (Id, First_Name,Last_Name, Email,Mobile, Address_Id)and 'Address'(Id, Street,City,State,ZipCode). So, each Employee can have Zero or one Address.
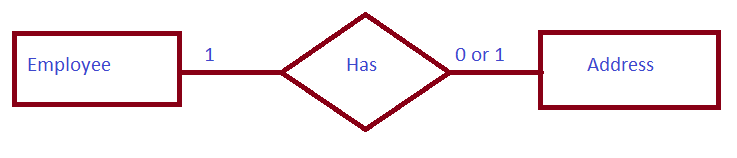
Configure a One-to-Zero-or-One relationship using Fluent API
Here, we will use Fluent API to configure a one-to-zero-or-one relationship between the Employee and EmployeeAddress entities. The following example sets a one-to-zero or one relationship between Employee and EmployeeAddress using Fluent API.
 protected override void OnModelCreating(DbModelBuilder modelBuilder)
   {
     // Configure Employee & EmployeeAddress entity
     modelBuilder.Entity<Employee>()
                          .HasOptional(s => s.Address) // Mark Address property optional in Employee entity
                          .WithRequired(ad => ad.Employee); // mark Employee property as required in Address entity. Cannot save  Address without Employee
    }
In the above example, we start with the Employee entity. The HasOptional() method configures the Address navigation property in Employee entity as optional (not required when saving the Employee entity). Then, the WithRequired() method makes the Employee navigation property of EmployeeAddress as required (required when saving the EmployeeAddress entity; it will throw an exception when the EmployeeAddress entity is saved without the Employee navigation property). This will also make the EmployeeAddressId as ForeignKey.
Thus, you can configure a one-to-Zero-or-one relationship between two entities where the Employee entity can be saved without attaching the EmployeeAddress object to it but the EmployeeAddress entity cannot be saved without attaching an object of the Employee entity. This makes one end required.
One-to-One Relationship
We have already discussed this in last two articles that in such type of relationship each record in one table is associated with one and only one record in another table.
For example, If there are two entities ‘Person' (Id, Name, Age, Address)and ‘AadhaarCard'(AadhaarCard'_Id, AadhaarCard'_No). then, each Person can have only one AadhaarCard and each AadhaarCard belongs to only one Person.

Configure a One-to-One relationship using Fluent API
We can configure a one-to-One relationship between entities using Fluent API where both ends are required, meaning that the Employee entity object must include the AadharCard entity object and the AadharCard entity must include the Employee entity object in order to save it.
Note:One-to-One relationship is not possible to achieve in SQL Server, these are just made for entities for better data integrity.
   protected override void OnModelCreating(DbModelBuilder modelBuilder)
    {
       // Configure EmployeeId as FK for EmployeeAddress
      modelBuilder.Entity<Employee>()
                           .HasRequired(s => s.AadhaarCard)
                           .WithRequiredPrincipal(ad => ad.Employee);

   }
In the above example, modelBuilder.Entity
One-to-Many or Many-to-One Relationship
One-to-Many relationship is the most common type of relationship amongst all where each record in one table can be associated with multiple records in another table, it can also be considered as Many-to-One relationship if observe from opposite direction.
For example, If there are two entity type ‘Employee' and ‘Department' then each ‘Department' can have more than one ‘Employee' but each ‘Employee' belongs to only one ‘Department'. In this example, we can say that each Department is associated with many Employee. So, it is a one-to-many relationship. But, if we see it the other way i.e many Employee is associated with one Department then we can say that it is a many-to-one relationship.

Configure a One-to-Many Relationship using Fluent API
More often we don't really need to configure a One-to-Many relationship explicitly because default conventions automatically creates such relationships which we have already discussed in last article, but for simplicity or to keep configuration for relationship at one place we can use Fluent API to configure a One-to-Many relationship.
Consider the following Employee and Department entity classes.
 public class Employee
  {
    public int Id { get; set; }
    public string Name { get; set; }
    public int DepartmentId { get; set; }
    public Department Department { get; set; }
  }

   public class Department
   {
    public int DepartmentId { get; set; }
    public string DepartmentName { get; set; }
    public ICollection<Employee> Employees { get; set; }
  }
To configure One-to-Many relationship between Department and Employee we will have to override OnModelCreating method in the context class as shown below.
  public class OrganizationDbContext : DbContext
  {
    public DbSet<Employee> Employees { get; set; }
    public DbSet<Department> Departments { get; set; }

    protected override void OnModelCreating(DbModelBuilder modelBuilder)
    {
        // configures one-to-many relationship
        modelBuilder.Entity<Employee>()
                             .HasRequired<Department>(s => s.Department)
                             .WithMany(g => g.Employees)
                             .HasForeignKey<int>(s => s.DepartmentId);
       }
      }
  }
Let's understand the above code step by step.
•
We can start confuguring from any of the end we wantmodelBuilder.Entity<Employee>()means we are starting with the Employee entity
• Then, .HasRequired<Department>(s => s.CurrentDepartment) specifies that the Employee entity has required Department property. The configuartion will create a NotNull foreign key column in the Employee table
• Now, it's time to configure the other end of the relationship - the Department entity.
• .WithMany(g => g.Employees) specifies that the Department entity class includes many Employee entities. Here, many infers the ICollection type property.
• Now, if the Employee entity does not follow the Id property convention for foreign key, then we can specify the name of the foreign key using the HasForeignKey method.
• .HasForeignKey<int>(s => s.DepartmentId) specifies the foreign key property in the Employee entity.
Alternatively, you can start configuring the relationship with the Department entity instead of the Employee entity. The code will produce exactly the same result as above.
   modelBuilder.Entity<Department>()
                       .HasMany<Employee>(g => g.Employees)
                       .WithRequired(s => s.Department)
                       .HasForeignKey<int>(s => s.DepartmentId);
Configure the NotNull ForeignKey using Fluent API
In previous article in convention 1, we have seen that by-default Entity Framework creates an optional one-to-many relationship which in turn creates a nullable foreign key column in the database. To make the foreign key column Not-Null we use HasRequired() method as shown below.
modelBuilder.Entity<Employee>()
    .HasRequired<Department>(s => s.CurrentDepartment)
    .WithMany(g => g.Employees);
Configure Cascade Delete using Fluent API
Cascade delete means to delete all related child records when parent record is deleted.For example, if Department is deleted then all the Employees in that Department should also be deleted automatically. Entity Framework provides us WillCascadeOnDelete extension method to configure cascade delete.
    modelBuilder.Entity<Department>()
                         .HasMany<Employee>(g => g.Employees)
                         .WithRequired(s => s.CurrentDepartment)
                         .WillCascadeOnDelete();
Many-to-Many Relationship
we have already learnt that in many-to-many relationship many records from a table can be associated with multiple records in another table, this is a combination of two one-to-many relationship and we need to define a bridge table to relate both the tables efficiently
Example: If there are two entity type ‘Customer’ and ‘Product’ then each customer can buy as many products as he wish and a product can also be bought by several customers.

In order to understand the conecpt of bridge table let's take the example of Customers and products, obviously a customer can order multiple products and a product can be bought by multiple customers so to relate the customers with their products we define a bridge table called orders..
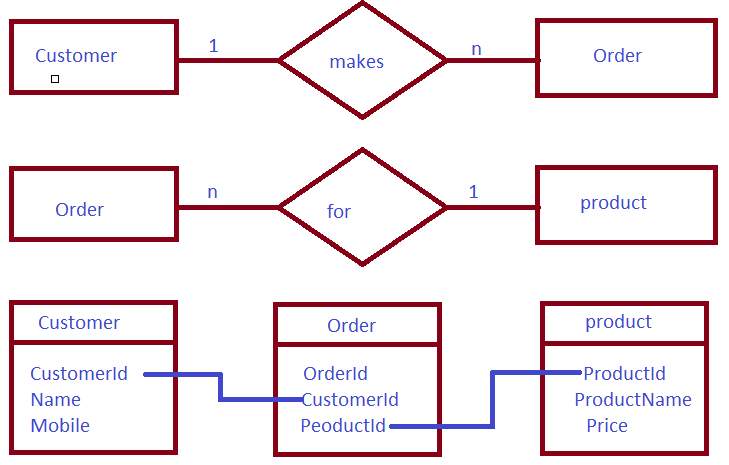
Configure a Many-to-Many Relationship using Fluent API
As you have seen in the previous article, with the default conventions for a many-to-many relationship, the EF creates a bridge table with the default name which is a combination of the name of both entities. we use Fluent API to customize the bridge table name and its column's name, as shown below:
   protected override void OnModelCreating(DbModelBuilder modelBuilder)
    {
      modelBuilder.Entity<Employee>()
                          .HasMany<Product>(s => s. Product)
                          .WithMany(c => c.Employees)
                          .Map(cs =>
                          {
                             cs.MapLeftKey("EmployeeId");
                            cs.MapRightKey("ProductId");
                            cs.ToTable("Order");
                         });
           }
In the above example, the HasMany() and WithMany() methods are used to configure a many-to-many relationship between the Employee and Product entities. The Map() method takes Action generic delegate, hence, we can pass the lambda expression to customize column names. We can specify the PK property name of Employee in MapLeftKey() (we started with the Employee entity, so it will be the left table) and the PK of the Product table in MapRightKey() method. The ToTable() method specifies the name of a joining table (Order in this case). The above code will create a joining table Order with two Primary Keys EmployeeId and ProductId which will also be Foreign Keys.
In this way, you can override the default conventions for many-to-many relationships and customize the joining table name and its columns.