Sometimes we need to ask user to upload their profile picture during registration. For better user experience it is always recommended to provide an Image preview before uploading the image into the server, not only this , we should also validate the image extension so that only the accepted images are uploaded to the server.
In this article we will learn, how to upload image, validate them properly and show the image preview. Following validations are taken into consideration.
1. Image field should not be empty.
2. Image type must be png or jpg.
Step 1. Create two Action method, one for returning the view and second for storing the image into specific folder.
public class ImageUploadController : Controller
    {
        //
        // GET: /ImageUpload/
        public ActionResult Index()
        {
            return View();
        }
        public ActionResult fileSave(HttpPostedFileBase Image)
        {
            try
            {
                if(Image!=null)
                {
                    string filename = Image.FileName;
                    var ext = filename.Substring(filename.LastIndexOf(".") + 1).ToLower();// take the string from position of last "." to the end, gives extension.
                    if (ext.ToLower() == "jpeg" || ext.ToLower() == "jpg" || ext.ToLower() == "png")
                    {
                        string path = Server.MapPath("~/uploads/" + filename);
                        Image.SaveAs(path);
                        ViewBag.Message = "Image uploaded successfully!";
                    }
                    else
                    {
                        ViewBag.Message = "unsupported extension";
                    }
                }
                else
                {
                    ViewBag.Message = "Please select an Image";
                }


            }
            catch (Exception ex)
            {
                ViewBag.Message = ex.Message.ToString();
            }

            return View("Index");
        }
    }
Understand the code.
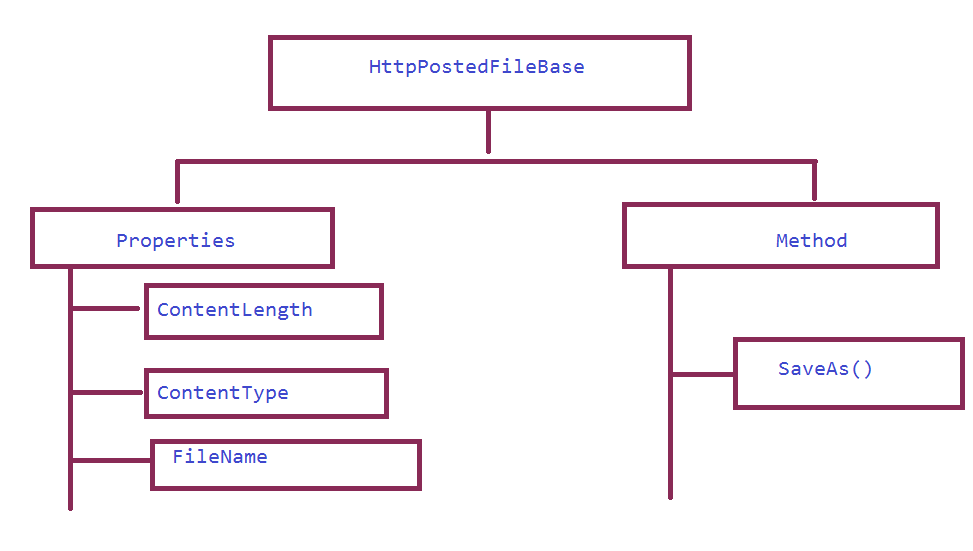
In .Net we have a readymade class called HttpPostedFileBase, that provide access to individual files that have been uploaded by a client, The properties and Method of HttpPostedFileBase class is shown in the below diagram.
Note: to find extension, i am using substring() extension method which returns the string from specified position, in our case from index of last "." (if you have multiple '.' in the file name) to the end.
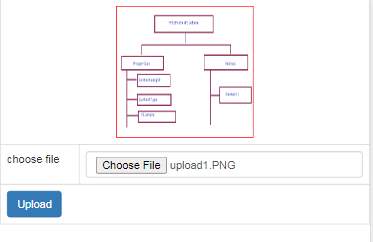
Step 2. Design user interface for image upload and write the necessary Javascript.
@{
    Layout = null;
 }
<!DOCTYPE html>
<html>
<head>
    <meta name="viewport" content="width=device-width" />
    <!-- Latest compiled and minified CSS -->
    <link rel="stylesheet" href="https://maxcdn.bootstrapcdn.com/bootstrap/3.4.1/css/bootstrap.min.css">
    <!-- jQuery library -->
    <script src="https://ajax.googleapis.com/ajax/libs/jquery/3.5.1/jquery.min.js"></script>
    <!-- Latest compiled JavaScript -->
    <script src="https://maxcdn.bootstrapcdn.com/bootstrap/3.4.1/js/bootstrap.min.js"></script>
    <title>Index</title>
</head>
<body>
    <div>
        <form action="/ImageUpload/fileSave" method="post" enctype="multipart/form-data">
            <table class="table table-bordered">
                <tr>
                    <td colspan="2">
                        <img src="#" alt="preview" id="imagePreview" style="border: 1px solid red; height: 169px; width: 176px; margin: auto; display: block;" />
                    </td>
                </tr>
                <tr>
                    <td>
                        choose file
                    </td>
                    <td>
                        <input type="file" name="Image" value="" onchange="return ShowImagePreview(this)" class="form-control" id="fileupload" required/>
                    </td>
                </tr>
                <tr>
                    <td colspan="2">
                        <input type="submit" name="Submit" value="Upload" class="btn btn-primary" />
                        <span style="color:green">@ViewBag.Message</span>
                    </td>
                </tr>
            </table>
        </form>
    </div>
    <script>
        function ShowImagePreview(input) {
            debugger;
            if (input.files && input.files[0]) {
                var fname = input.files[0].name;
                var re = /(\.jpg|\.jpeg|\.bmp|\.gif|\.png)$/i;
                if (!re.exec(fname)) {
                    alert("Image not supported!");
                    $("#fileupload").val("");

                    return false;
                }
                else {
                    var reader = new FileReader();
                    reader.onload = function (e) {
                        $('#imagePreview').prop('src', e.target.result);
                    };
                    reader.readAsDataURL(input.files[0]);
                }
            }
        }
    </script>
</body>
</html>
Inside the Onchange() function we are setting the image control's "src" for image preview, also we are checking the supported extension, if the image has an unsupported extension type then the method returns false which prevents the server trip.
Now run the application and you will be successfully able to upload an image to the local folder with an image preview.