OAuth is an open standard for authorization that enables client applications(Web Forms, MVC, Html, etc) to access server resources (web API methods (list of employee (GetEmployee method))) on behalf of a specific Resource Owner (End Users). OAuth also enables Resource Owners (end users) to authorize limited third-party access to their server resources without sharing their credentials. For example, a Gmail user could allow LinkedIn or Flickr to have access to their list of contacts without sharing their Gmail user name and password.
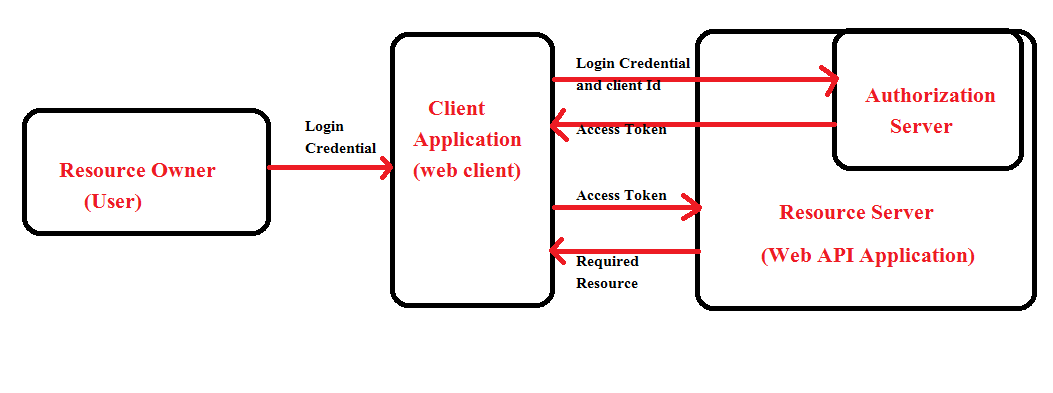
An OAuth 2.0 flow has the following roles
• Resource Owner: Entity that can grant access to a protected resource. Typically, this is the end-user.
• Resource Server: server hosting the protected resources. This is the API you want to access.
• Client: Application requesting access to a protected resource on behalf of the Resource Owner.
• Authorization Server: Server that authenticates the Resource Owner and issues access tokens after getting proper authorization.
Grant types
OAuth 2.0 defines four flows to get an access token. These flows are called grant types. Deciding which one is suited for your case depends mostly on your application type.
• Authorization Code Flow.
• Implicit Flow with Form Post.
• Resource Owner Password Flow.
• Client Credentials Flow.
Here we will discuss only the Resource Owner Password Flow.
So, What is Token Based Authentication in Web API in Nutshell?
Token-based authentication is a process where the client application first sends a request to the Authentication server with valid credentials. The Authentication server sends an Access token to the client as a response. This token contains enough data to identify a particular user and it has an expiry time. The client application then uses the token to access the restricted resources in the next requests until the token is valid. If the Access token is expired, then the client application can request a new access token by using the Refresh token.
Now, you must be thinking, okay, flows are good and I understand, that to get a token the resource owner will have to send their user Id and Password to the Authorization Server, but how as a developer we will implement Authorization server which could verify username and Password and could generate access Tokens. Don't worry, you know, how easy things become, when you are using Microsoft technologies, Microsoft guys are awesome and they know the developers are lazy and needs readymade libraries that could be configured easily in any .Net application, so they have worked hard for us and have created some Owin Middlewares that can be downloaded from Nuget and you can configure it according to your environment.
Now, you are thinking, what is Owin Middleware? Think of it as HTTP Modules which are independent of IIS and are Lightweight component which can easily be plugged into any .Net Application, Many Owin Middleware as reusable components for cross-cutting concerns like Authentication, Logging, etc are already available as Nuget Packages. The same Authentication component can be used to secure multiple application whether it is an asp.net MVC application, SignalR, or Web API.
Always remember ,Owin is just specification and needs implementation , OWIN has a number of implementations such as Katana for the C# community, and Freya for the F# community. Several libraries only implement host and server OWIN specifications such as Nowin and Suave.
Now, let's see a list of all those readymade own middlewares which are developed by the Microsoft team and available as NuGet packages for lazy developers like us.
• Microsoft.Owin - Katana implementation of OWIN (Important)
• Microsoft.Owin.Host - Common library for hosting component
• Microsoft.Owin.Host.HttpListener - Listener or server implementation
• Microsoft.Owin.Host.SystemWeb - Hosting component for IIS Hosting (Important)
• Microsoft.Owin.Diagnostic - Diagnostic middleware
• Microsoft.Owin.Cors - Cors middleware (Important)
• Microsoft.Owin.StaticFiles - Static files middleware
• Microsoft.Owin.Security - Common library for security and Identity (Important)
• Microsoft.Owin.Security.* - Middleware for specific security/identity model, e.g Cookies, active directory, Facebook, Google, jwt, OAuth, wsfederation, Twitter, Microsoft Account, open ID connect (Important)
• Owin - OWIN abstraction
• OwinHost - Katana host implementation
I have marked all the middlewares which are necessary for using owin components and providing security to any application, as important.
How to use owin middlewares in .net applications
Every OWIN Application has a startup class where we can inject middlewares into the application pipeline. There are different ways we can connect our startup class with the runtime, depending on the hosting model we choose (OwinHost, IIS, and IIS-Express), but the most common is to name the startup class as Startup. cs, because katana implementation of owin is such as it tries to detect the startup class by this name only.
Theory part is over, now let's make our hand dirty and do some real coding and secure our web API with OAuth2.
step1. Create a Web API project, Add a controller and create at least 2 method which exposes something to the outside world.
Below is my Controller which exposes a List of Indian Cricketers through GetCricketers method, and a List of Indian Captains through GetCaptains method, the reason to create two methods are simple, users who will be in Role of Admin, will only be able to fetch captains otherwise they will have to satisfy themselves with Cricketers List only. I have also created a Model Class called cricketers with some properties.
   public class Cricketer
    {
        public string Name { get; set; }
        public string Type { get; set; }

        public bool IsCaptain { get; set; }
    }
   public class CricketerController : ApiController
    {
        [Authorize(Roles="User")]
        [HttpGet]
        [Route("api/Cricketers")]
        public HttpResponseMessage GetCricketers()
        {
            try
            {

                var cricketors = CricketorListProvider().Select(x => new Cricketer()
                {
                    Name = x.Name,
                    Type = x.Type,
                    IsCaptain=x.IsCaptain
                }).ToList();
                if (cricketors != null)
                    {
                        return Request.CreateResponse(HttpStatusCode.OK, cricketors);
                    }
                    return Request.CreateErrorResponse(HttpStatusCode.NotFound, "No result found");

            }
            catch
            {
                return new HttpResponseMessage(HttpStatusCode.InternalServerError);
            }

        }

        public List<Cricketer> CricketorListProvider()
        {
            return new List<Cricketer>() {
            new Cricketer(){Name="Sachin Tendulkar",Type="All Rounder",IsCaptain=false},
             new Cricketer(){Name="Saurabh Ganguly",Type="All Rounder",IsCaptain=true},
              new Cricketer(){Name="MS Dhoni",Type="Batsman",IsCaptain=true},
               new Cricketer(){Name="Jahir Khan",Type="Bowler",IsCaptain=false},
              new Cricketer(){Name="Virat Kohli",Type="Batsman",IsCaptain=true},

            };
        }
        [Authorize(Roles="Admin")]
        [HttpGet]
         [Route("api/Captains")]
        public HttpResponseMessage GetCaptains()
        {
            try
            {

                var cricketors = CricketorListProvider().Where(x=>x.IsCaptain==true).Select(x => new
                {
                    name = x.Name,
                    type = x.Type
                }).ToList();
                if (cricketors != null)
                {
                    return Request.CreateResponse(HttpStatusCode.OK, cricketors);
                }
                return Request.CreateErrorResponse(HttpStatusCode.NotFound, "No result found");

            }
            catch
            {
                return new HttpResponseMessage(HttpStatusCode.InternalServerError);
            }

        }
    }
Step 2. Install following packages from Nuget Manager Console.
  install-package Microsoft.Owin.Host.SystemWeb
  install-package Microsoft.Owin.Security.OAuth
  install-package Microsoft.Owin.Cors
Step 4Create a Startup.cs Class File , (Owin Startup file)
  public class Startup
    {
        public void Configuration(IAppBuilder app)
        {
            app.UseCors(Microsoft.Owin.Cors.CorsOptions.AllowAll);
            var myProvider = new AuthProvider();
            OAuthAuthorizationServerOptions options = new OAuthAuthorizationServerOptions
            {
                AllowInsecureHttp = true,
                TokenEndpointPath = new PathString("/token"),
                AccessTokenExpireTimeSpan = TimeSpan.FromDays(1),
                Provider = myProvider
            };
            app.UseOAuthAuthorizationServer(options);
            app.UseOAuthBearerAuthentication(new OAuthBearerAuthenticationOptions());


            HttpConfiguration config = new HttpConfiguration();
            WebApiConfig.Register(config);
        }
    }
Let's understand the above code , we know every request comes to the IIS , but anyhow those request needs to reach to the owin pipeline , the real owin specification is, as shown below

Every OWIN middleware takes an AppFunc as a parameter to communicate with each other and with the Server as well. The dictionary object is called the environment dictionary and it contains every information about the HTTP request that the server has passed to the application and the returning task object tells the server when the application has done processing.
But, the Microsoft team has made this even more simple by replacing the AppFunc with IAppBuilder, in reality, IAppbuilder is a coat above AppFunc and uses AppFunc behind the scene.
At the same time, the Microsoft team knows the lazy developers very well so they have developed many extension methods that can be directly used to inject any desired middleware into the pipeline.
UseOAuthAuthorizationServer() is an extension method which is used to inject OAuth middleware into the pipeline, this takes 4 parameters:-
• AllowInsecureHttp :- to allow or disallow https.
• TokenEndpointPath :- to specify url , client will use to request token.
• AccessTokenExpireTimeSpan :- to specify ,token expiration time
• Provider:- The object provided by the application to process events raised by the Authorization Server middleware. The application may implement the interface fully, or it may create an instance of OAuthAuthorizationServerProvider and assign
delegates only to the events it wants to process.
These are called options in owin terminology, to encapsulate these options , the class OAuthAuthorizationServerOptions has been used.
UseOAuthBearerAuthentication() is again an extension method over IAppBuilder which is used to inject the middleware responsible to verify the token and claims and roles the token contains.
Step 3 Create AuthProvider.cs Class File
Now, let's create the class file to provide credentials to access data depending on username, password, and roles, in short let's override necessary methods of Authorization server class.
   public class AuthProvider: OAuthAuthorizationServerProvider
    {
        public override async Task ValidateClientAuthentication(OAuthValidateClientAuthenticationContext context)
        {
            context.Validated();
        }
        public override async Task GrantResourceOwnerCredentials(OAuthGrantResourceOwnerCredentialsContext context)
        {
            var identity = new ClaimsIdentity(context.Options.AuthenticationType);
            if (context.UserName == "admin" && context.Password == "admin")
            {
                identity.AddClaim(new Claim(ClaimTypes.Role, "admin"));
                identity.AddClaim(new Claim("username", "admin"));
                identity.AddClaim(new Claim(ClaimTypes.Name, "Hi Admin"));
                context.Validated(identity);
            }
            else if (context.UserName == "user" && context.Password == "user")
            {
                identity.AddClaim(new Claim(ClaimTypes.Role, "user"));
                identity.AddClaim(new Claim("username", "user"));
                identity.AddClaim(new Claim(ClaimTypes.Name, "Hi User"));
                context.Validated(identity);
            }
            else
            {
                context.SetError("invalid_grant", "Provided username and password is incorrect");
                return;
            }
        }
    }
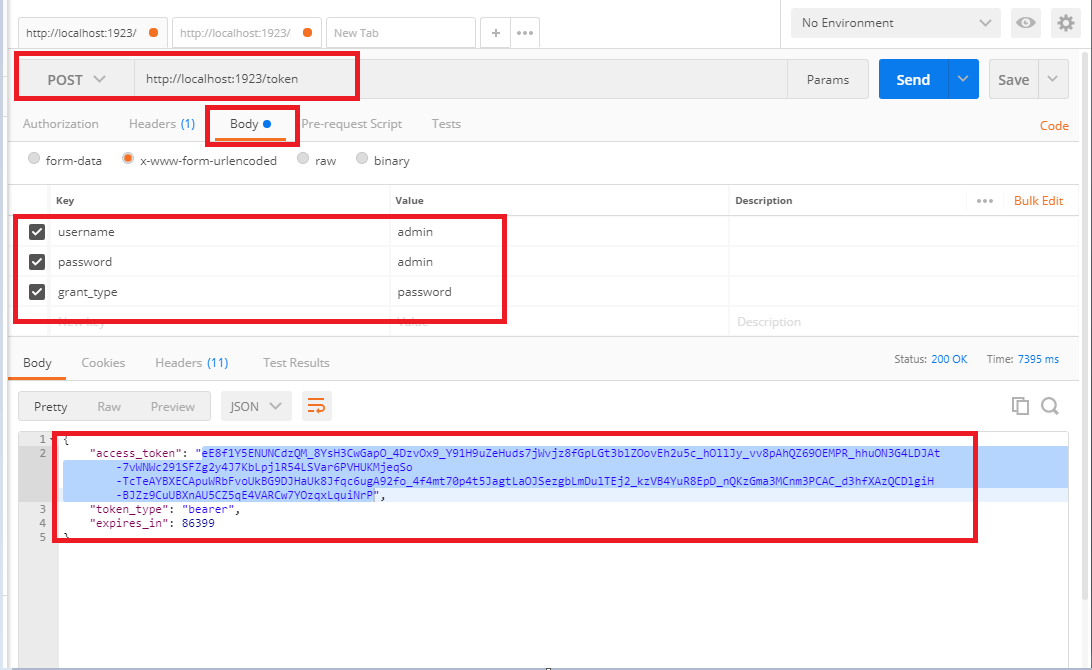
At this moment, open postman and issue a Post request to token end point by providing necessary credentials as shown in below figure.
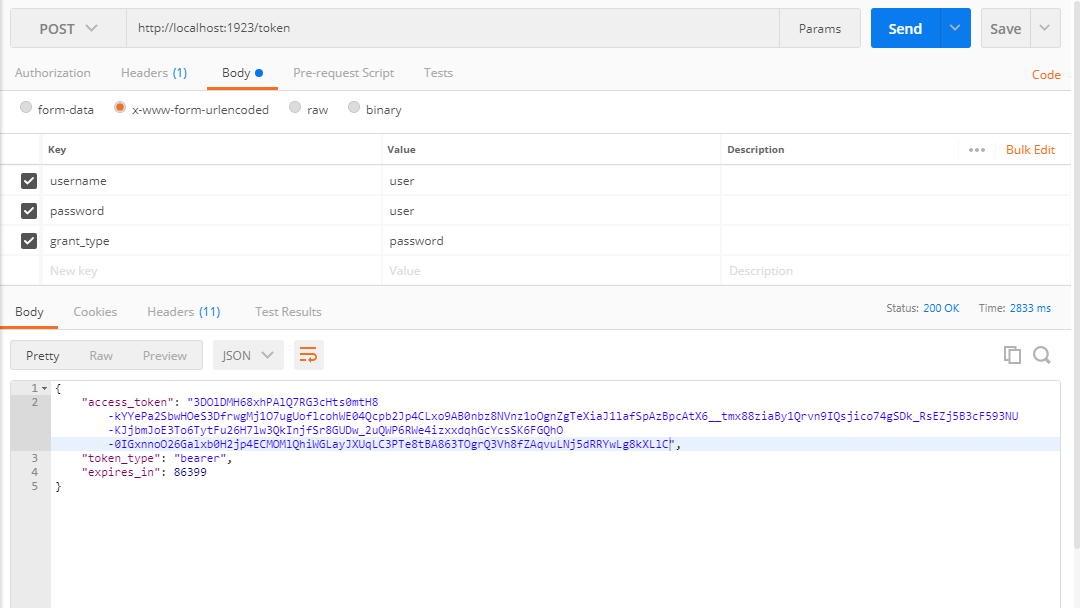
Now once the token is generated for the "user" now we can easily access the actions by using the user token.
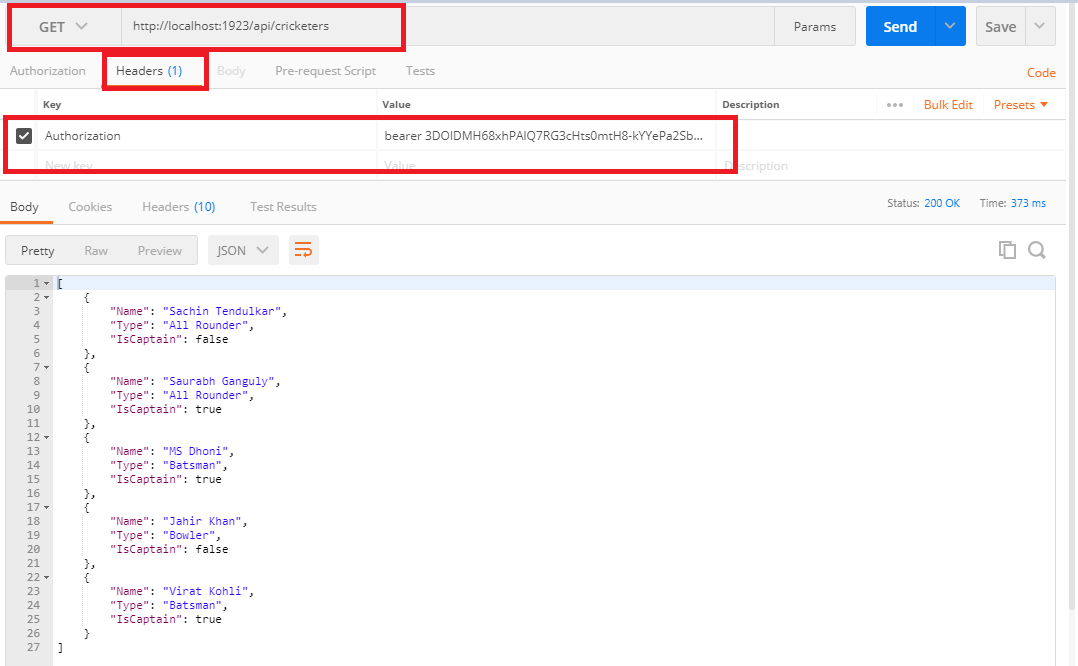
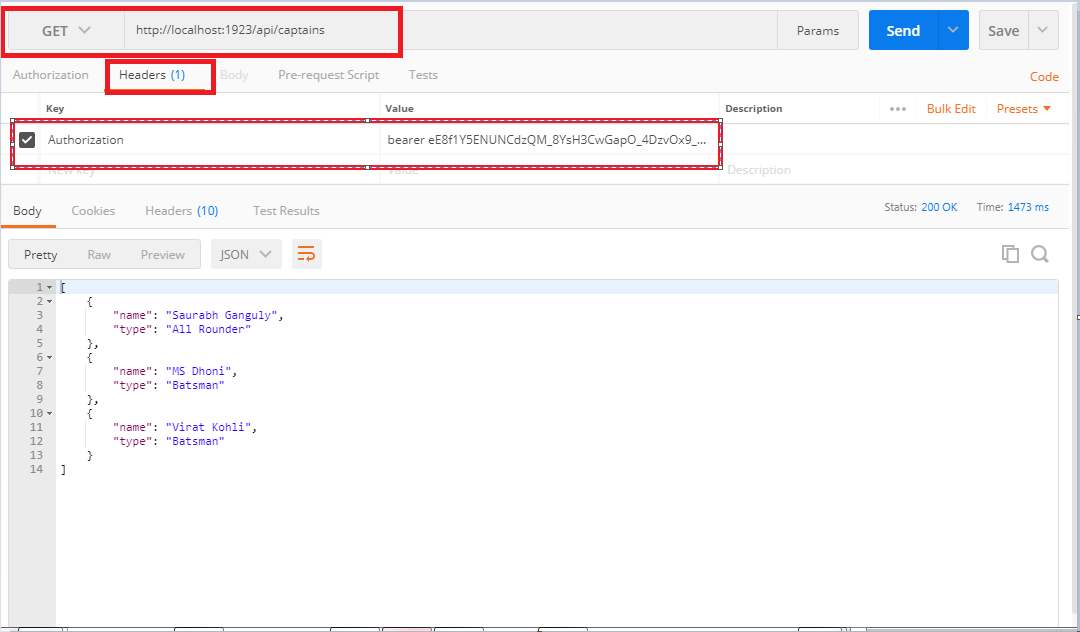
Similarly, we can access the action as "admin" by generating token as admin and then using it.